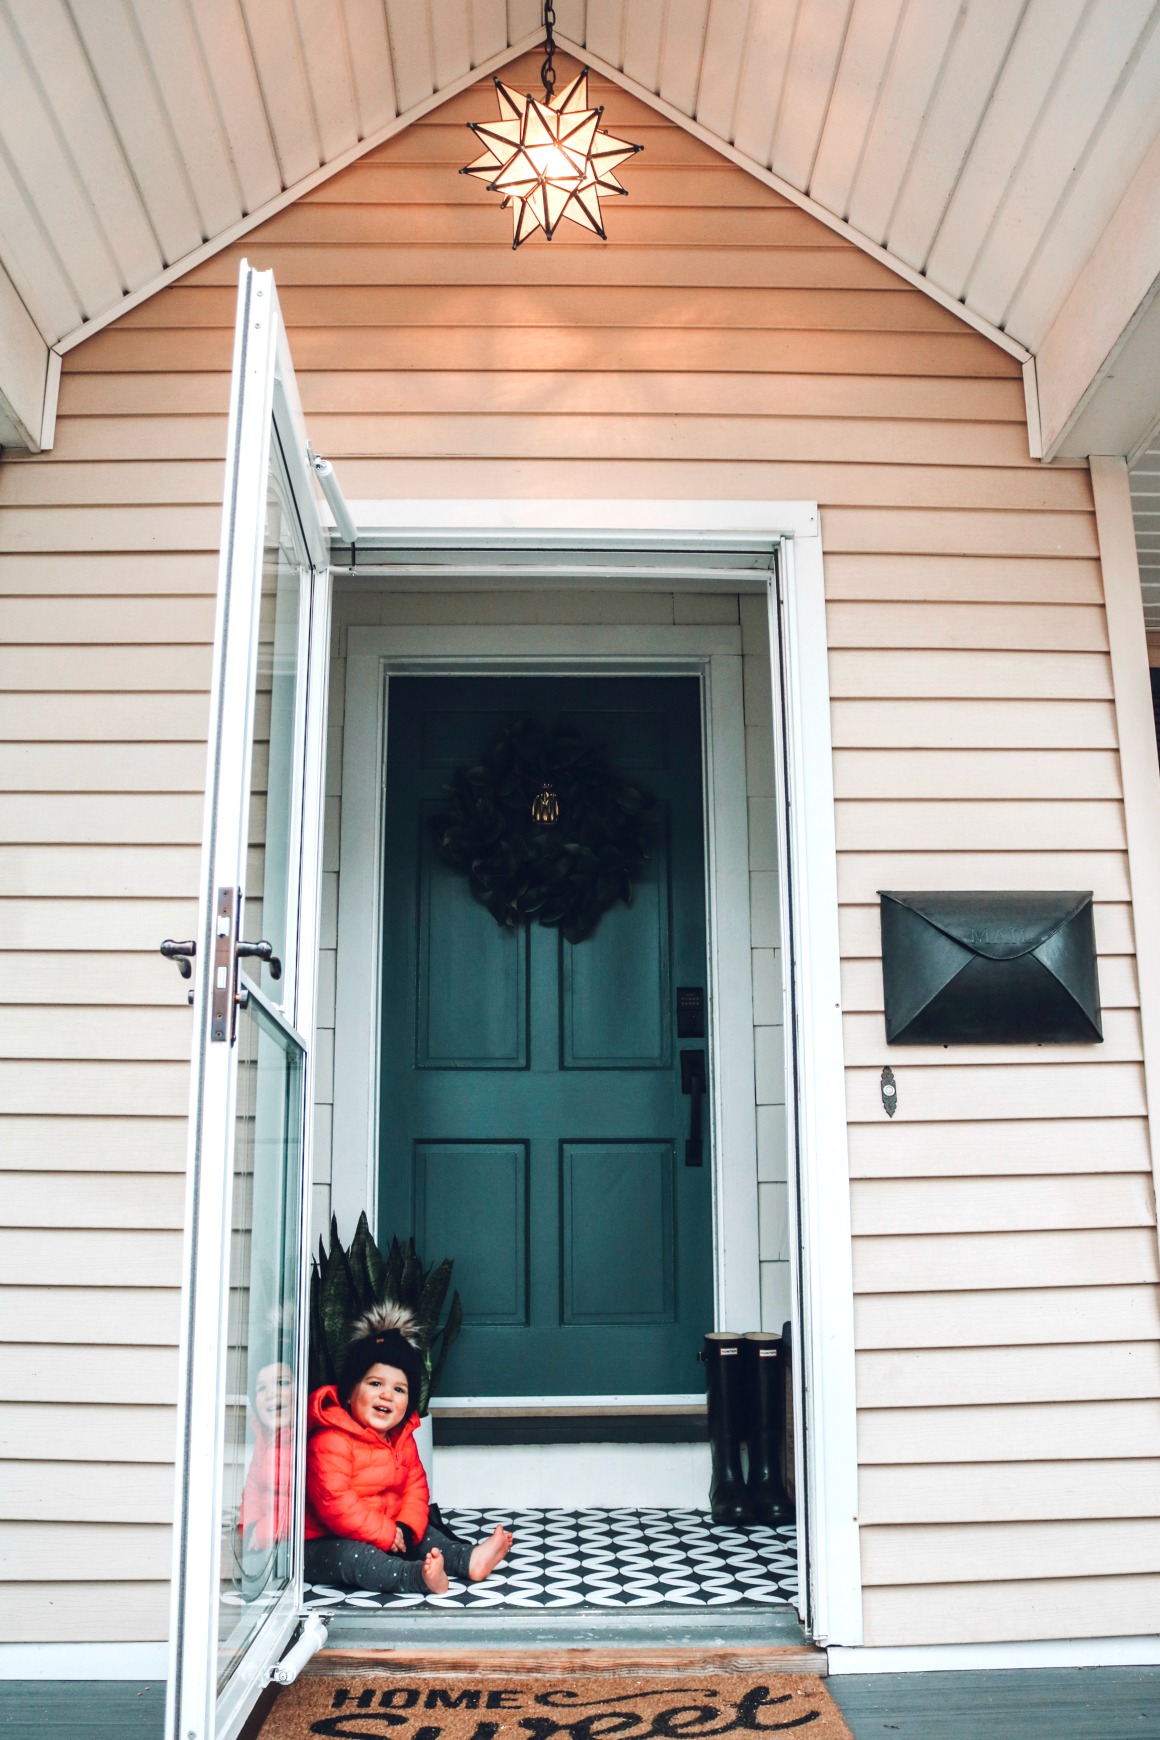
When asked, I always recommend to decorate the rooms in your home you spend the most time first. And I personally like to always try to decorate the entry first as well. Often that is the only space that guests see. And not to mention, it greets YOU everyday, so why not make it a welcoming place! We did a weekend entry makeover to show you that it does not have to take a lot of money or time to totally transform your entry into a welcoming and organized space. Painting your front door, hanging some hooks and a place for shoes. We also painted the tile to look like painted cement (first time). I’ll let you know if we would paint tile again in this post!
Thank you The Home Depot for sponsoring this post
This entry makeover belongs to friends of ours (that I have done a lot of projects for…I know my friends and family in Utah wish we would move back!). They live around the corner from us, so I frequent this little entry often. And I knew it had MAJOR potential. It is an awesome vestibule, that a lot of older homes in Connecticut have. I love how they are a mini-mud room and also such a great way to keep your home clutter free of shoes and coats.
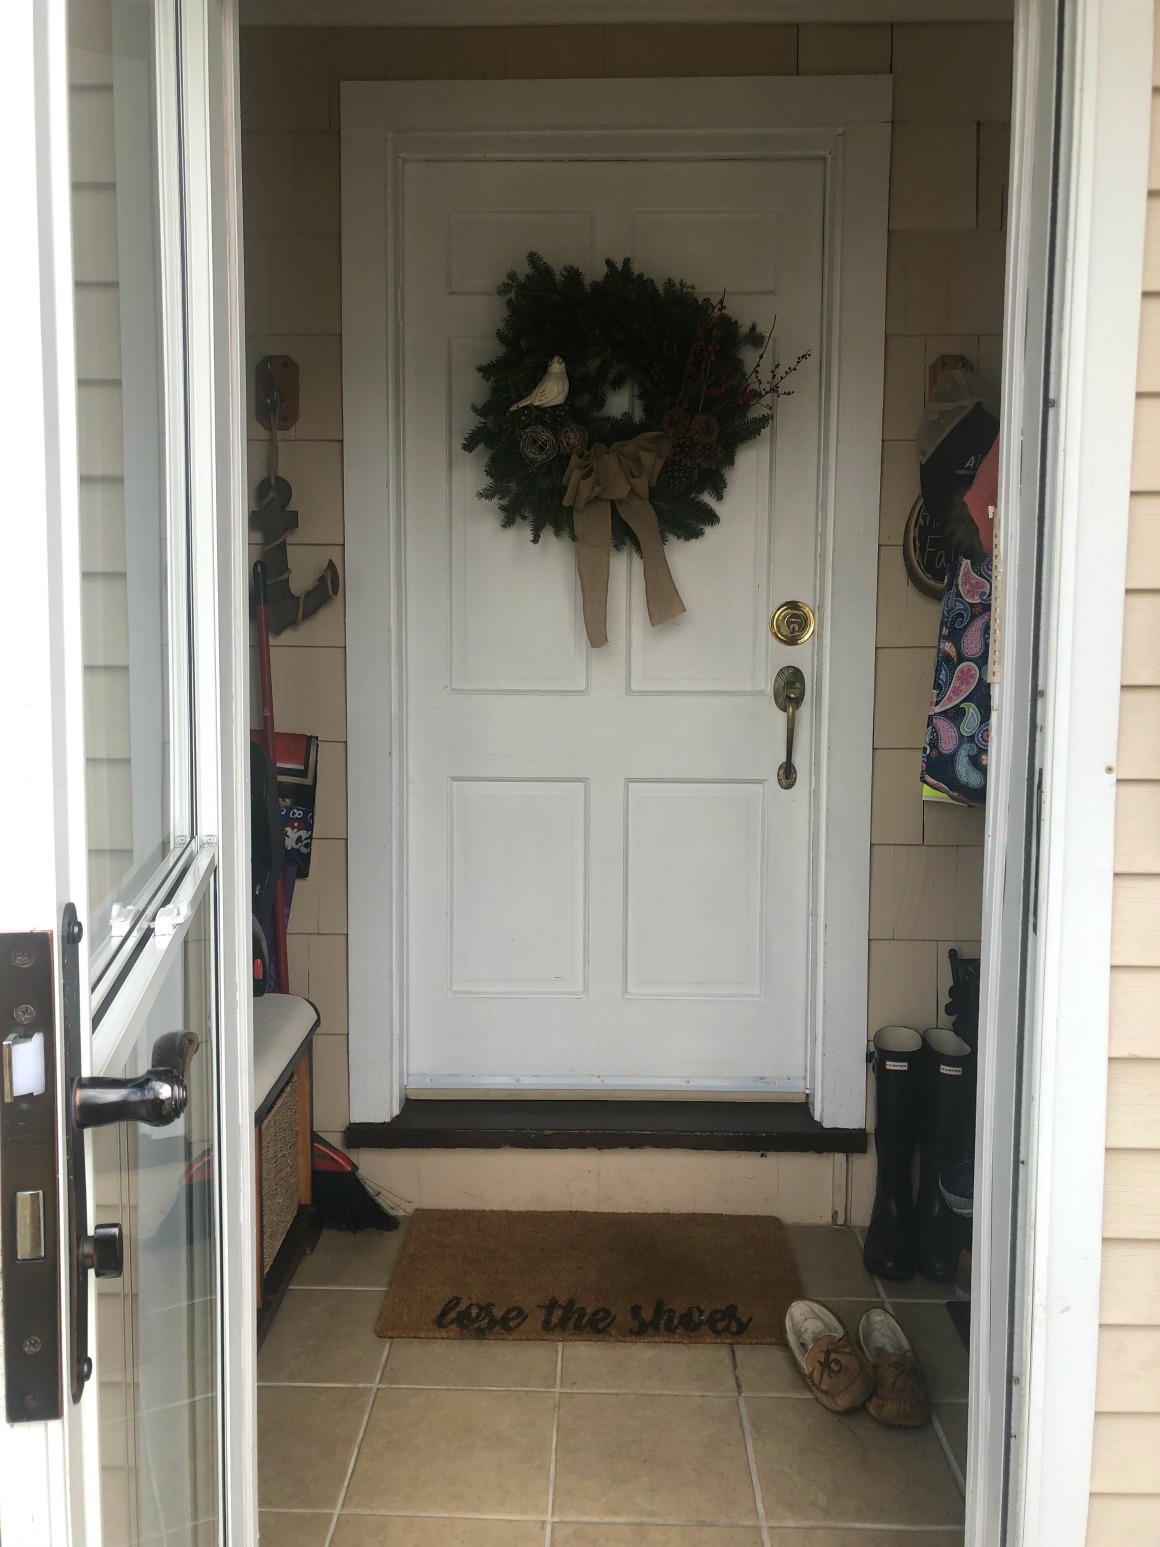
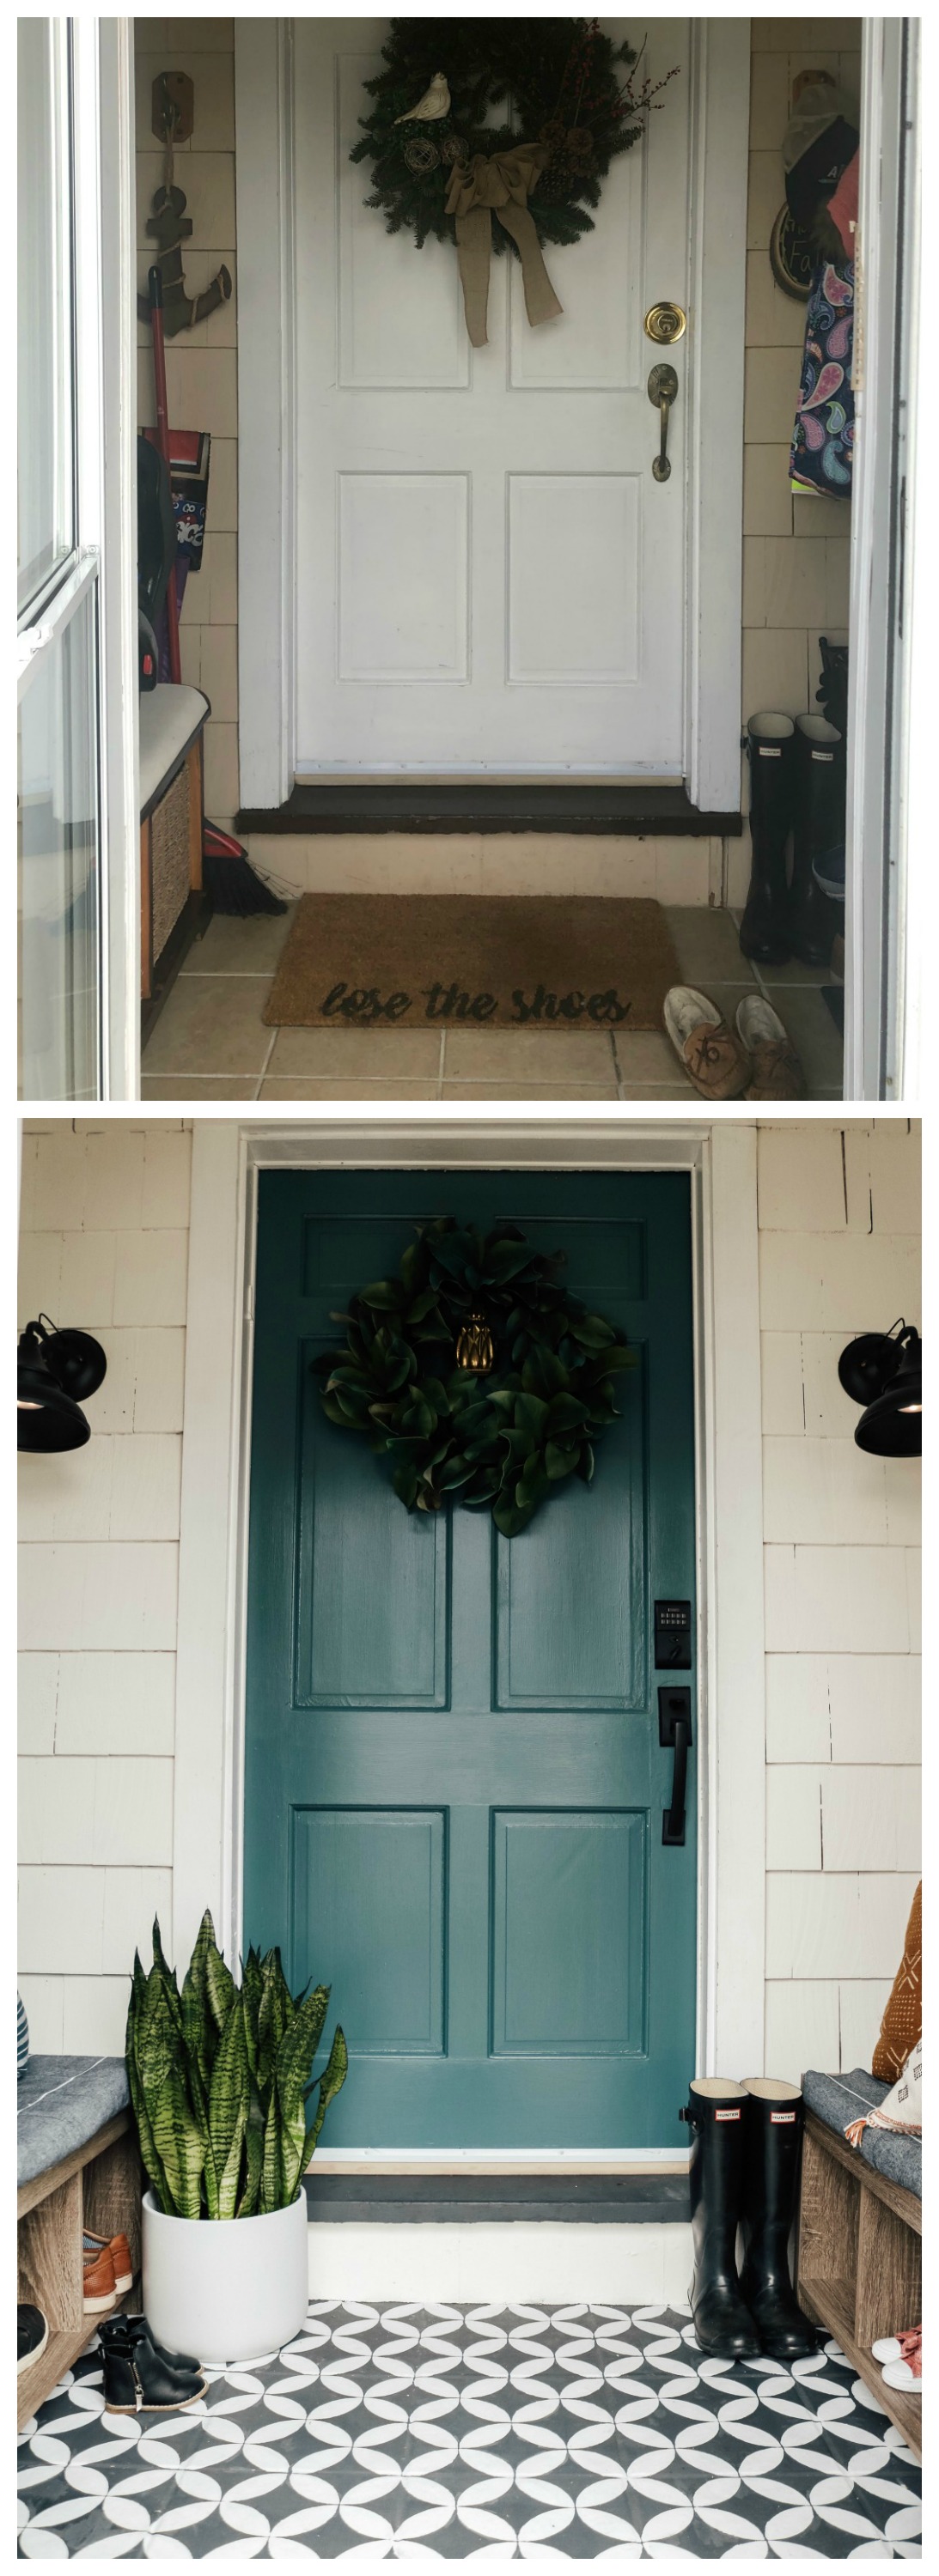
Entry BEFORE-
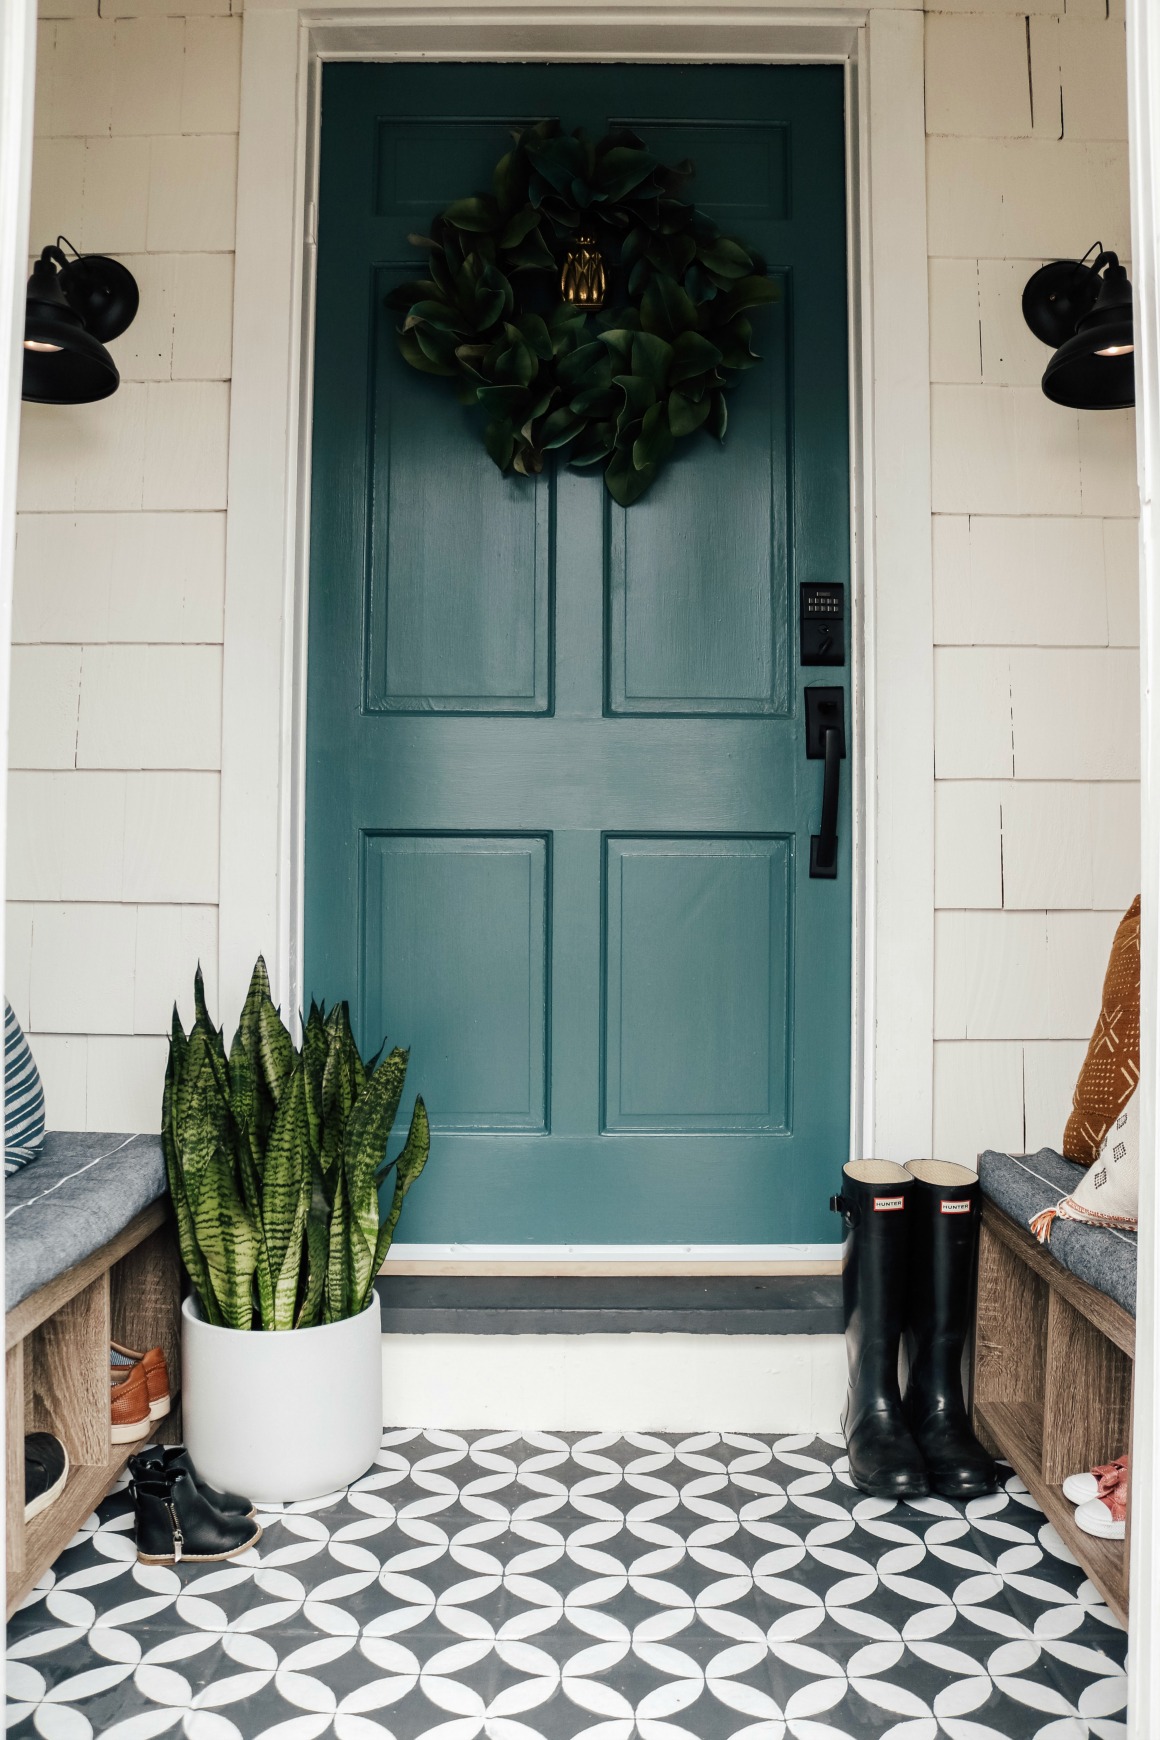
Entry AFTER-
Another look at the Entry Before and After-
We first gave the walls a new coat of white paint! Paint color- Benjamin Moore Cloud White. HUGE difference in just the light paint.
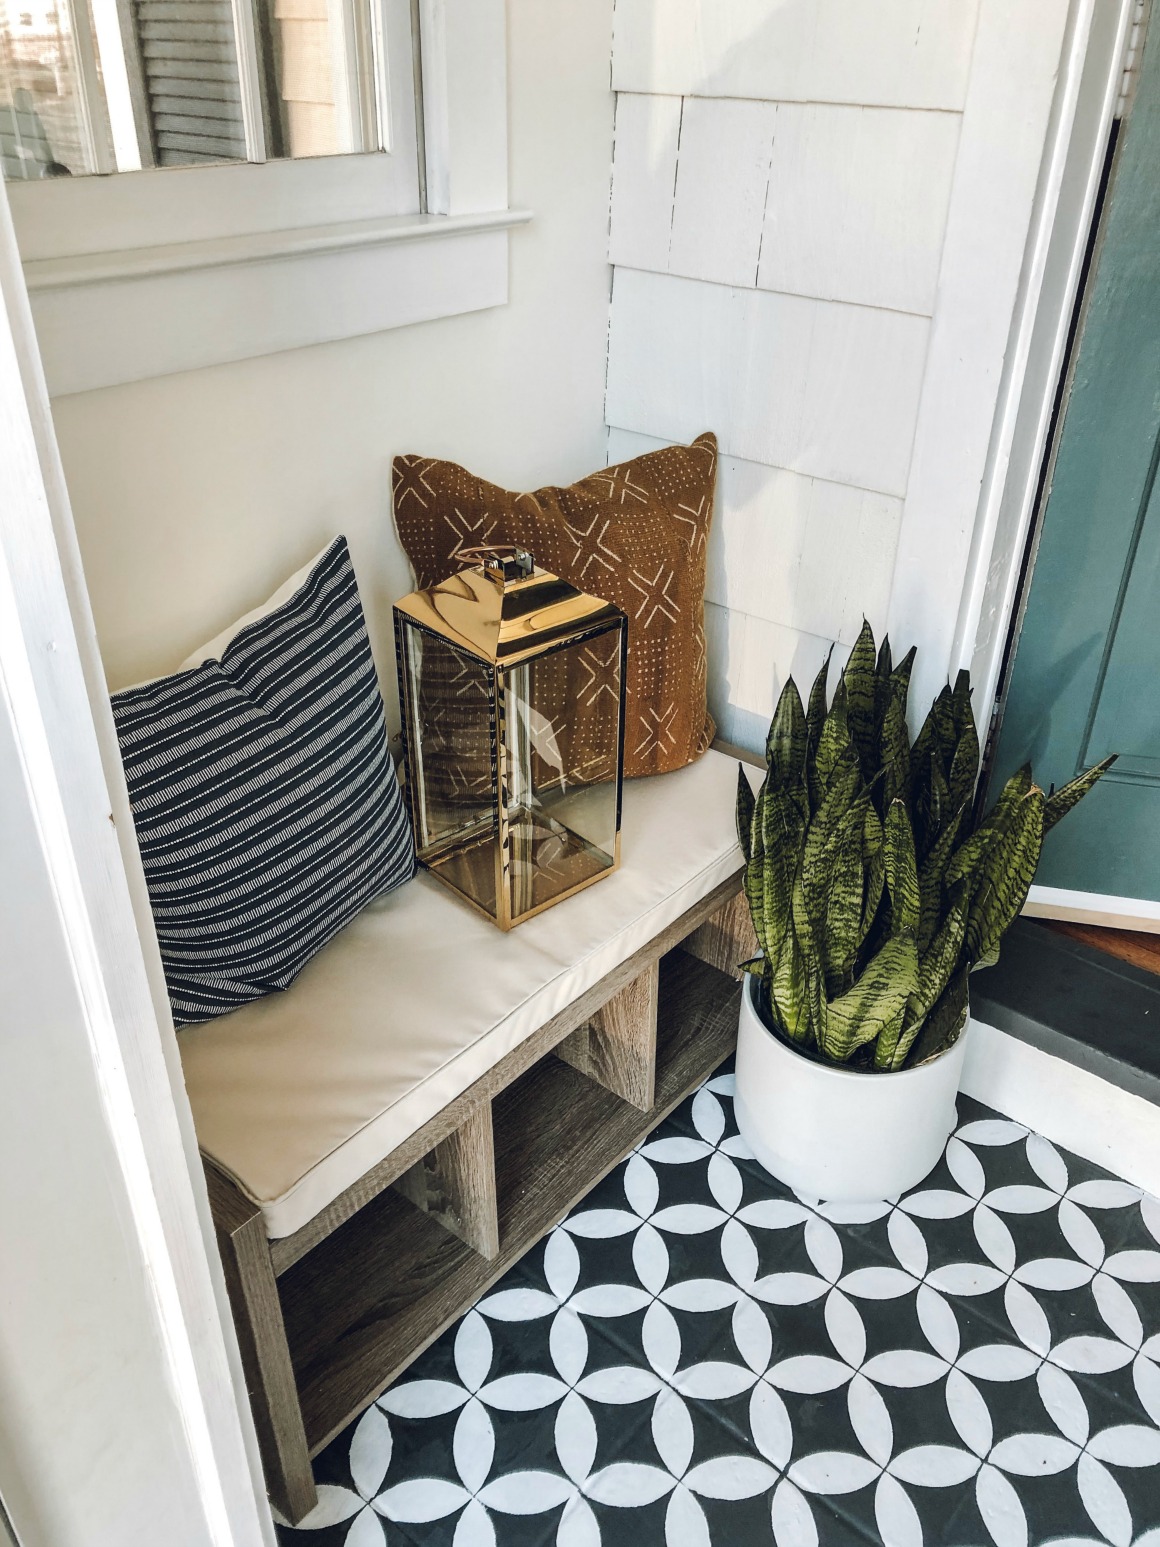
Entry Furniture
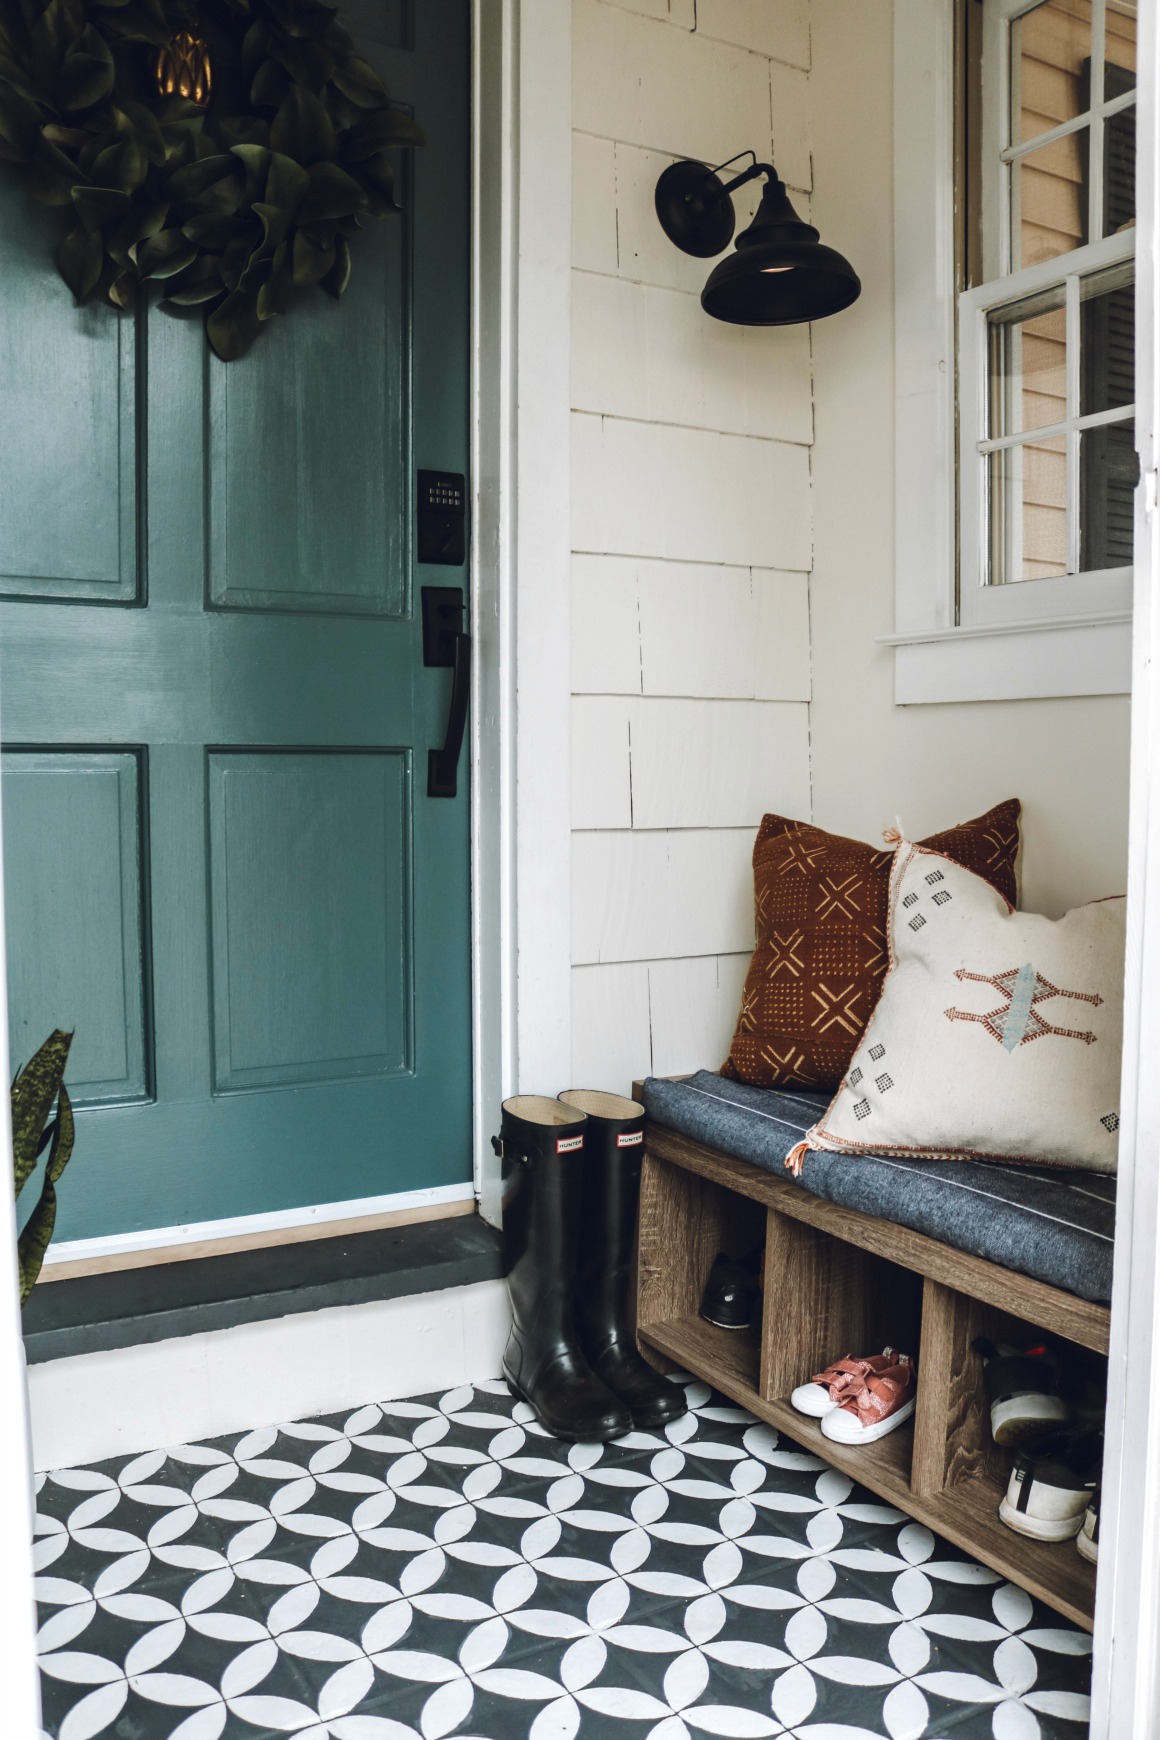
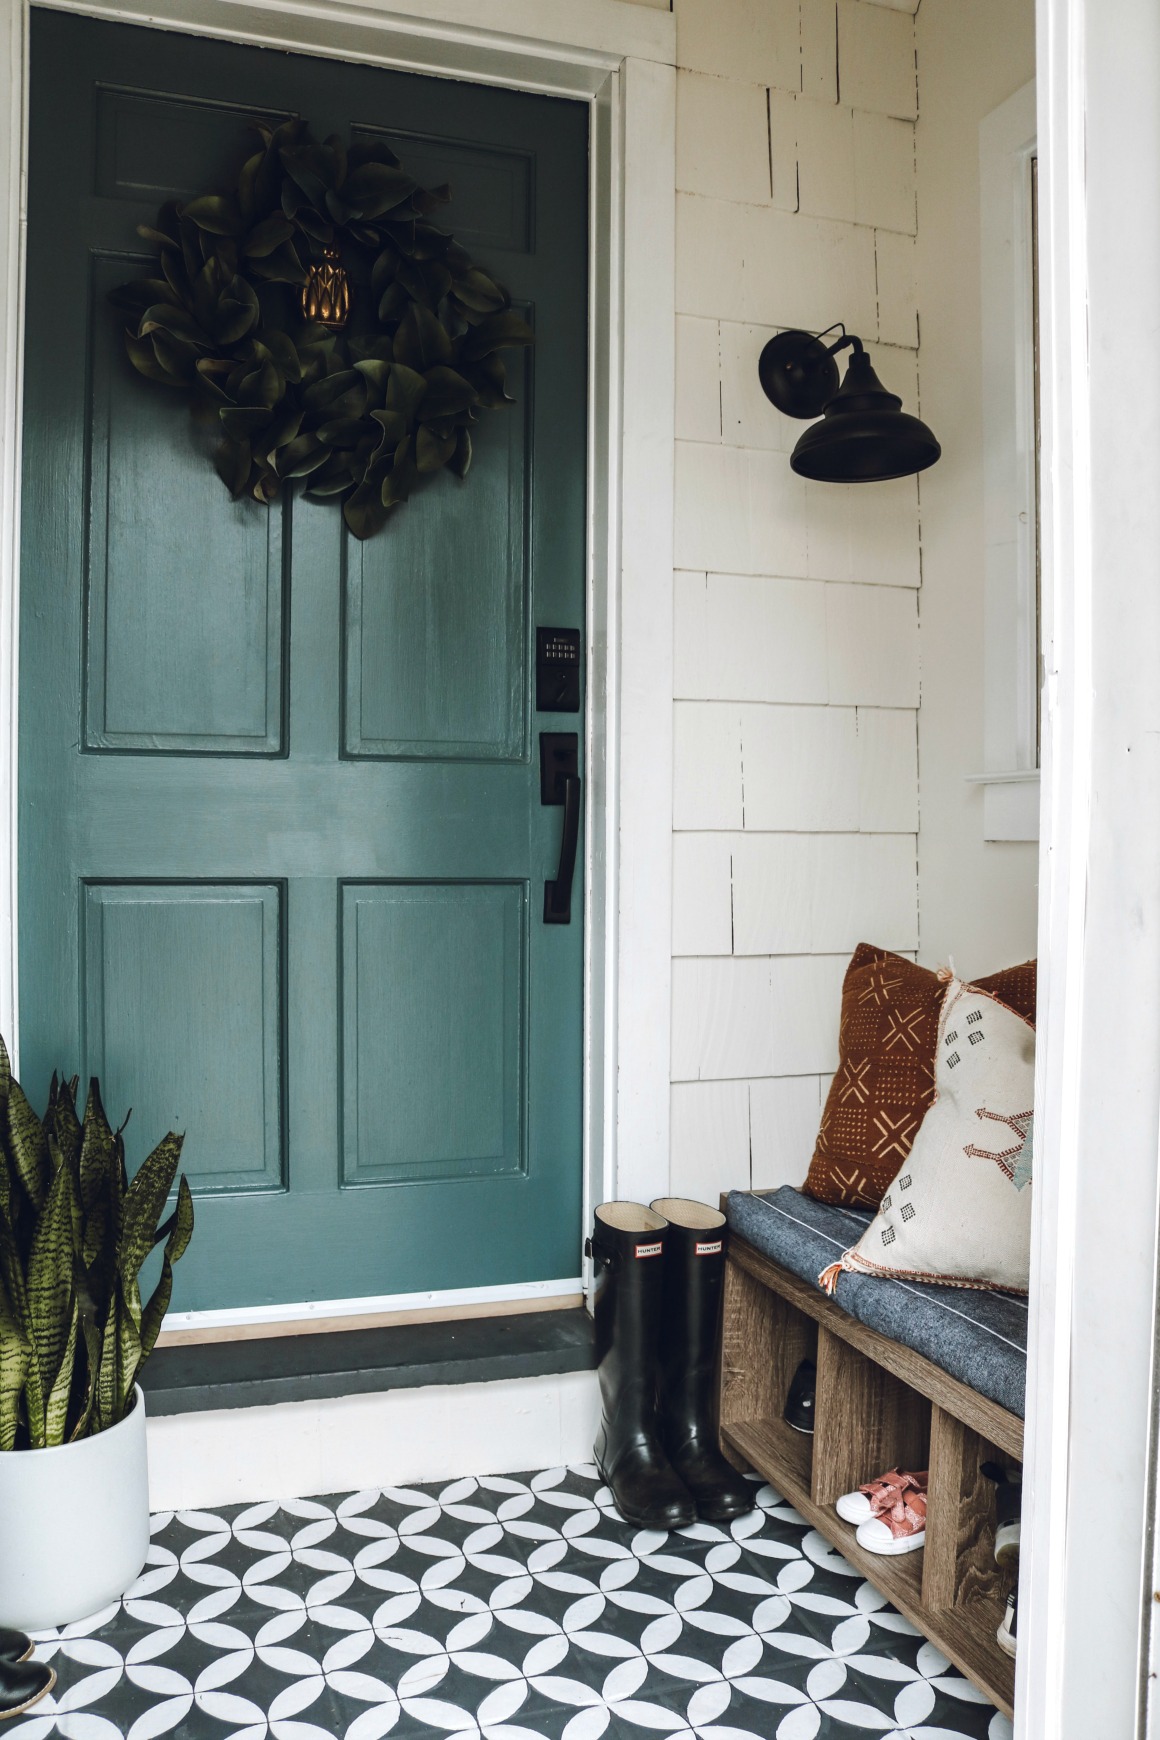
Some of you might be thinking- “Ya it looks pretty, but where did you put all their stuff?” I will tell you! Donated it! Ha. But honestly we donated about 3/4 of it. It was full of stuff they didn’t use. They had a bench on the left when you walked in the door, that had baskets in it, the baskets were not functional at all. The point of this entry/mud room is to be a place for guests to take shoes off and hang up their things. Or for the homeowners to take off their shoes and either leave them there if they are going back out (they do have a hall closet and bedroom closets).
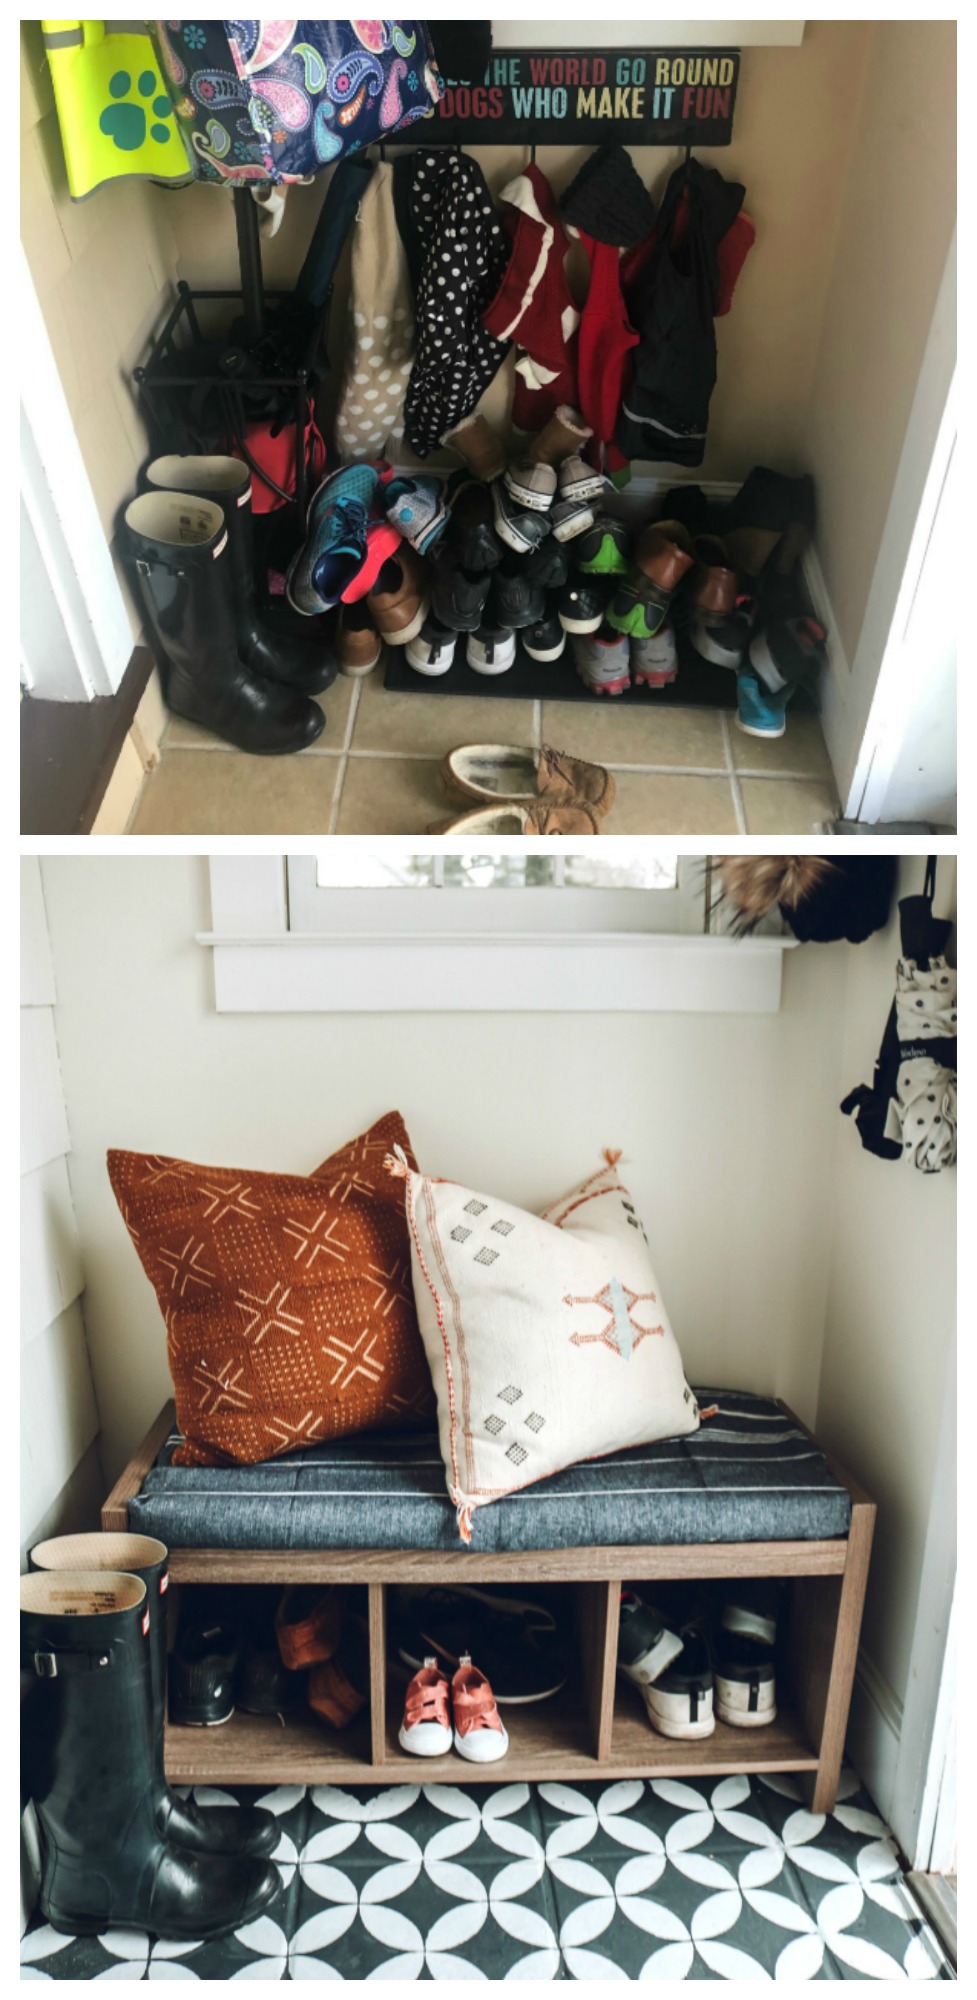
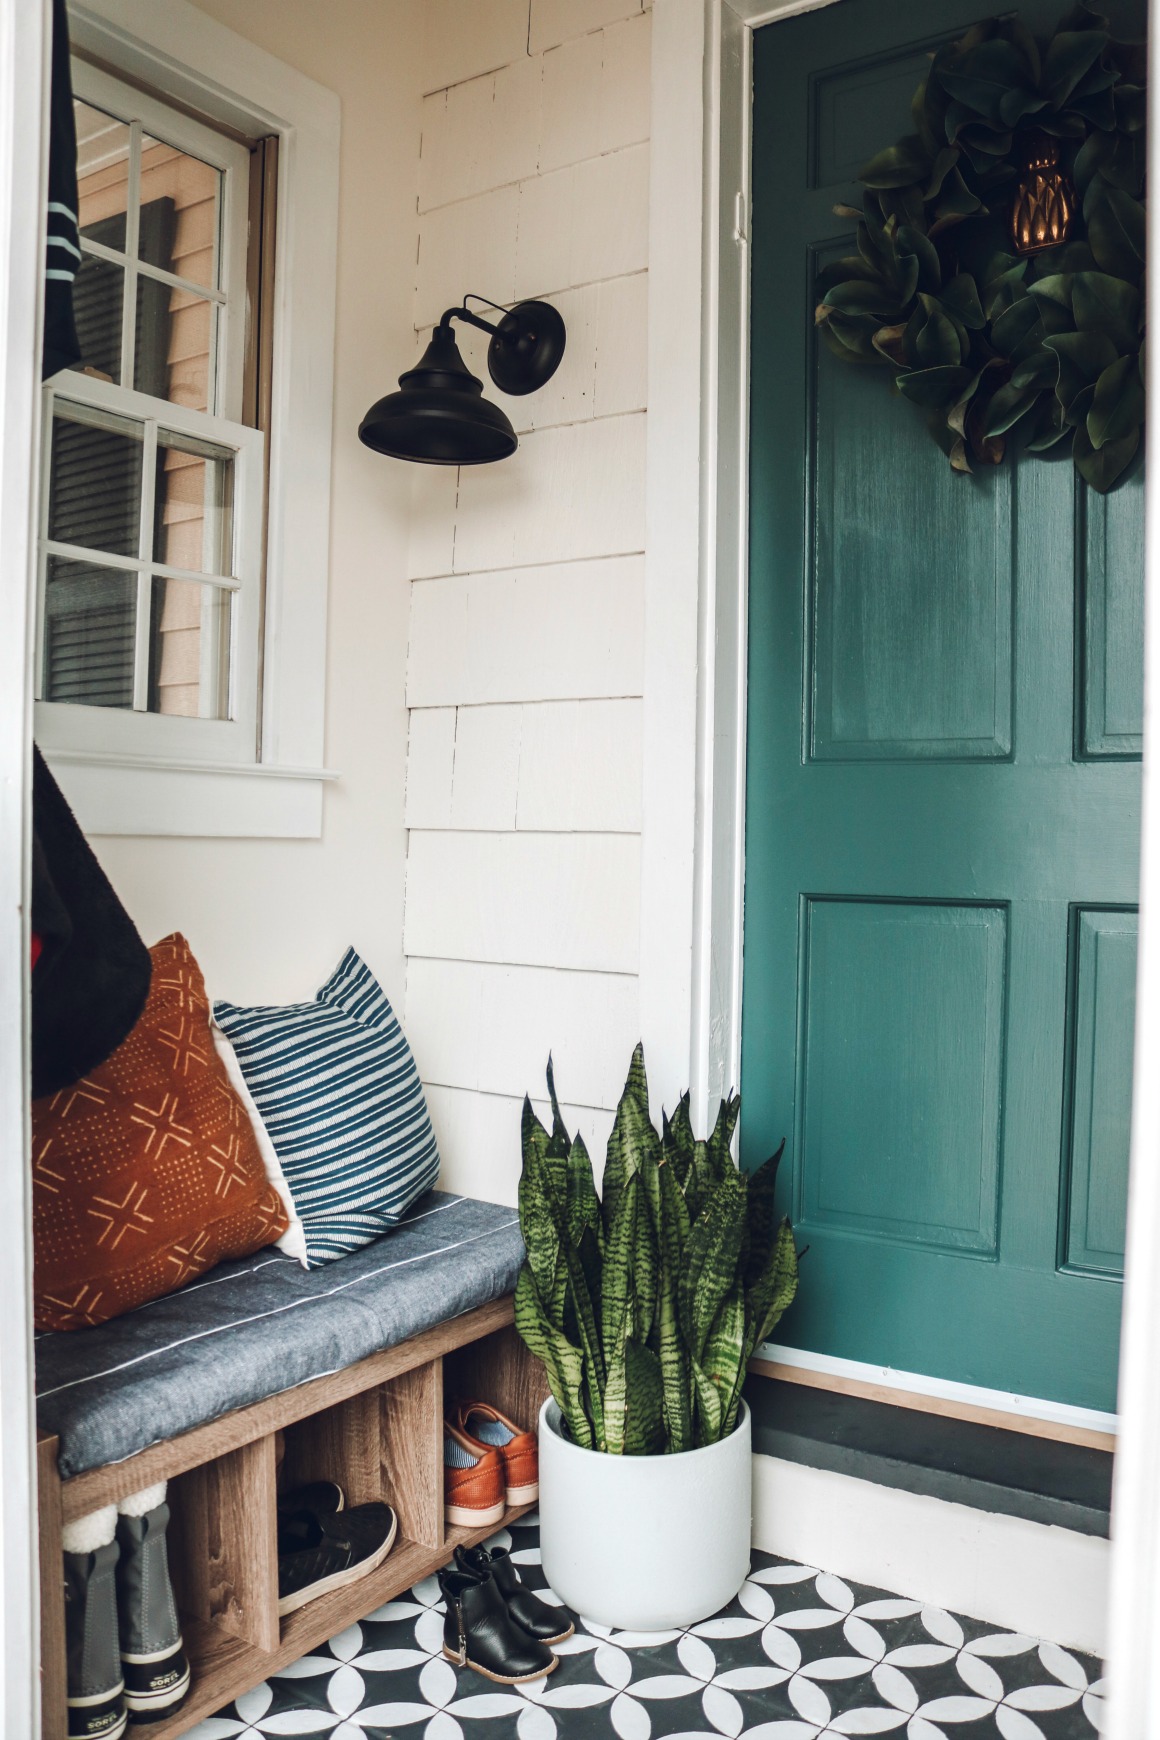
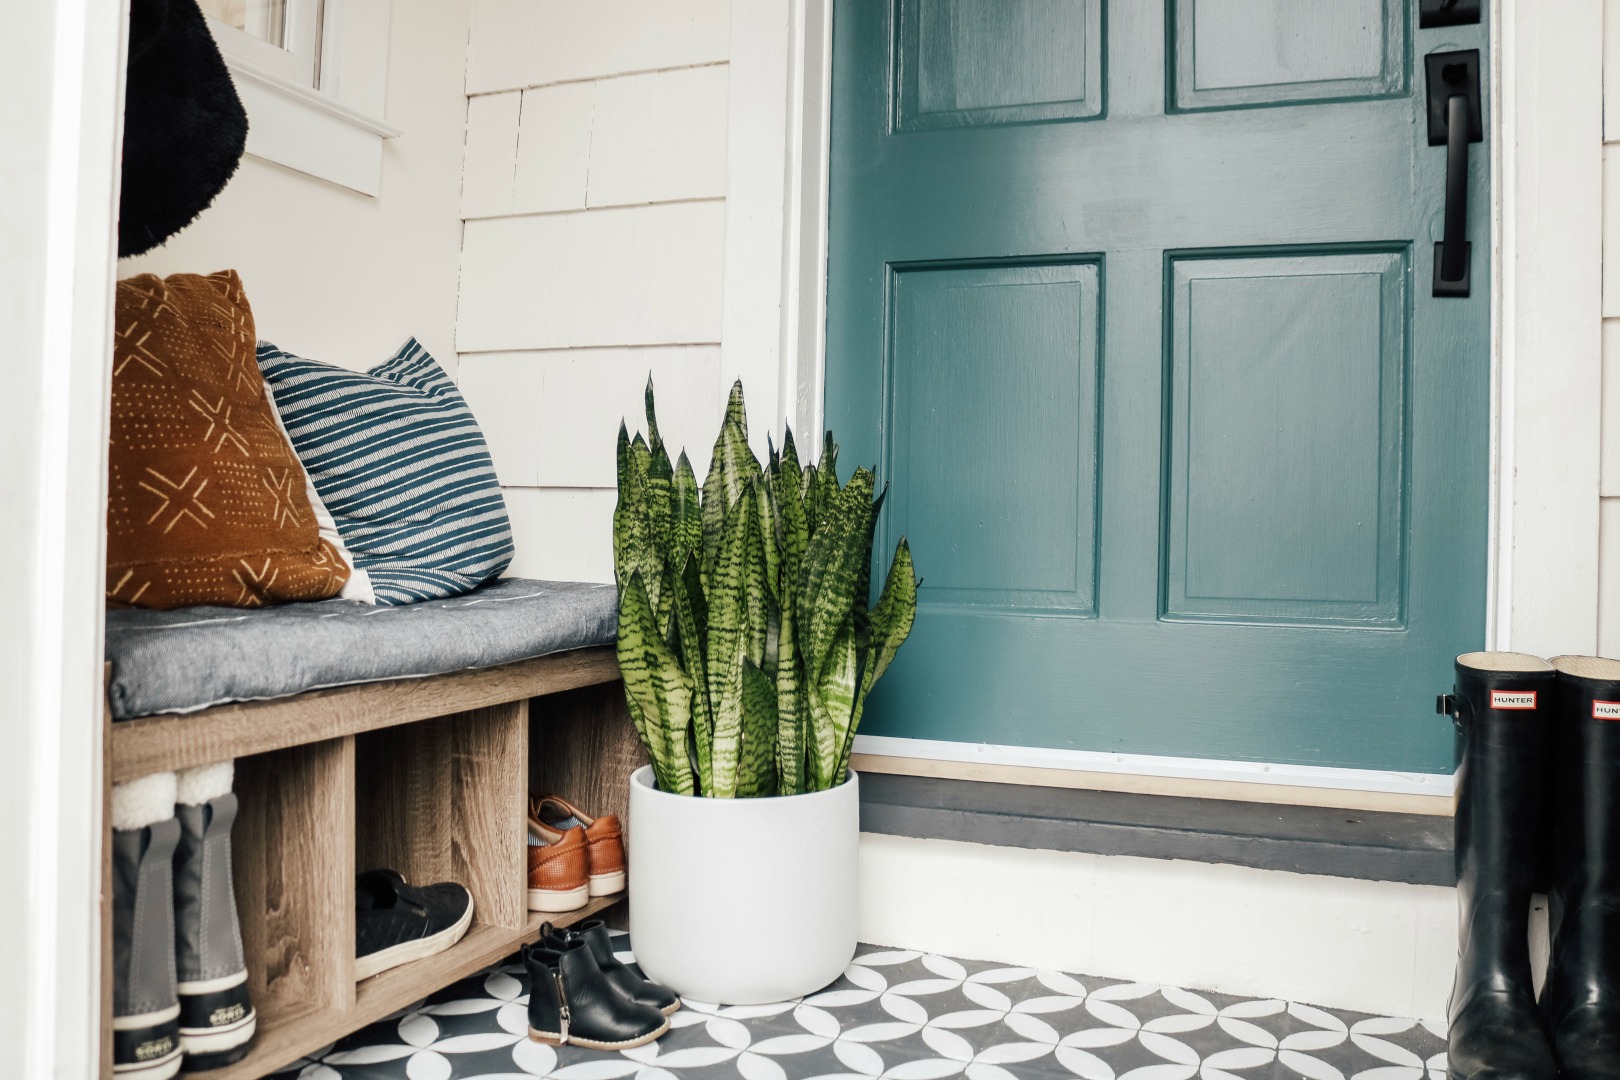
I bought them two matching benches from The Home Depot that are stylish and also very functional. They have a spot to put their shoes that always stay here, like snow boots and some gym shoes. And there are cubbies for guests to put their shoes also. Both benches came with a cushion! I did cover them just by wrapping a Turkish towel over the cushions. Such an easy solution to protect them and to add a contrasting color. (Shop the benches HERE).
Below are the bench cushions before, without the Turkish towel (you can find the towels I used on THIS blog post). You can see how they needed a contrasting color. Also I was considering using those lanterns rather than the lights I hung. But the lanterns didn’t really match the look of the exterior of their home.
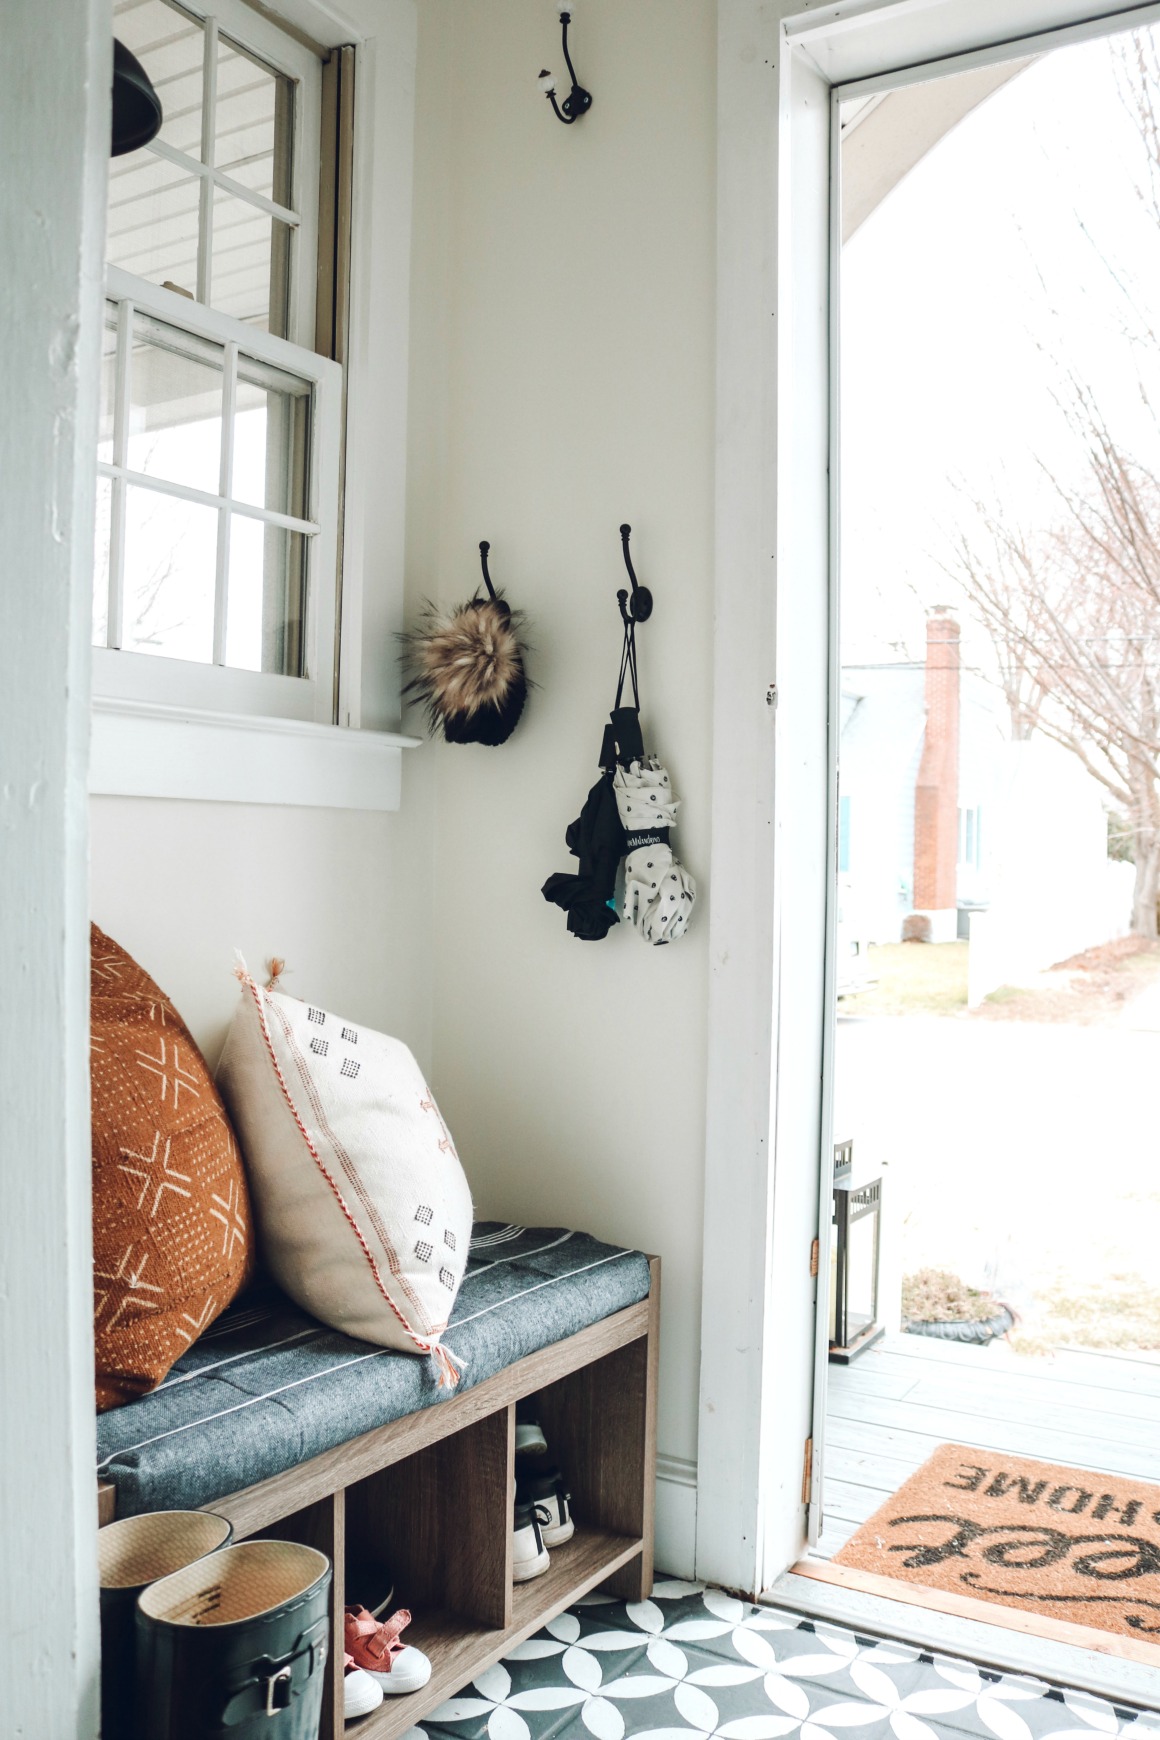
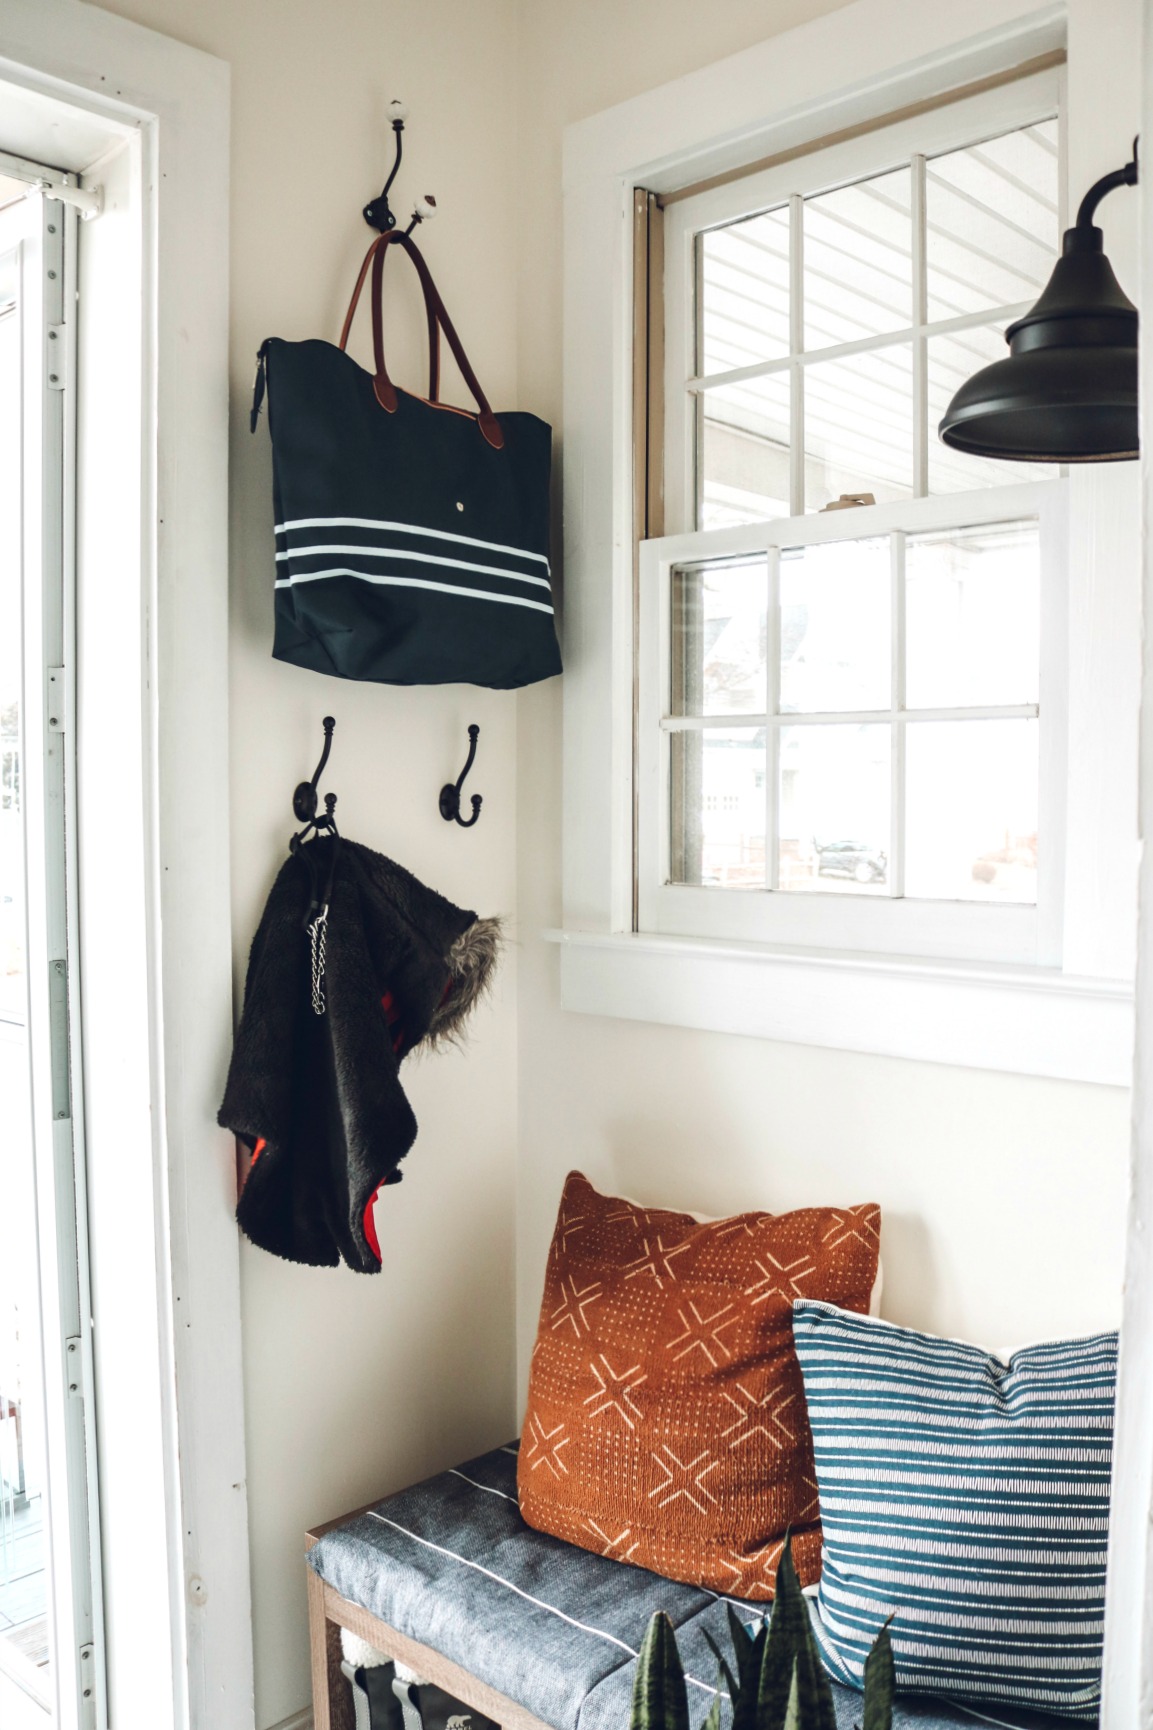
Rather than having a coat tree that was just a place to hang random bags and take up space. I added hooks to the wall by the door, that way you don’t see a bunch of clutter right when you walk in the door, where it was before.
Entry Lighting-
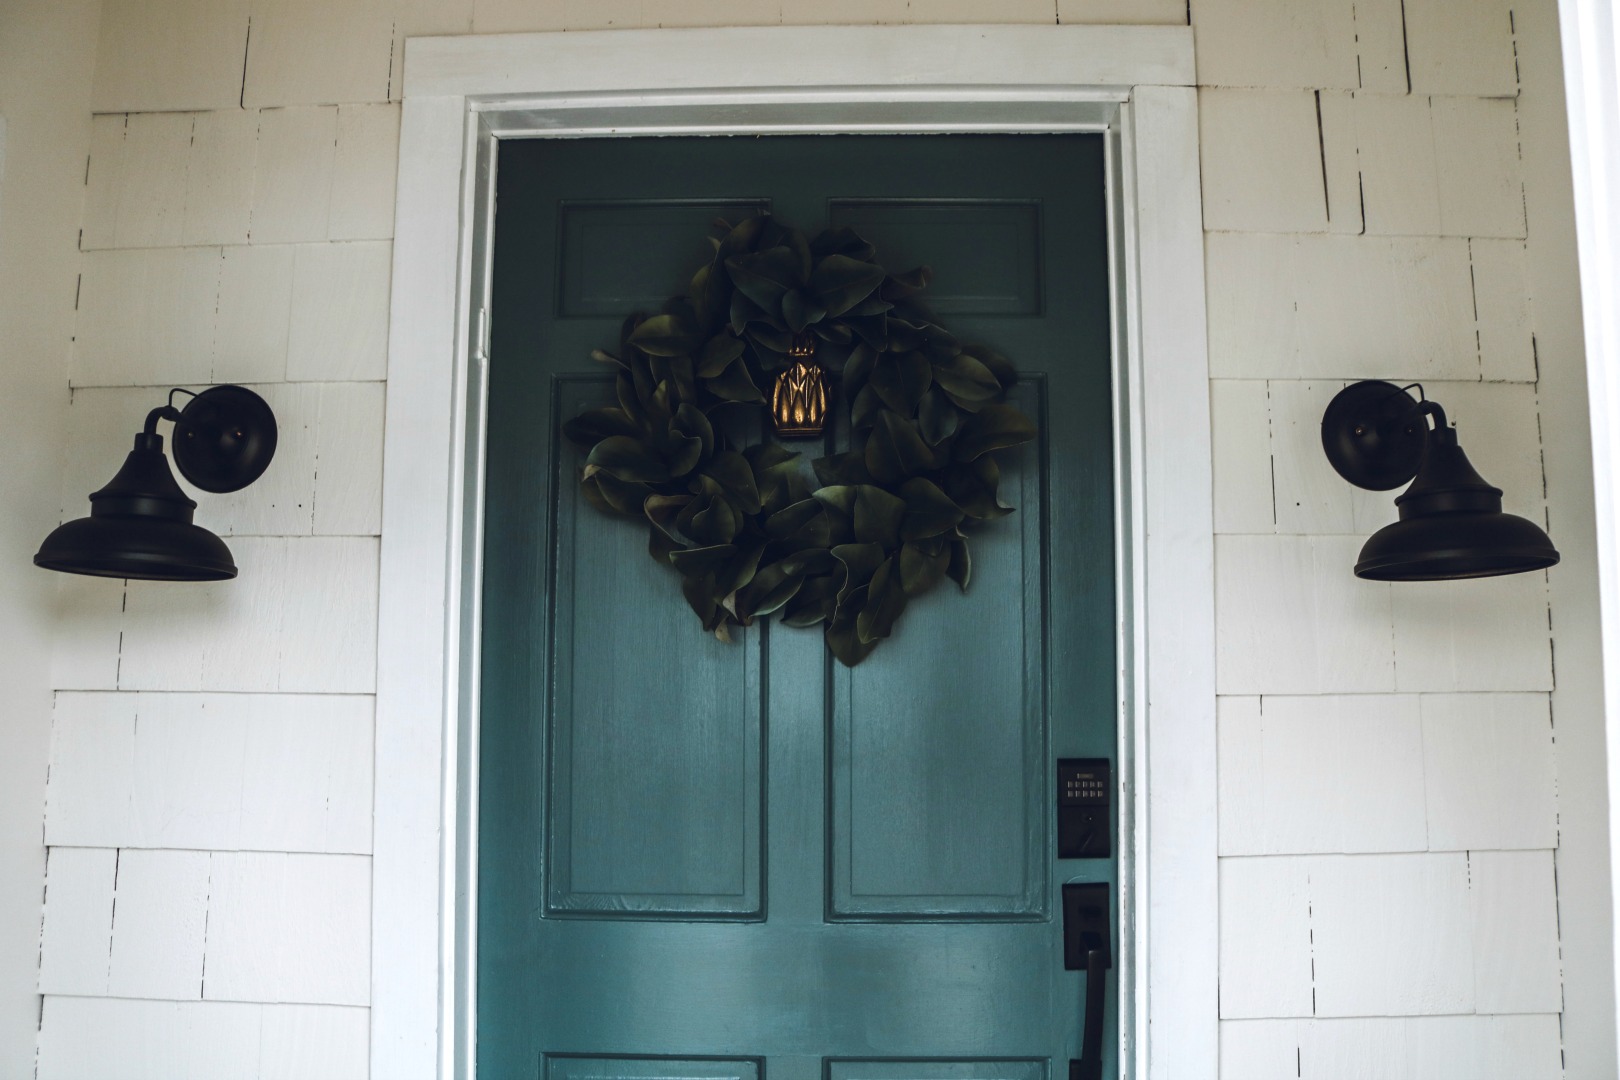
They did have hooks on either side of the door that they never used. So I decided to make the front door a focal point, as it should be. I found THESE awesome outdoor lights from The Home Depot, that are very affordable. I like how the black ties in the floor and the door hardware. And I just realized I used these same lights on THIS family room makeover!
We did the Magic Light Trick of course! Such an easy way to add sconces without hiring an electrician or doing any electrical work. The best part about adding the lights was that they now have a light as they are trying to unlock the door. Before there was no switch to turn on the overhead light. No more fumbling in the dark!
Front Door-

We went with Inchyra Blue No.289 . I love that The Home Depot matches any paint color. I actually always get my paint from The Home Depot, I am always happy with their BEHR Premium, low VOC. I will say DO NOT go off of my pictures when selecting your paint color. And you shouldn’t base your paint colors off of what you see online. Especially since ours was a color match and in-person this door does look darker and depending on the time of day. Just a tip, you never know the edits bloggers put on their photos too.
And we did end up changing out the lock to my exact same keyless entry lock HERE on THIS blog post. It is one of my top favorite home- purchases!
We did use my pineapple door knocker for the pictures (she really wanted a pineapple one…l swear I am not a pineapple door knocker pusher 😂). She did order THIS pineapple door knocker, it just didn’t come in yet!
Painted Stenciled Tile-
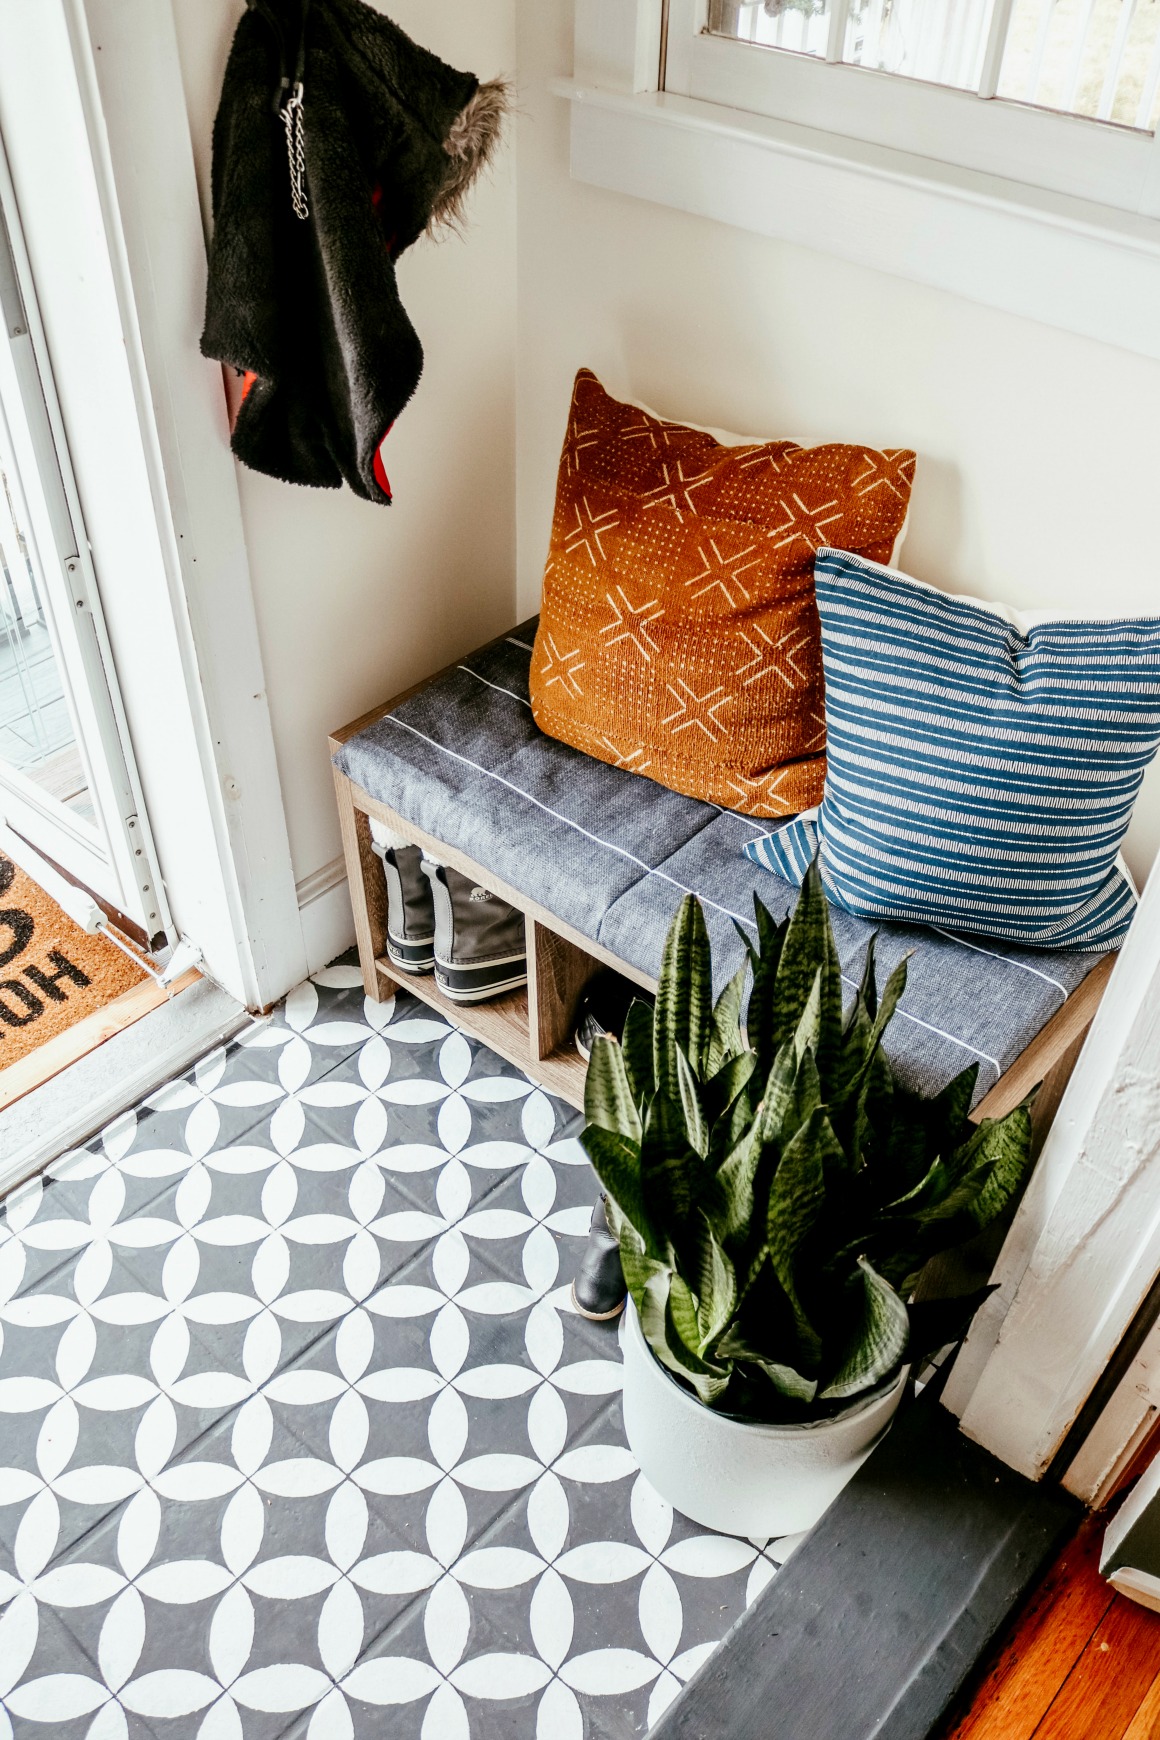
The biggest thing that would effect the entire look was the tile floor. It needed to be changed. I didn’t want to spend a lot of money on the flooring and I didn’t want them to feel like they had to change it. I decided to try painting the tile a dark charcoal then doing a stencil over it. I have seen it all over Pinterest and Instagram. It seemed easy enough to paint the floor and stencil the tile. Maybe a couple hours to get it done? I thought the thing that would take us the most time was the drying. Wrong. It took some time!!!
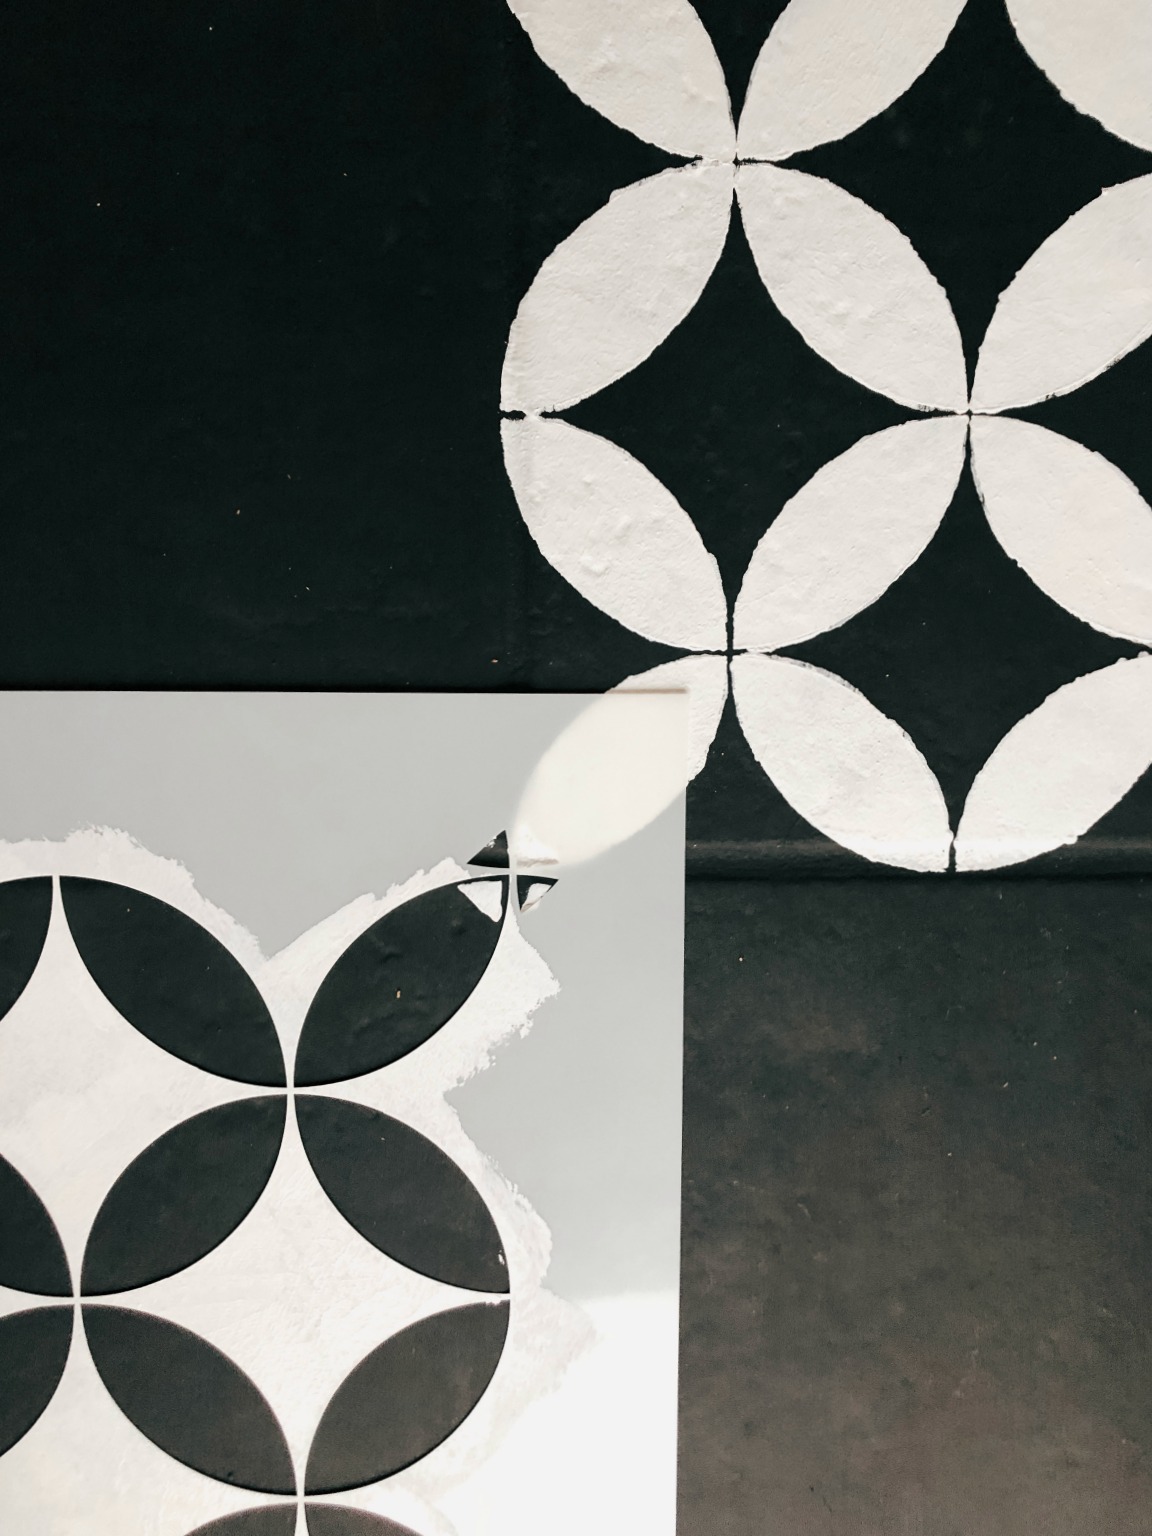
Scott painted the tile with THIS Rust-Oleum Charcoal Chalk Paint we bought at The Home Depot. That was super easy and quick to do. Just make sure to clean and prepare the tile before you paint. It took about three coats of the chalk paint. Then we used THIS Rust-Oleum Linen White for the stencil. Then make sure to seal it with a Polyurethane….most people do THREE coats of polyurethane. We did NOT even seal it yet (because the home owner is going to tile over this). But I would research for a painted tile cement blog post if you plan to do it! And read a lot of them! We followed THIS tutorial on painting your tile and using a stencil.
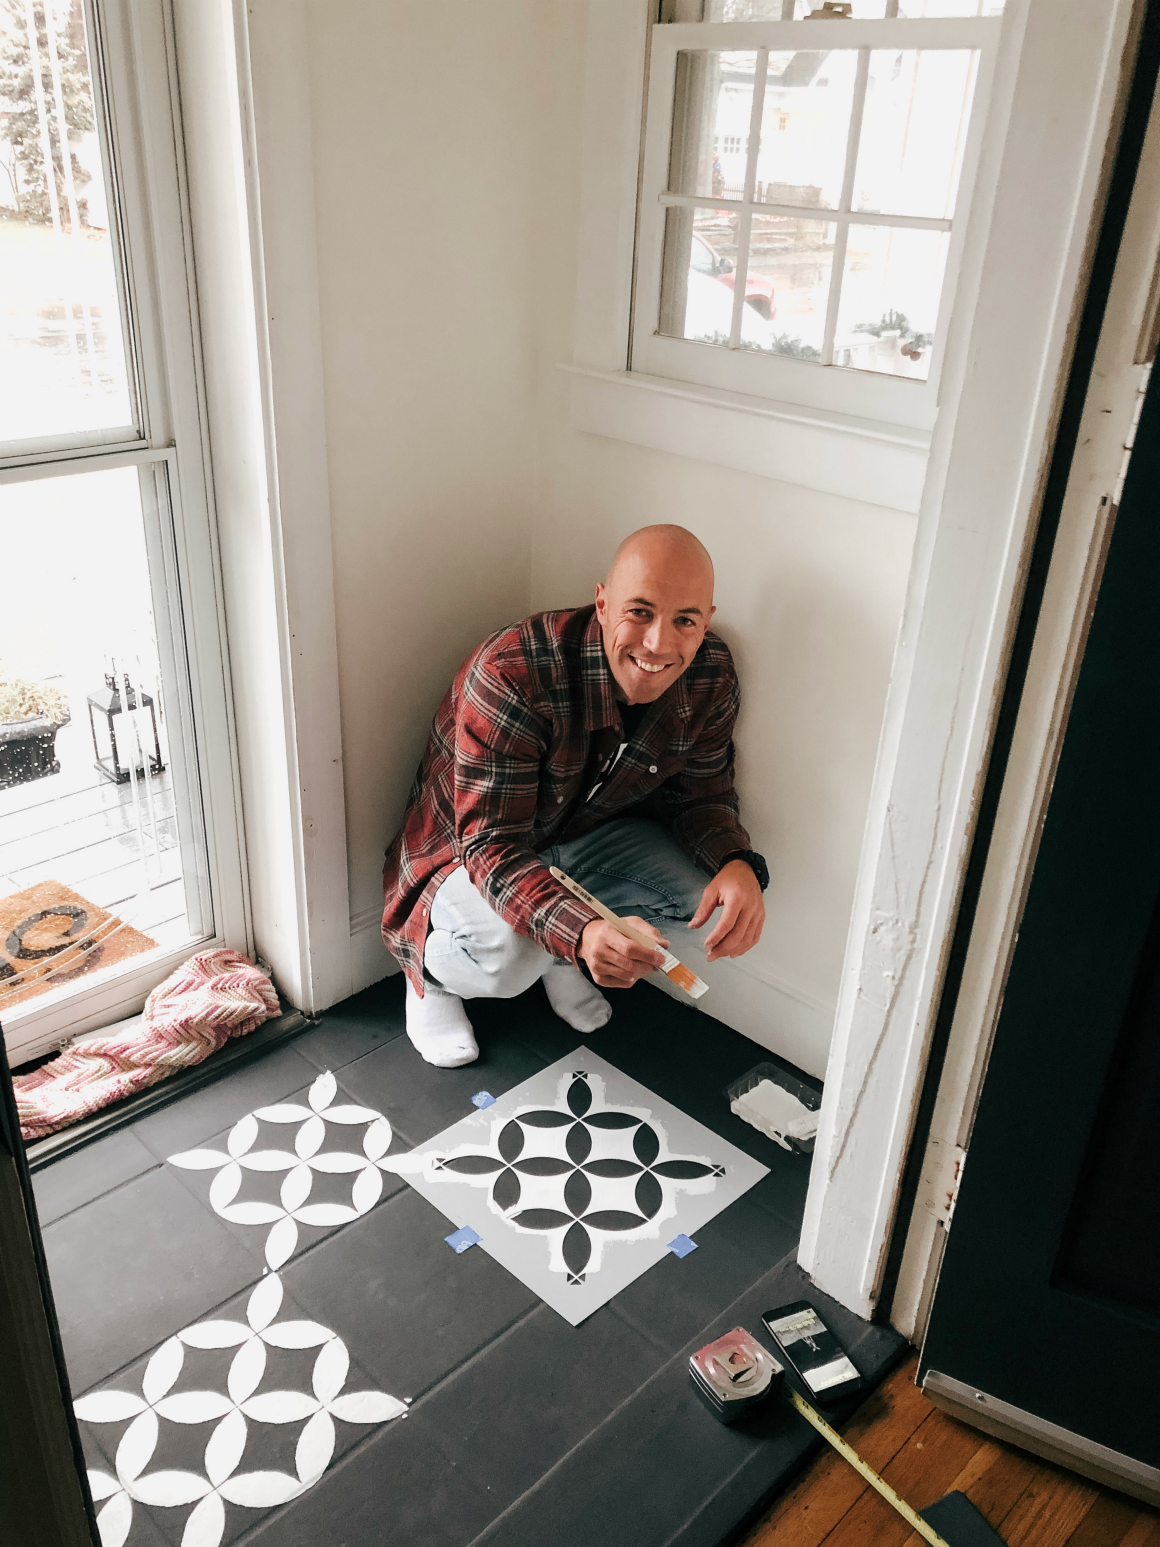
Then Kevin (the most patient and awesome guy) came in and did the stencil. We were both there and really only one person could do it. So he took it on. He is faster and doesn’t stress about it being perfect, like I would (especially for someone else’s home, I am pretty chill about our home). It took him about 4 hours total. Then my mom and I came in and touched it up and that took about an hour and a half. The edges were HARD!!! They look bad. Not because because of Kevin, they would have looked the same if I did them. But because it’s hard to do the edges.
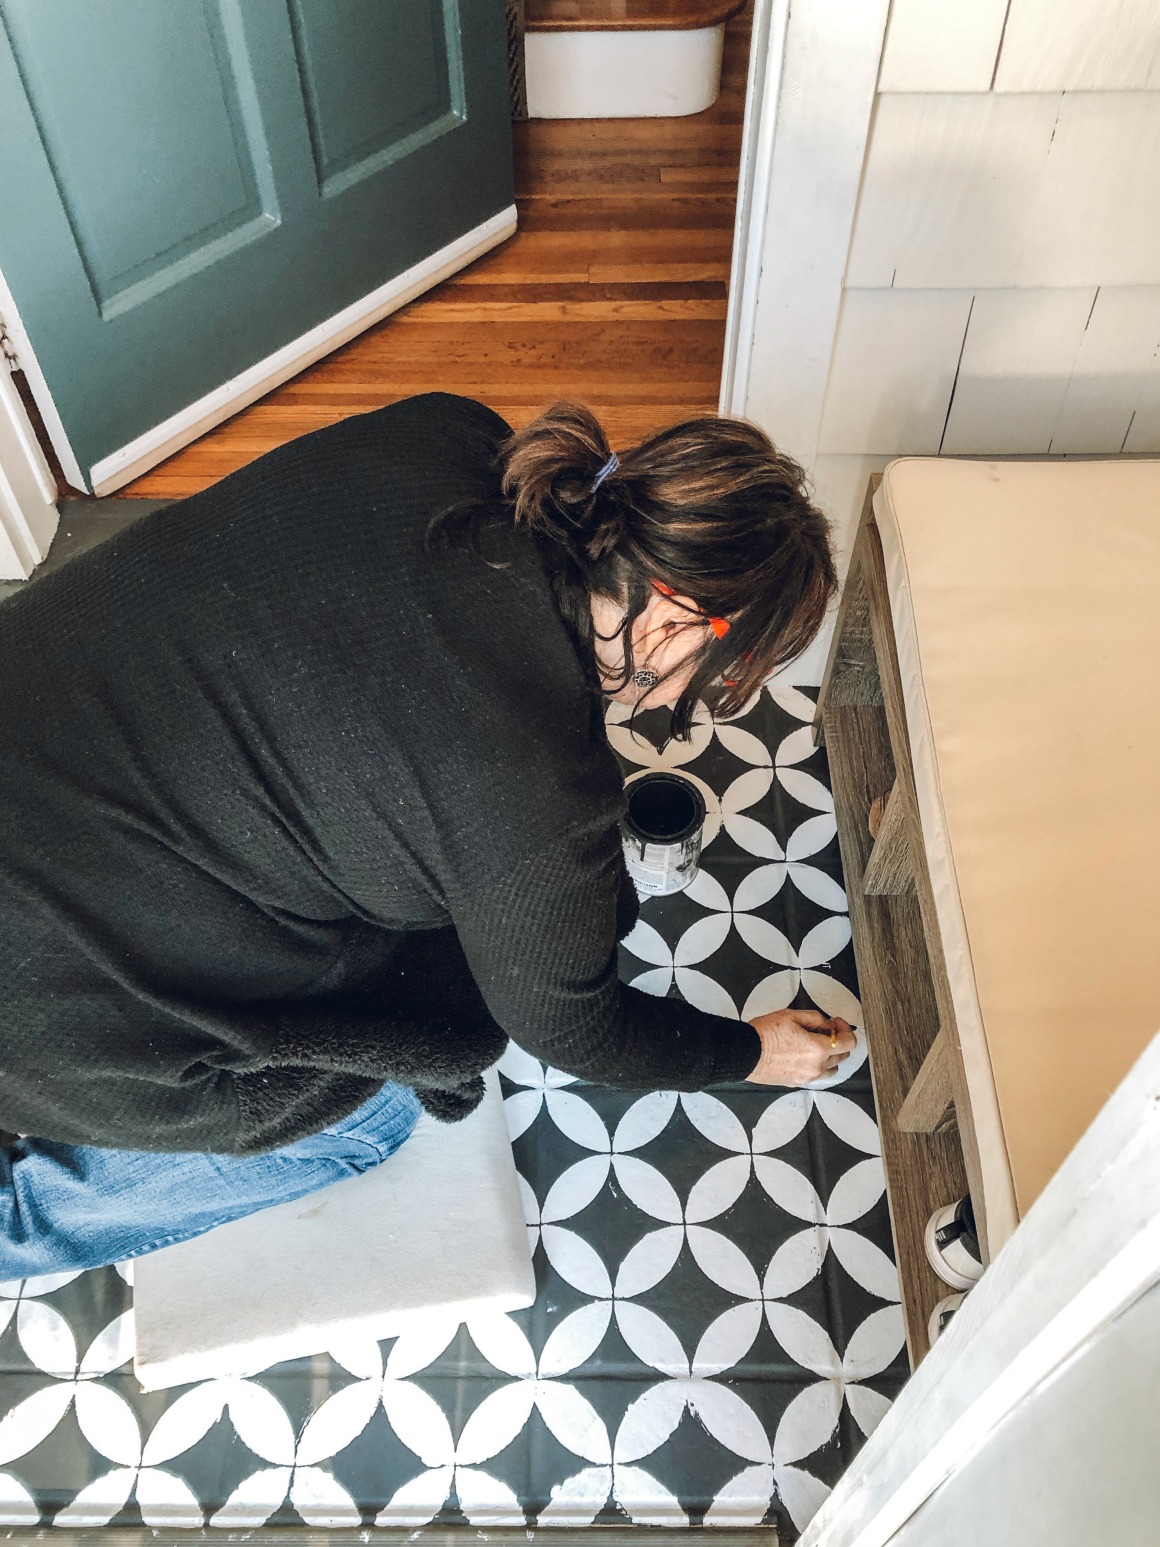
My mom and I decided to put the benches in that were going in the room and ignore the edges. They were going to be covered up anyways. And focused on touching up the main area. Which turned out awesome. It really looked good. Not perfect. But good.
Scott is going to put THIS painted cement tile over it. He is not a fan of it. Which is ok. All it really cost was time. I would 100% recommend painting your tile if you are on a tight budget. Or if you want a quick fix. I would recommend stenciling and painting your tile if you have pieces of furniture that are going to cover up the edges. I would not recommend stenciling your tile in a tiny bathroom. I would just paint the tile a solid color or do a really large, basic stencil.
Just know that stenciled tile will NOT look perfect (in our experience). On Pinterest it might look like it is. Even in these photos it does, but up-close it has flaws.
But I do want to be clear tho. This entry is FAR better than before. And the only thing I would think as I was walking into this entry was how cute it looks! That is the goal when you are doing makeovers in your home. The purpose is to make it inviting. I would never even second guess the floor. I think we can get obsessed with small details and worry too much and waste time. When in the end, all you have to ask yourself does it look better than it did before? Then that is what counts. Your effort was not in vain.
There you have it. My two cents on stenciled painted tile.
Laying tile is a skill and that takes a lot of time. But I did find some really similar patterned tile HERE at Home Depot.
Click on an image to shop this Entry Makeover!


Oh my goodness, Brooke! This makeover is amazing!! I love the hooks and the bench pads you covered in the towels! So smart and easy to remove when they get dirty. I hate our kitchen tile floor and I’ve been researching painting it, but this post has convinced me. I think I might even just paint the whole thing dark (without a stencil) because I love that look here, too. Now, to kick my family out for a few days so I can paint….haha!
Thanks Rachel!! Yes- it is SOOOOOO much time to stencil the floor. I would just paint it a solid color! And if you do want to stencil go get a sample piece at Home Depot and test it out just so you can see how tricky it is to get the stencil perfect!
I gasped – this is beautiful! She had to have been thrilled!
I love this makeover!! I love the stenciled tile! I think it looks so great!!
LOVE it! Where did the pillows come from?
I am wondering the same thing. I love them!
I gave them some that I had.
I used these from woven nook- the blue combo https://wovennook.com/collections/pillow-cover-sets/products/kennedy-pillow-covers
I really appreciate your honesty about the painting of the tiles. Most people make it look so easy and so perfect. I was tempted to do this in a bathroom but now I’m not so sure I’m up to the task. The makeover looks phenomenal. Great Job!
I love it! Love the stencil, Kevin did a great job. Looks so much better!
As always, you did an awesome job. It’s a cute little space made cuter by your touches. Looove the paint color! I think the floor looks great but appreciate your honesty about the details. Keep the makeovers coming! So fun
Love how this came out!!! Can you link the stencil please??
yes! This is the one I bought- https://rstyle.me/n/dfauejb5qwf
I so wish that I had an entry way like this. My husband is a contractor and doesn’t do half of what Kevin does.
Well, he does, just not at home. lol But what a change. Since it is the first thing you see when someone is
coming into your home this adds the wow factor instead of the ew. Great job!
It seems to be that way when you do it for a living 😂
But I would love a vestibule added to the back of our home. They are awesome!!
Wow! It’s beautiful! I love it. (Ive been wanting that pineapple door knocker.) Did you paint the walls a lighter color? It looks much brighter in there. If you did, what color did you use? Thanks!
oh yes!! I forgot to mention that! Thanks! We used Paint color- Benjamin Moore Cloud White
So glad to see this!! I’m planning on tackling my front stoop in the spring and possibly my patio as well!! I’ve been looking at stencils and have narrowed it down to a couple of SIMPLE ones!! It’s amazing how detailed some of them are!! Looks beautiful and helps boost my confidence to move forward with my projects!!
It looks amazing! Any chance you can link the door handle and lock? 🙂
yes!! https://rstyle.me/n/damac4b5qwf
It is the same as mine on this post- https://nestingwithgrace.com/one-of-our-best-home-purchases-our-new-door-knobs-automatic-locks/
I think it looks amazing !! Love everything that you changed.Brilliant !!
I just really love how you give permission to be imperfect. I about started crying reading that statement.
Oh you are just so kind. Thank you. I really don’t want people to stress about perfection. We have to remember what the point of everything is. xoxo
I love how this entry makeover came out! Looks so much better, brighter:) Do you have a link for the stencil used?
Yes! Here- https://rstyle.me/n/dfauejb5qwf it was a really good price!
Awesome!! L❤️VE this !! What a difference! Makes you wanna come home 😍
Quick question about the entry lights… since you did the Magic Light Trick, do they keep the remote with them or hide it somewhere so they can turn the lights on as they come in? Was curious about that one. It looks ah-mazing! I’ve been wanting to redo our entryway, it’s overrun with kids coats and shoes and my husband’s shoes too. Now to convince my husband it’s only paint 😉 (we have white paint sitting in our entry closet for the living room (adjacent), it’s only been there for almost a year and our living room walls remain green – bleck!)
So they can just reach in and push them on. I did give them the remote to put somewhere incase they want to set it on a timer or adjust the brightness! Oh yes!!! You will be so happy after- paint is the biggest impact!!!
This is sooo adorable. I have thought about using chalk paint on my 80’s red and blue slate tile entryway. I have only found one blog with someone else doing this but was on their hearth. Do you have any advice and think that that it will hold up well? Thank you so much!!!
Would love to paint my bathroom tile floor! This is giving me inspiration. Did you apply a topcoat over the Rustoleum Chalk Paint after the stenciling was done? I also was wondering about the wear and tear factor on a chalk painted floor.
This redo looks Fantastic! Love everything you and Kevin did!
You are supposed to apply one once the stencil is all the way complete!
Thank you!!!
I’m so impressed that you use your skills and sponsored posts to bless others with. This looks great, and I wish they would keep the stenciled floors – there is always something to spend $ on with home-ownership, and these floors are really CUTE. Wish that we were your neighbors too!