I am so, so, soooooo very excited to show you this bedroom makeover! This room belongs to neighbors and good friends of mine. We took their room from being dark and cramped to light and bright! Best part- we kept ALL the same furniture! We painted the dark wood bedroom set all white, did a little DIY to the headboard and wallpapered the main focal point wall with temporary wallpaper. It did NOT happen overnight. It took many hours to paint the furniture and I will share the details. And many hours on my part installing the wallpaper. But, the wallpaper really makes the room feel complete and more styled than anything else! Ok are you ready to see it??? (PS- you can shop everything at the end of this post and I also mention about what we spent).
Thank you Devine Wallpaper for making this makeover possible and sponsoring this post
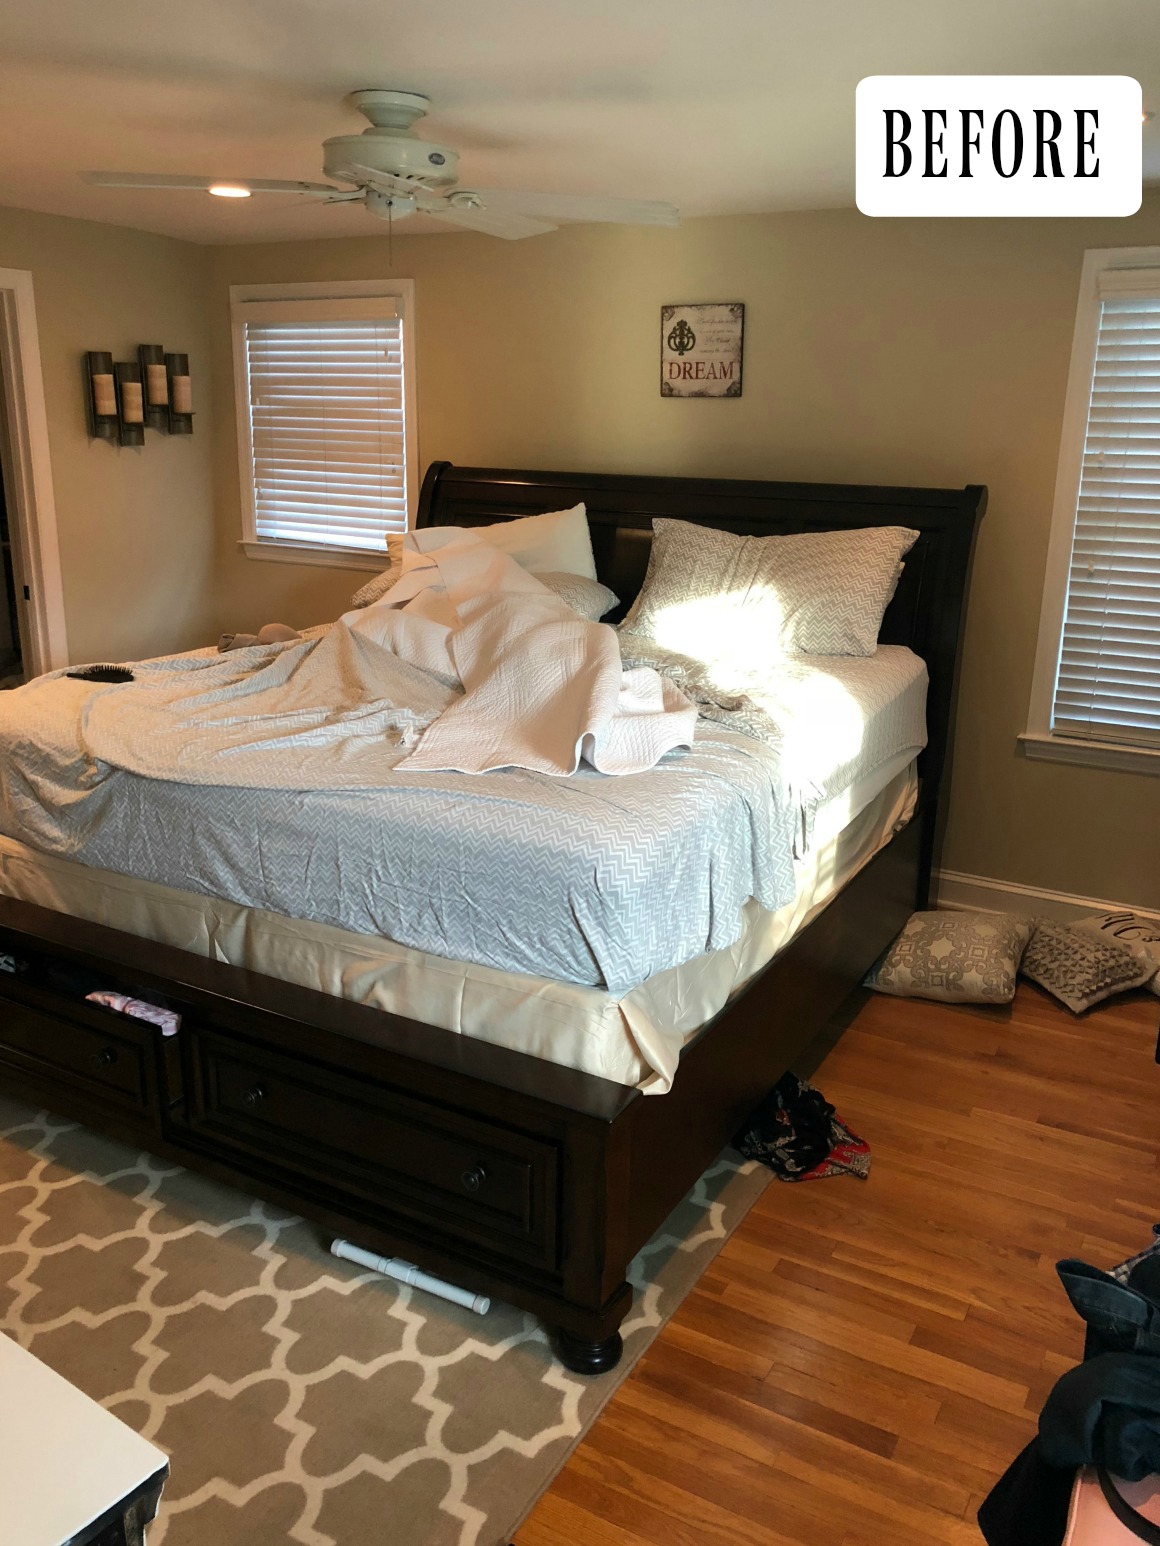
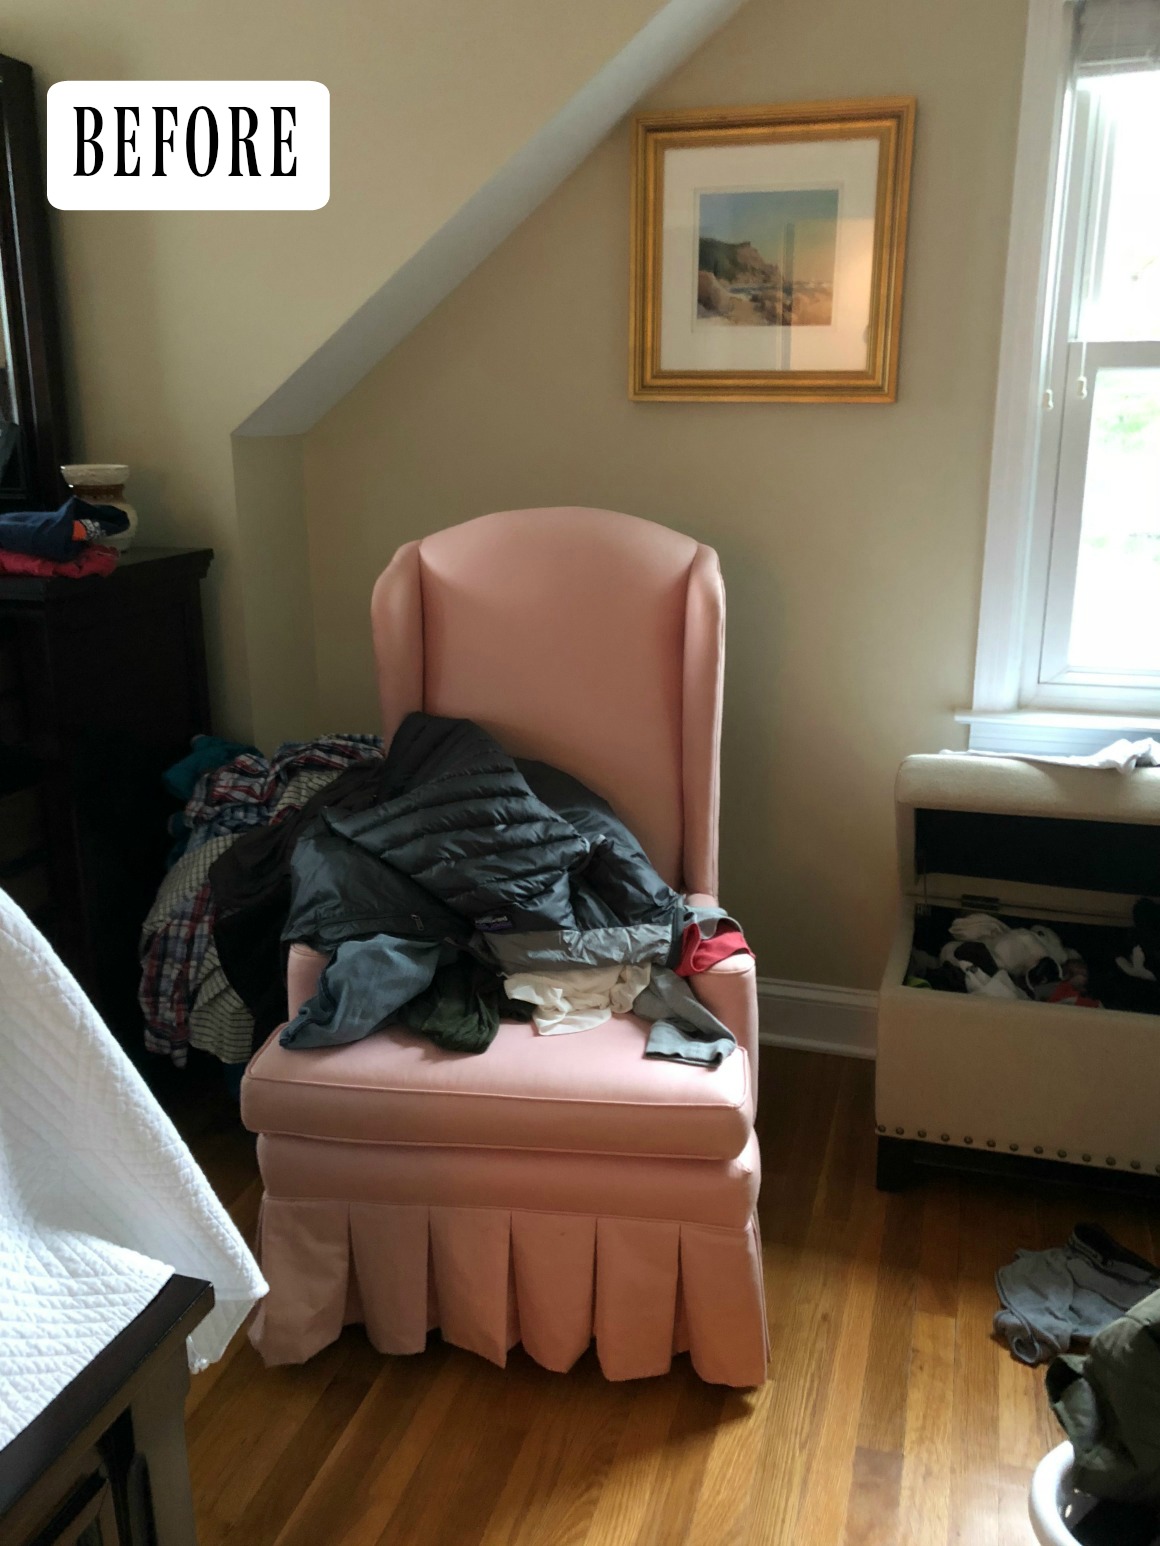
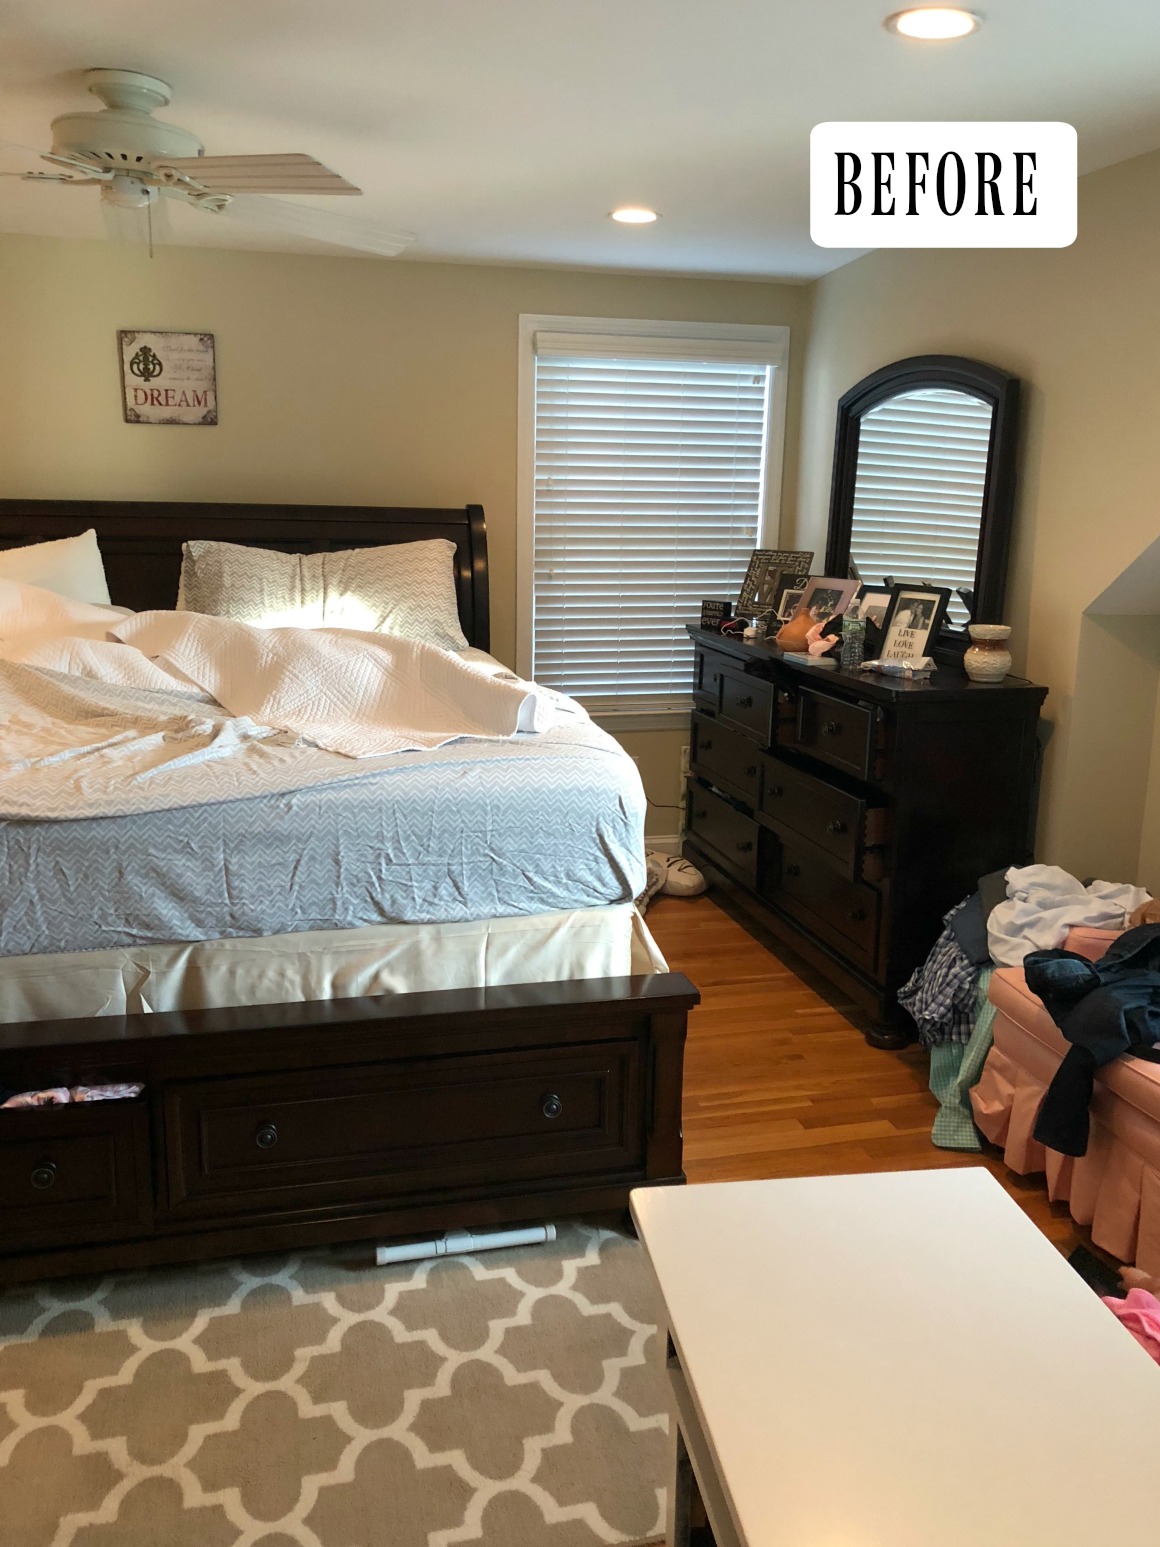
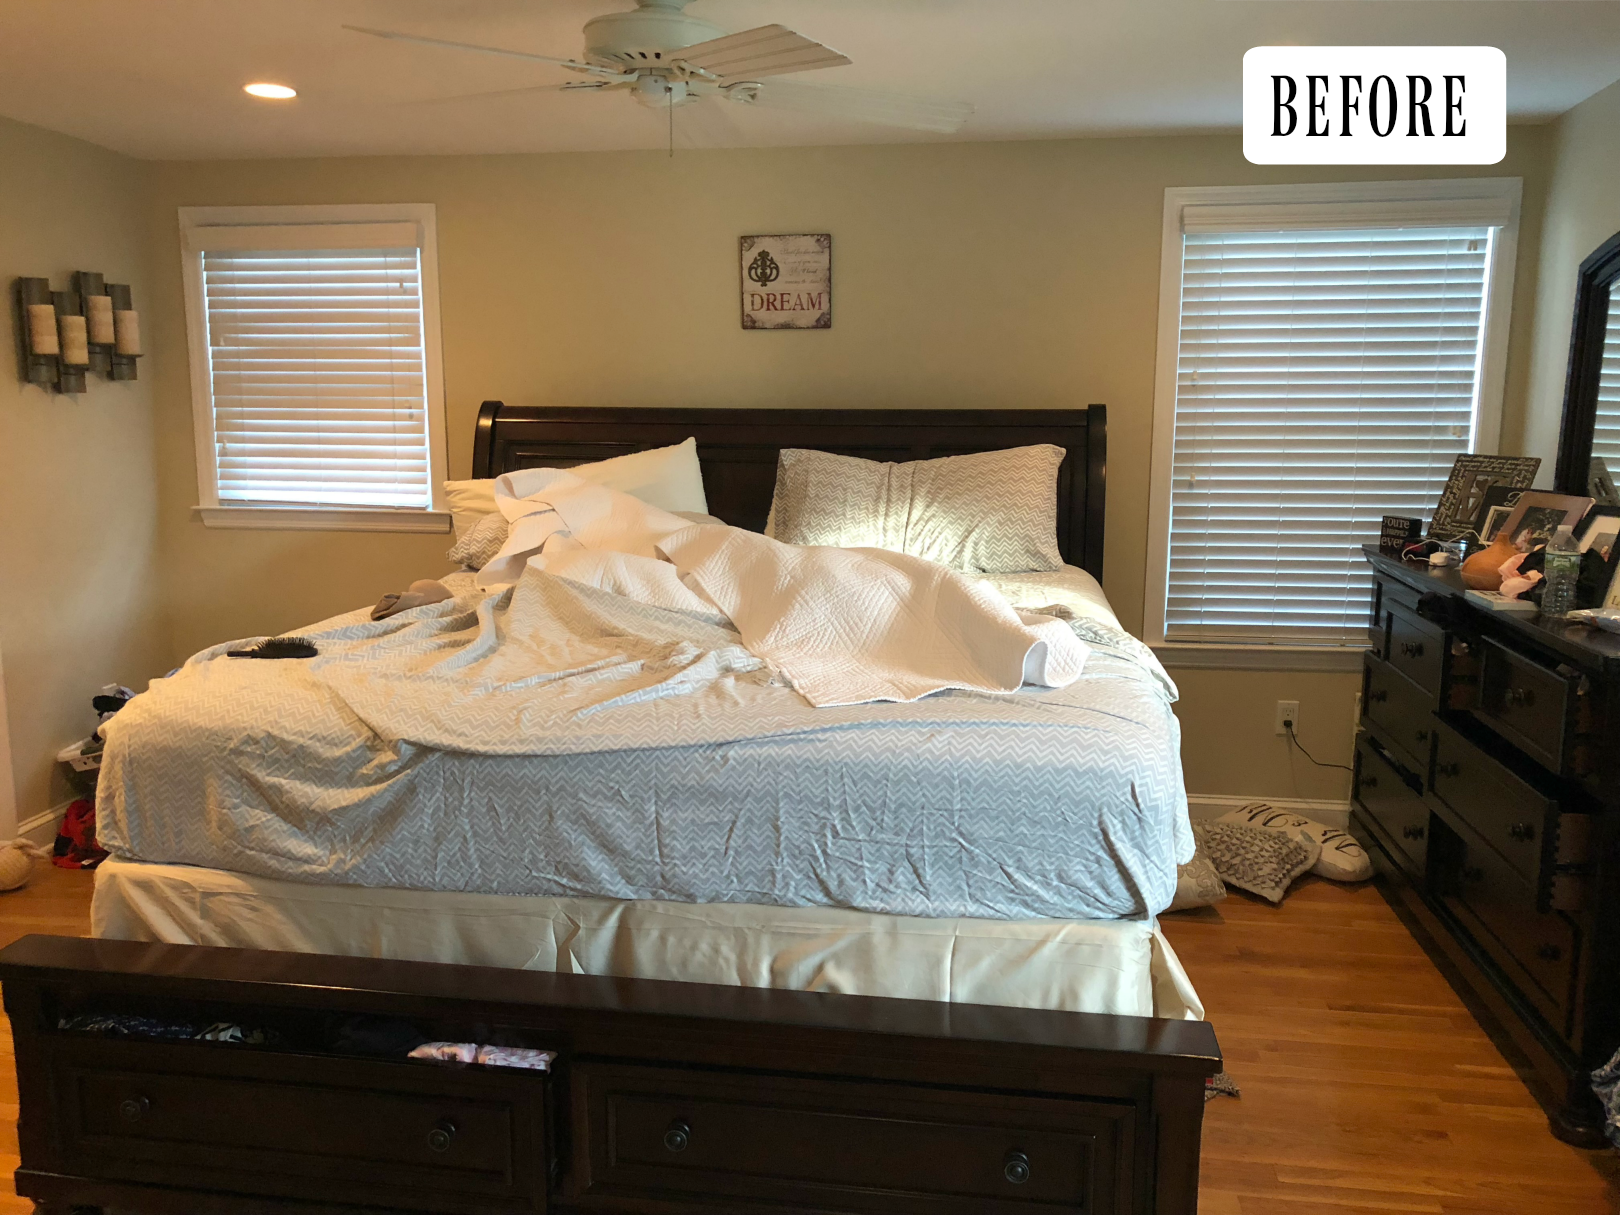
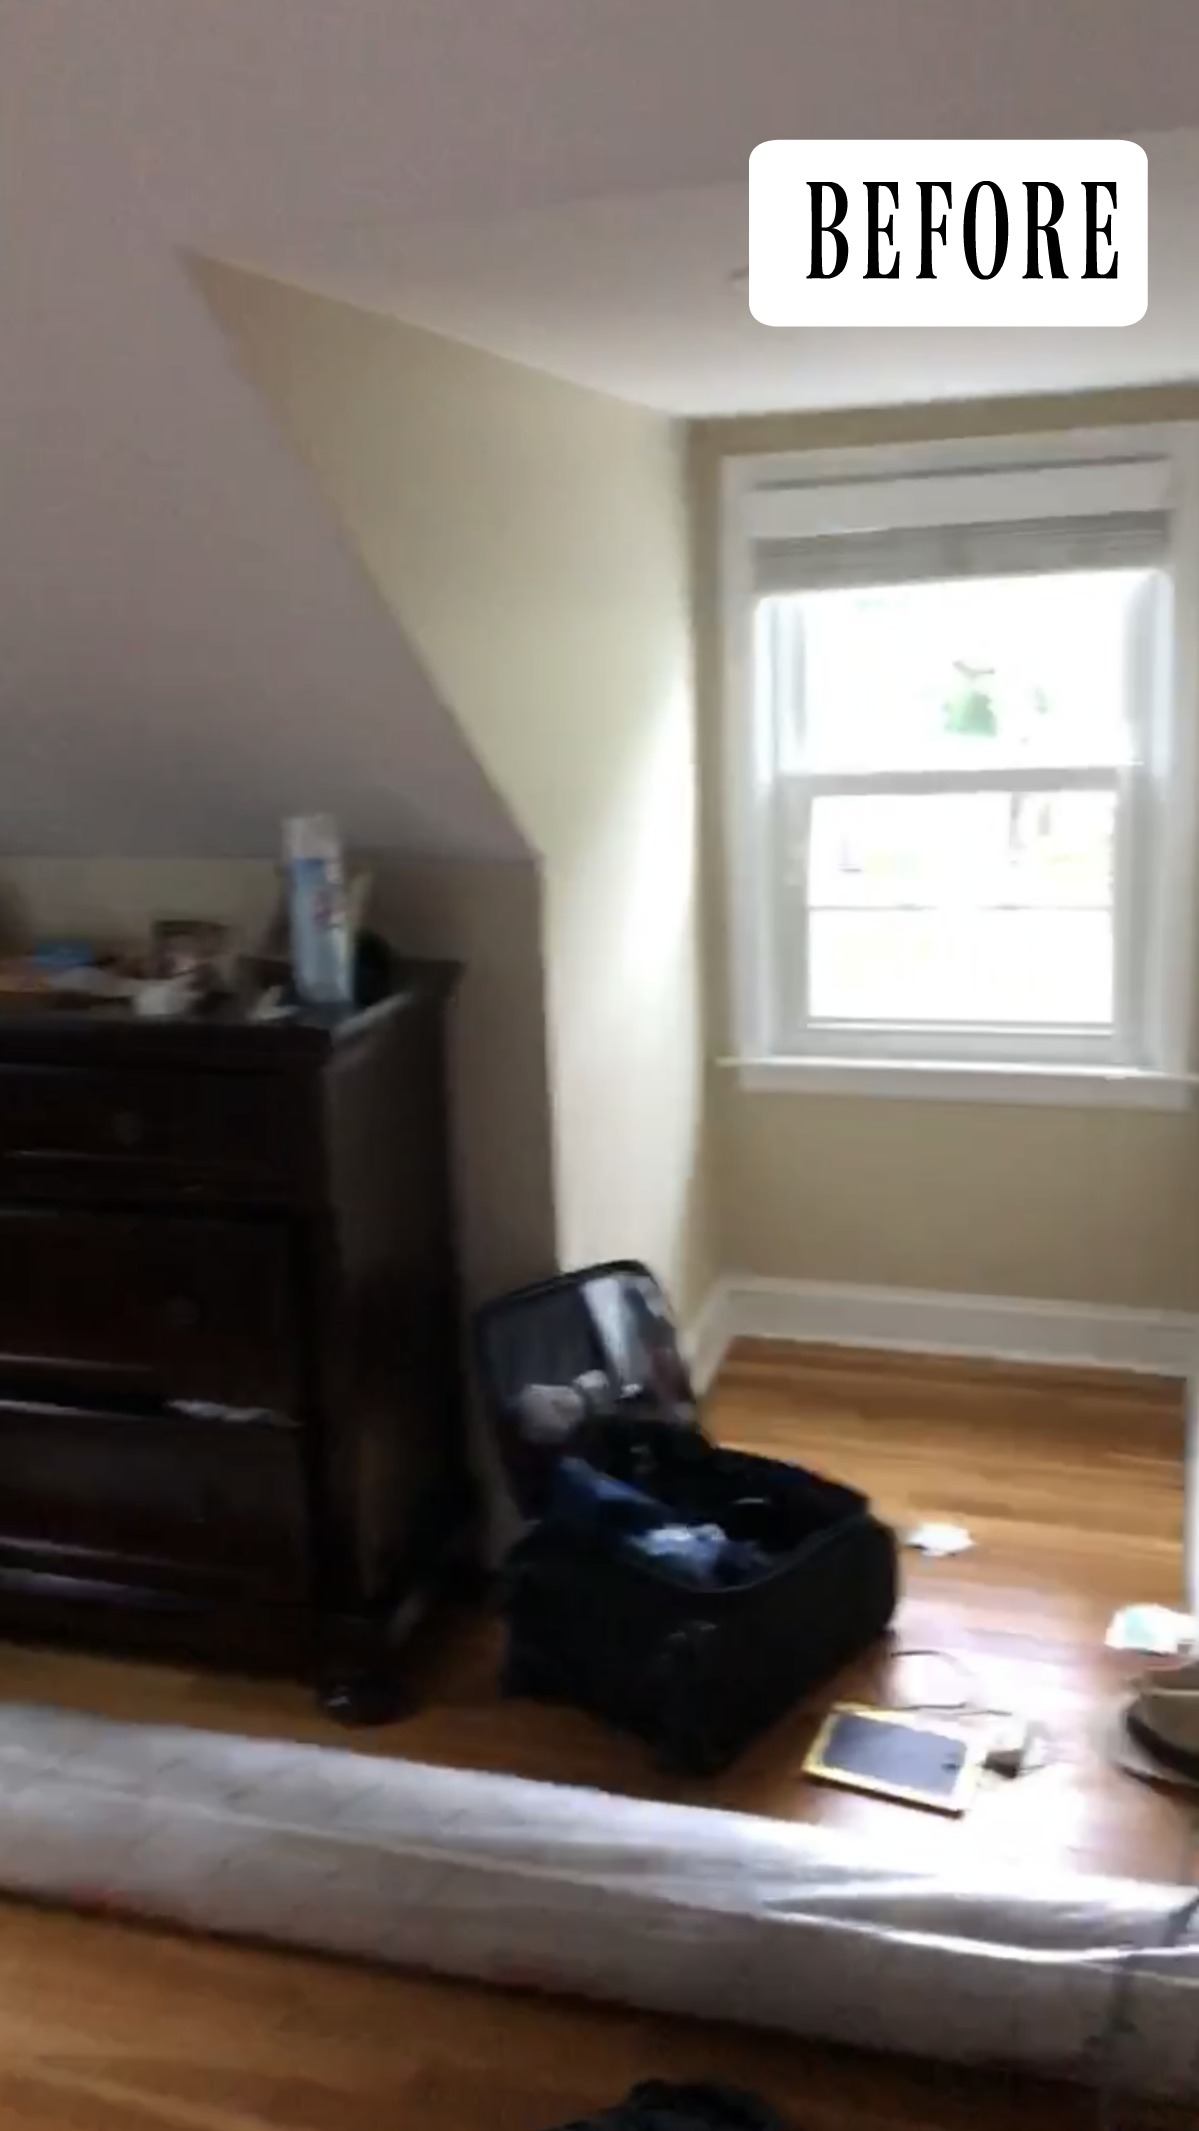
Dark Master Bedroom BEFORE-
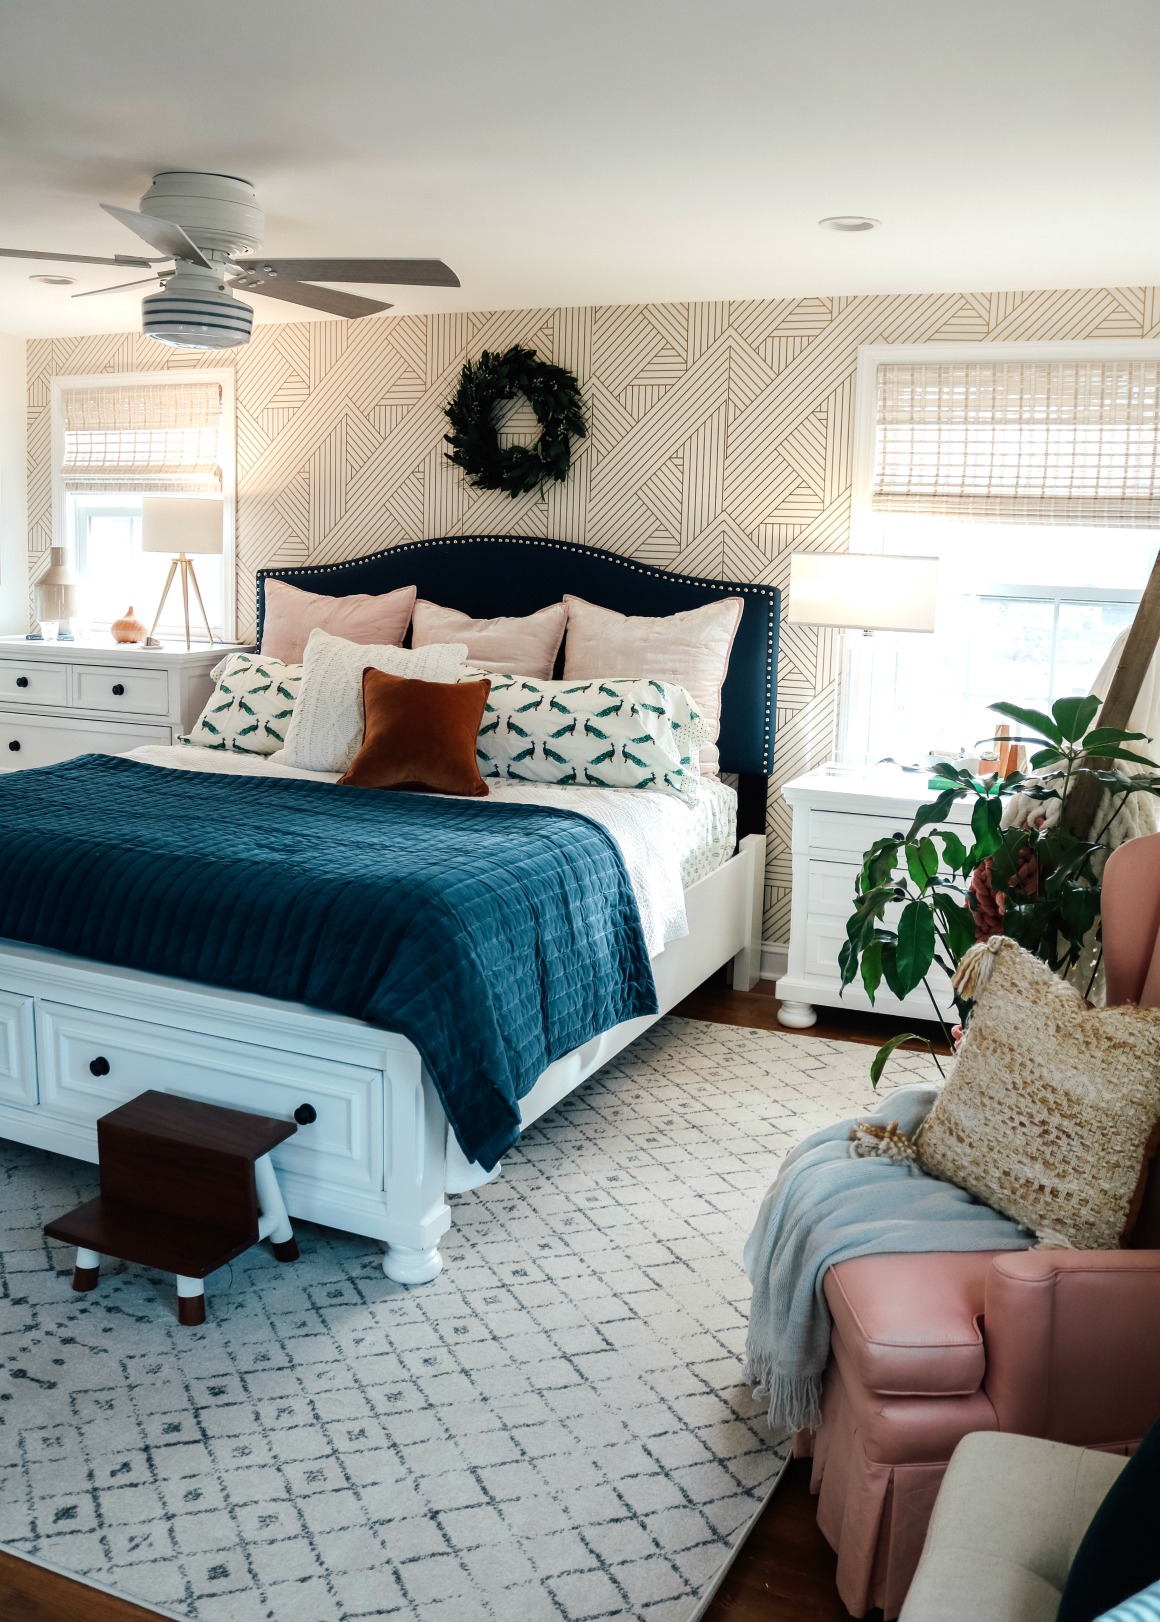
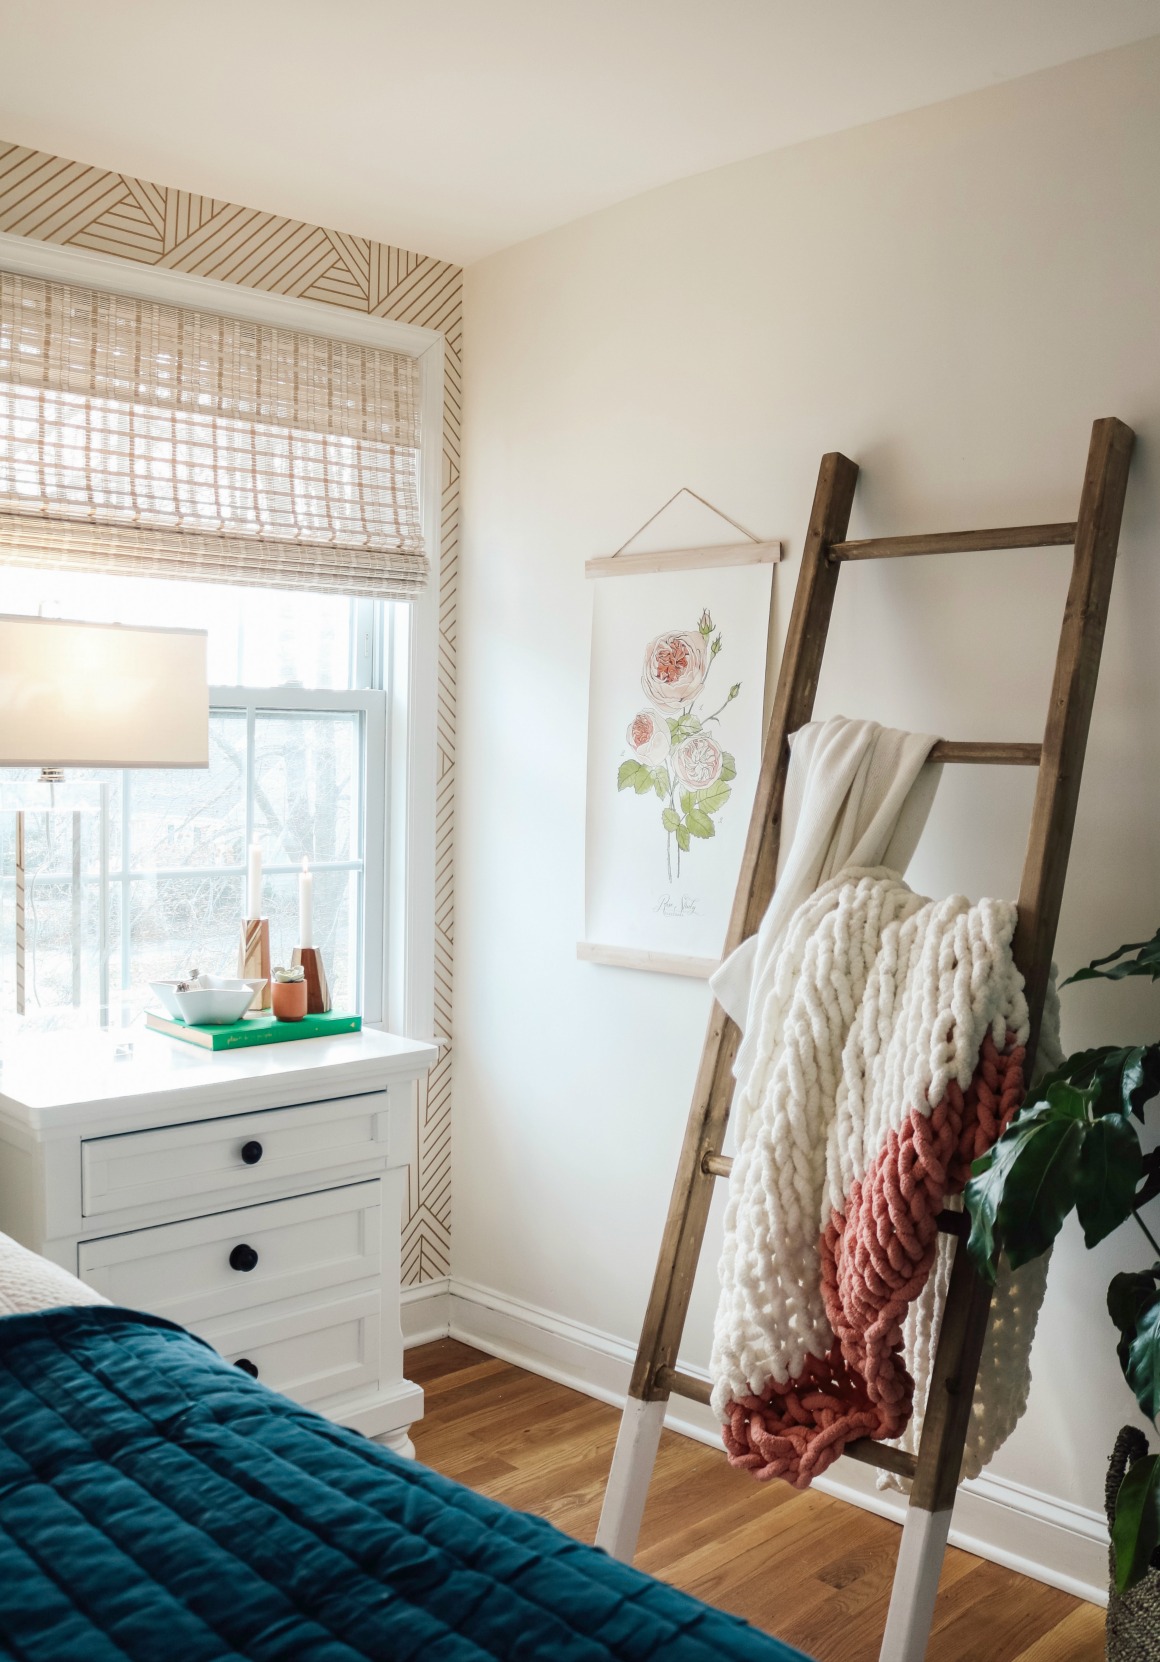
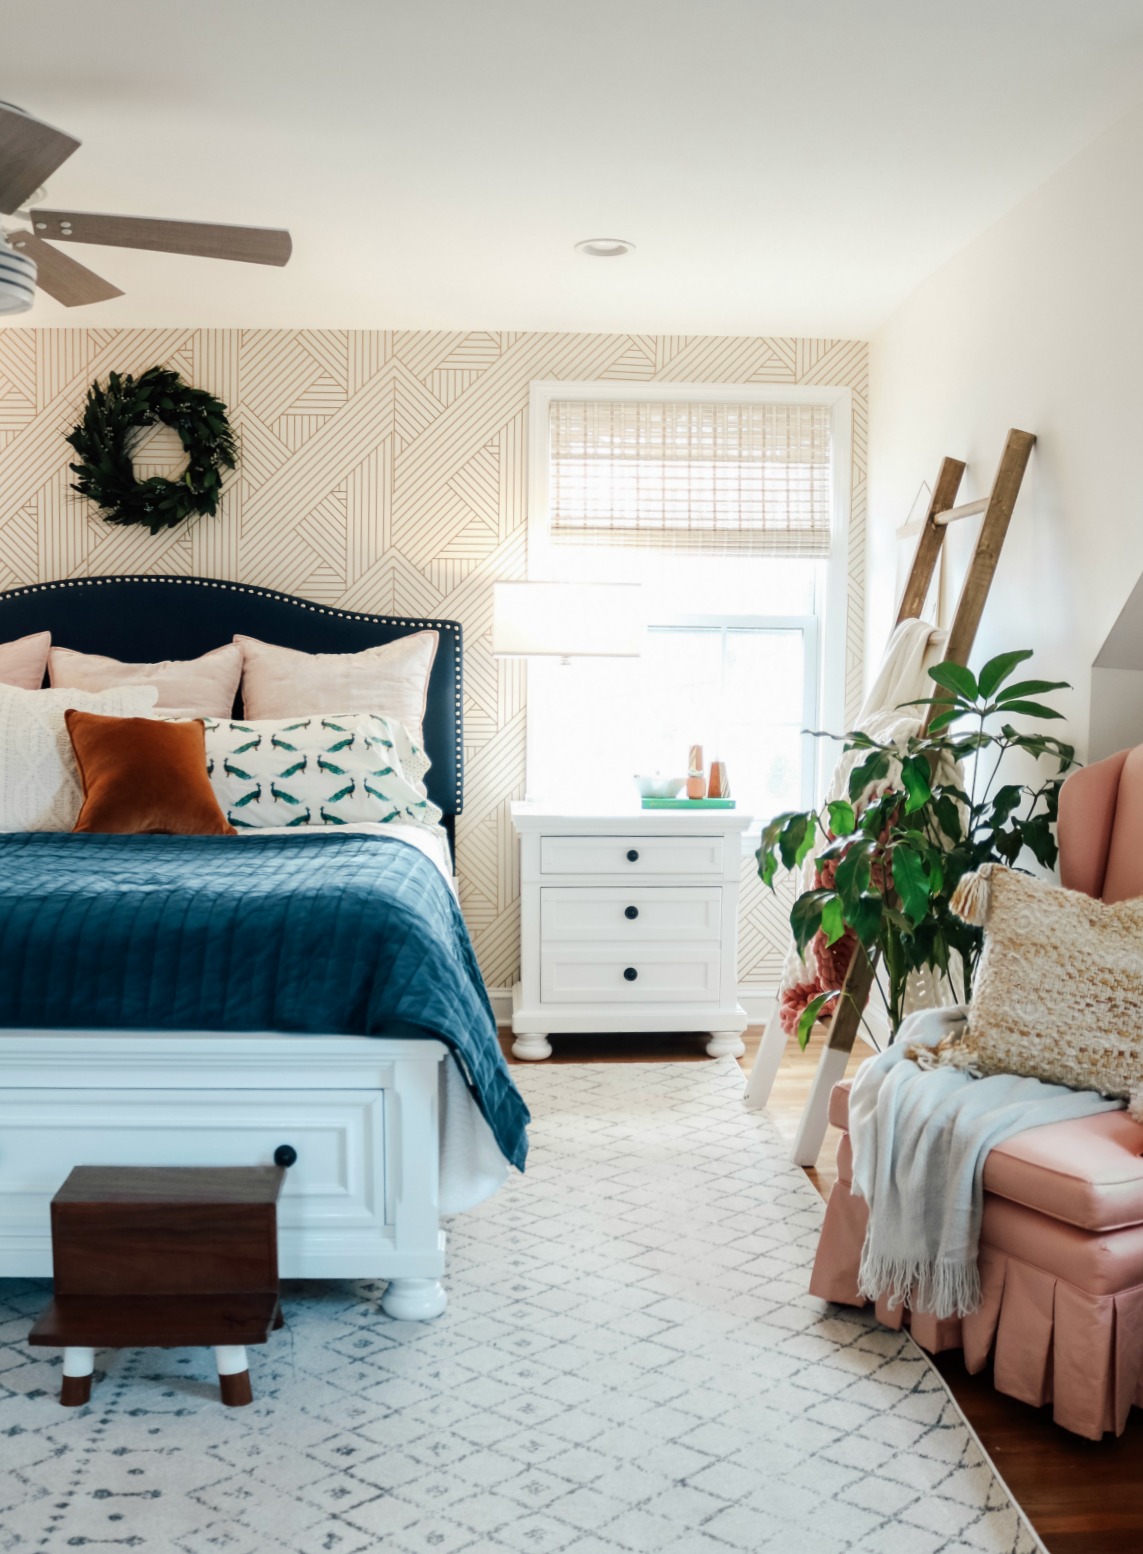
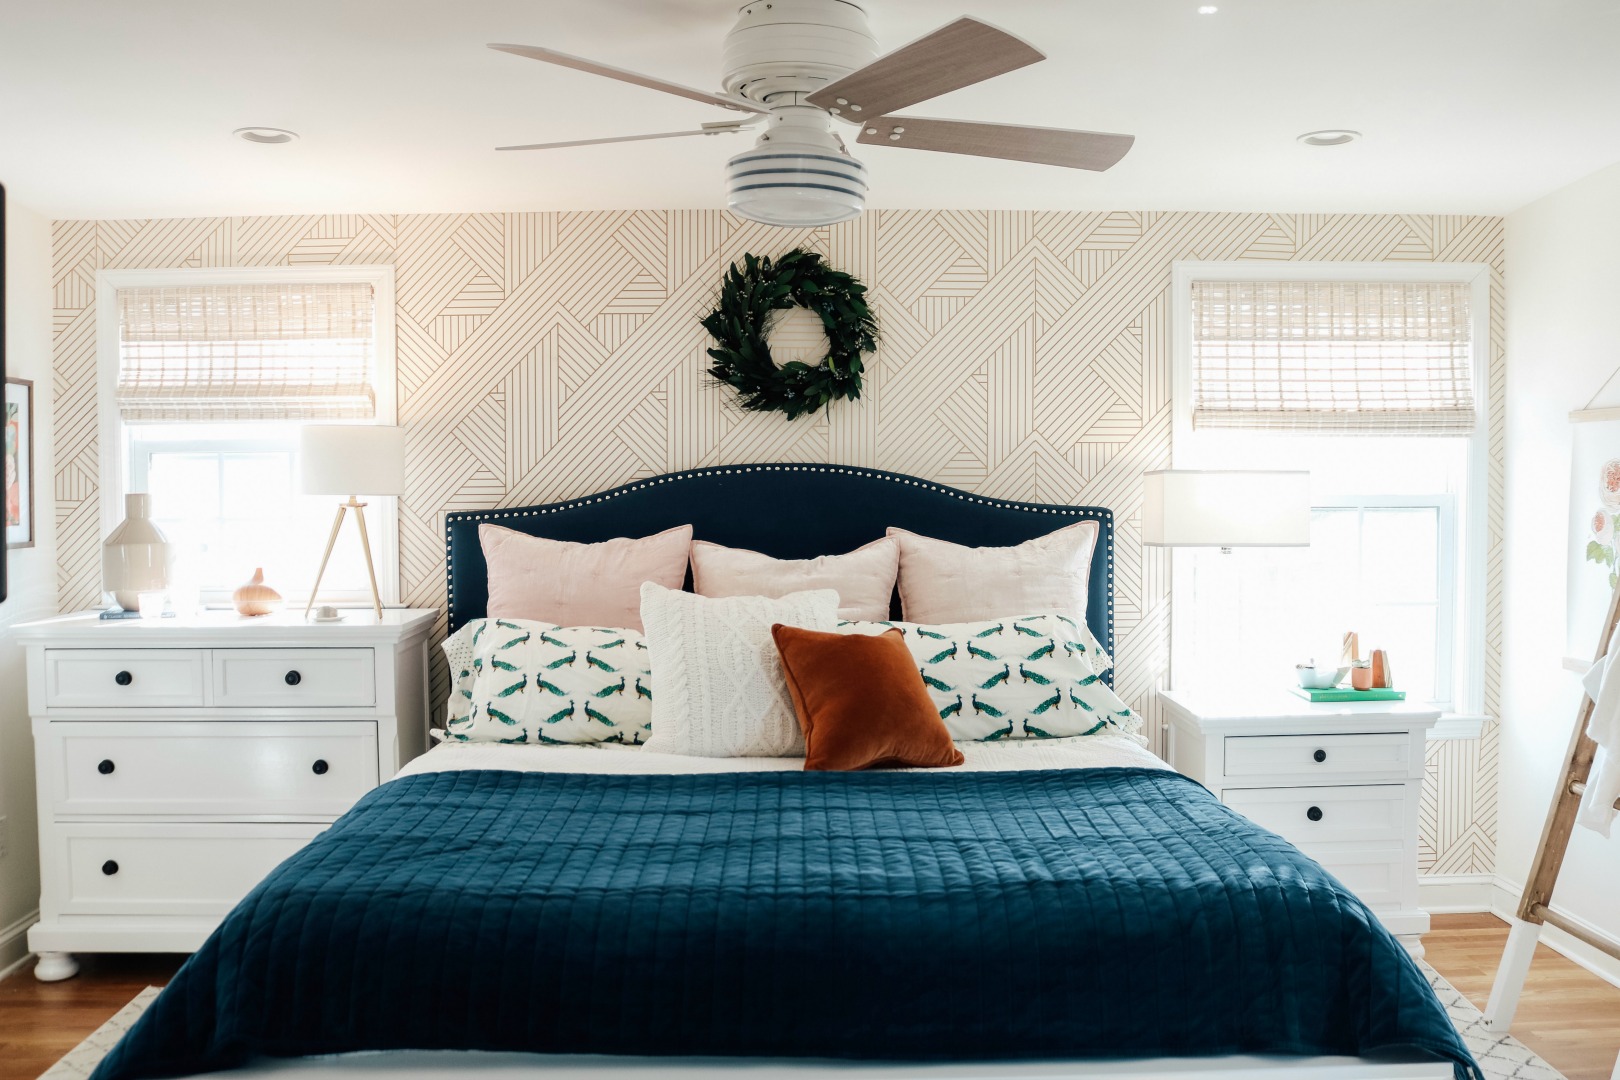
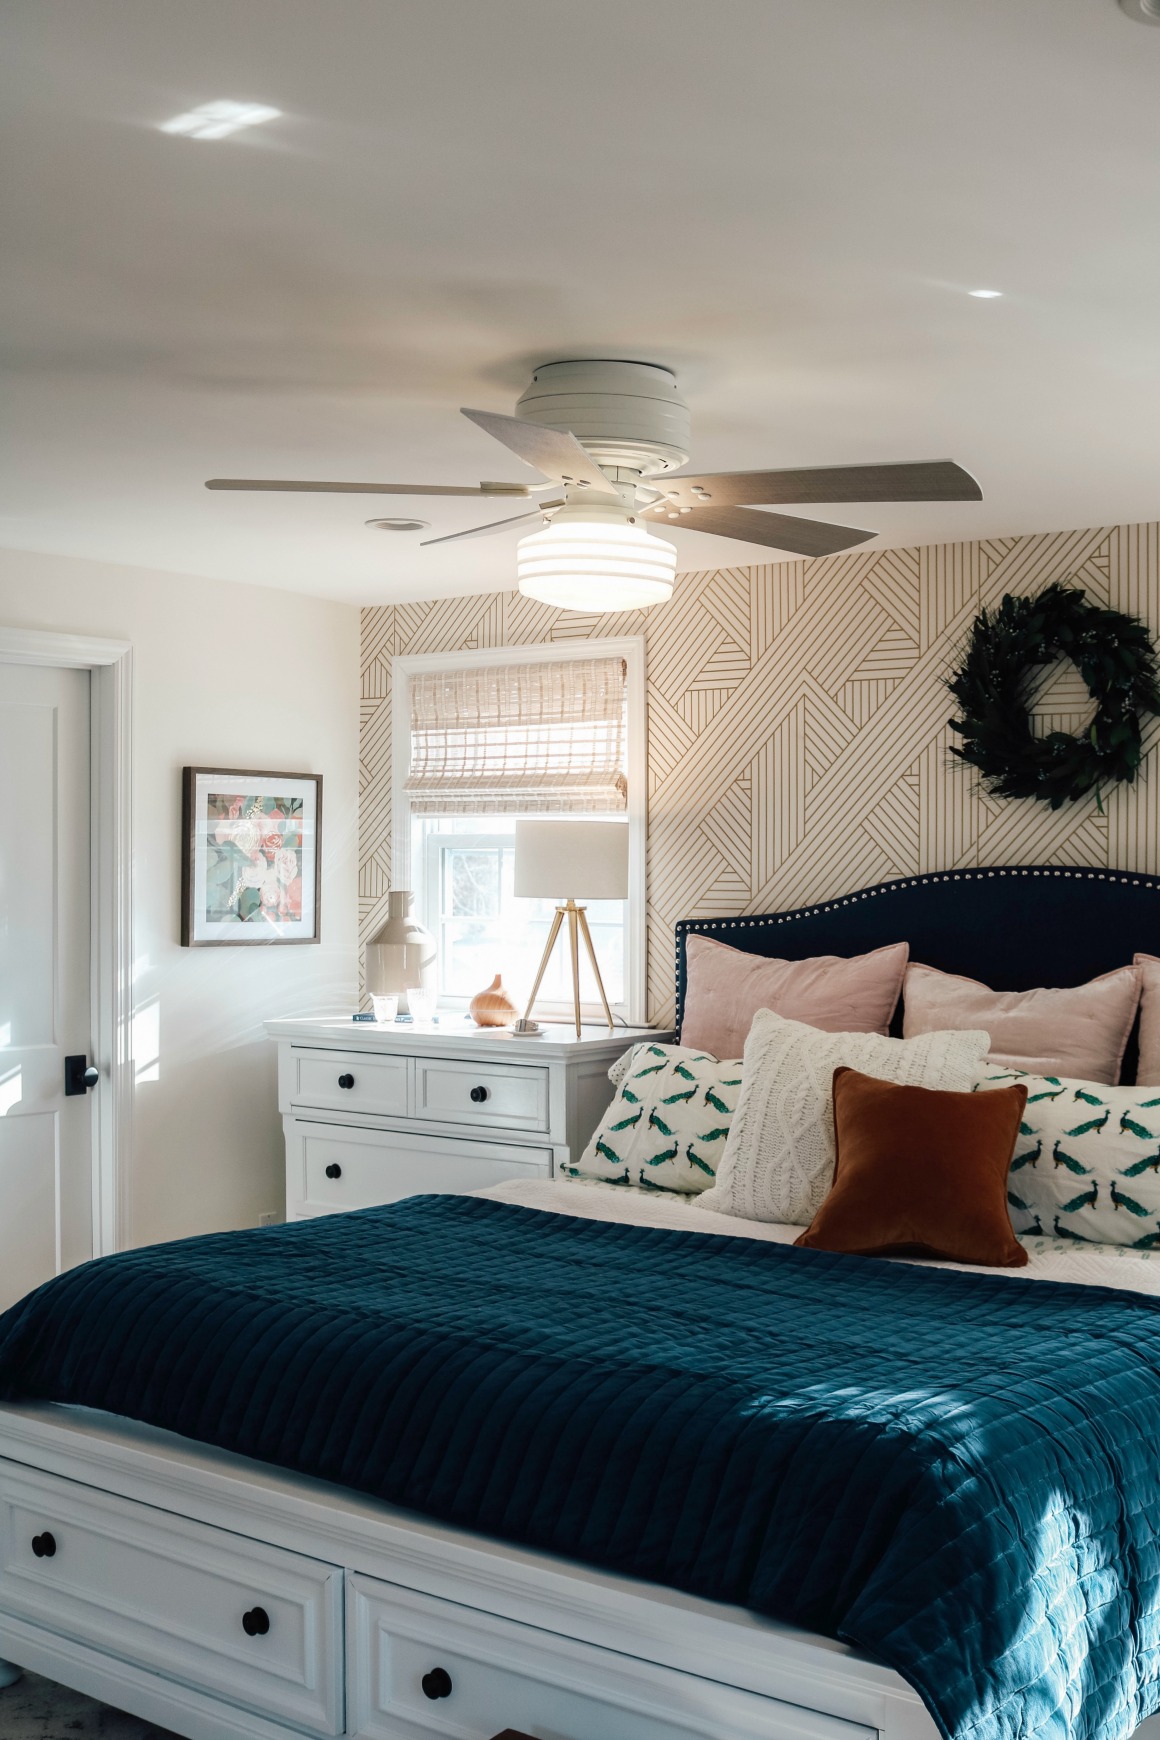
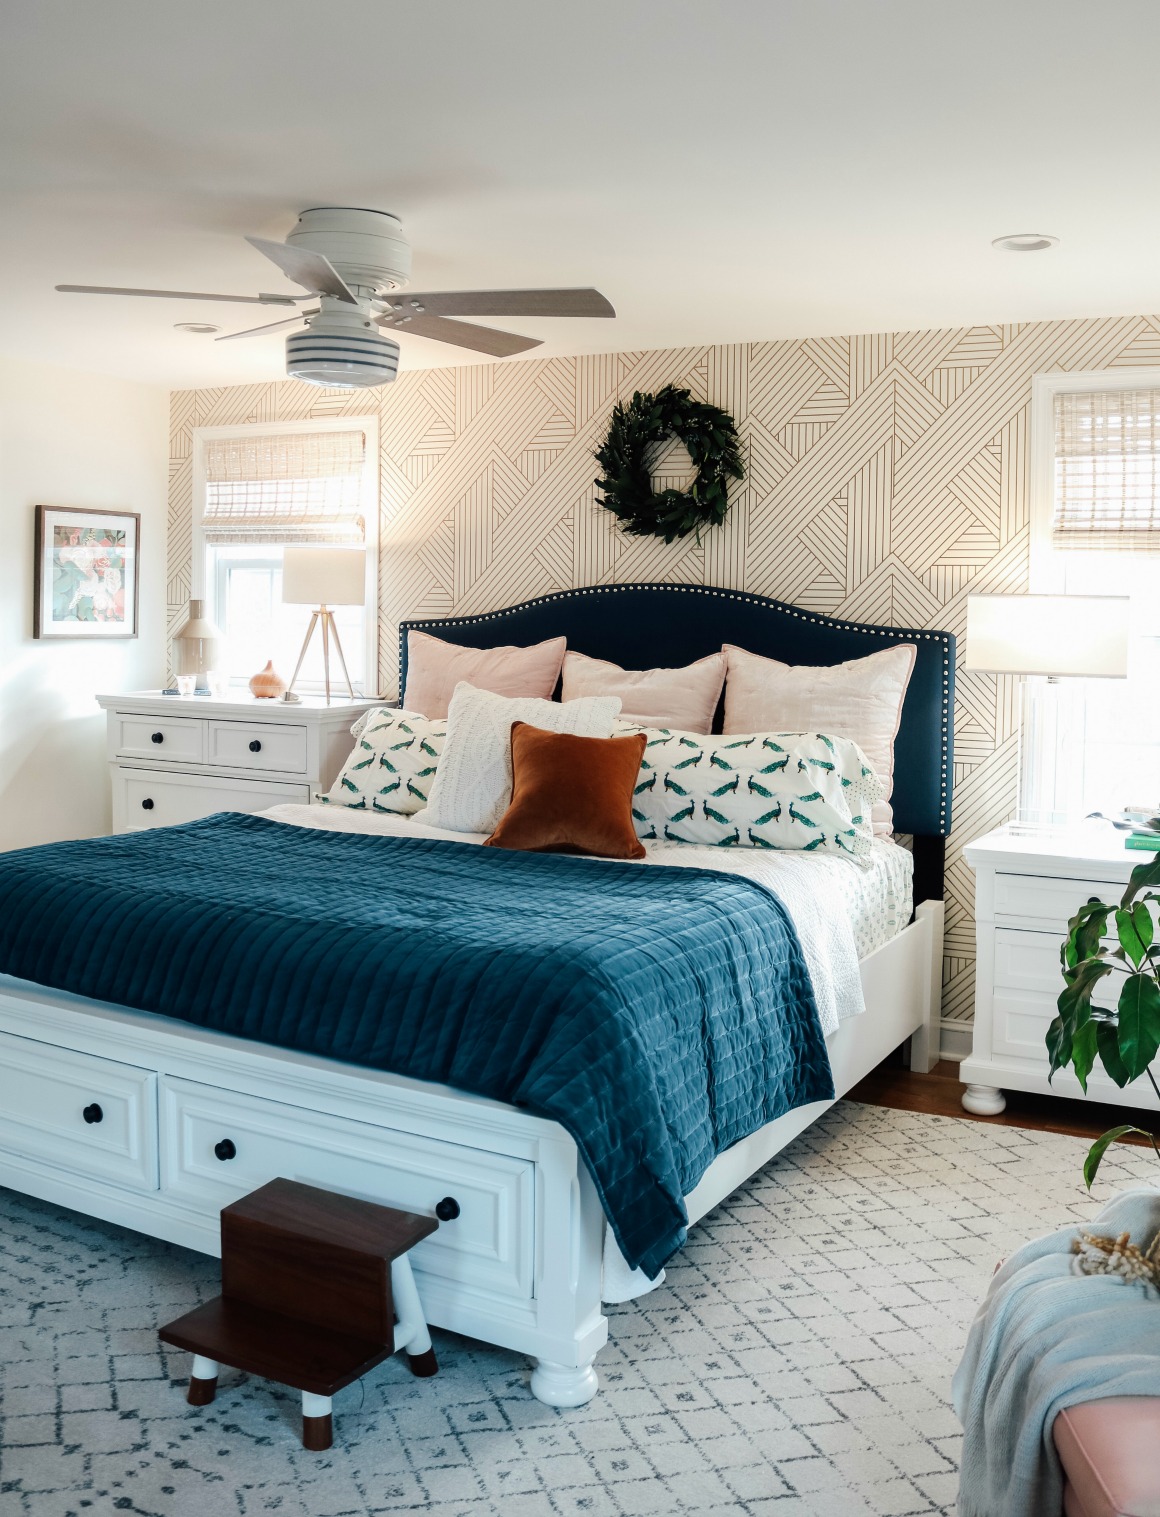
Light Master Bedroom AFTER-
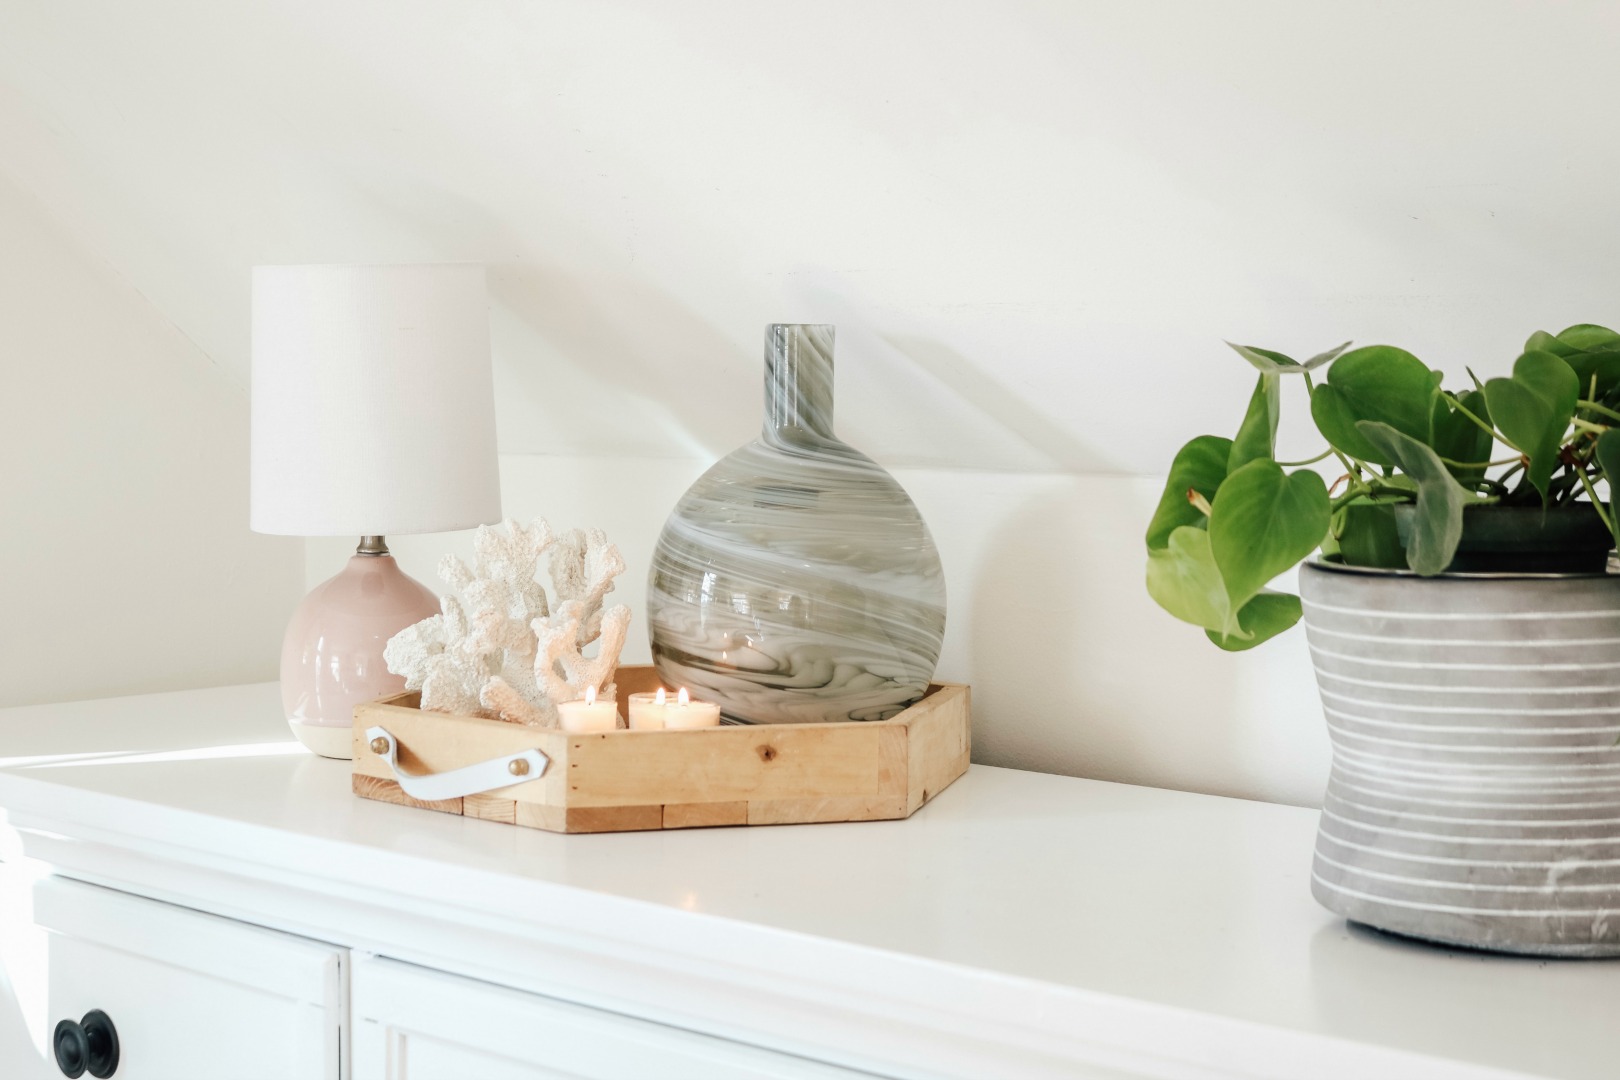
Ok there is a lot to take in! THIS Ribbon Wallpaper from Devine Wallpaper turned out AMAZING! I love that this style can work with a modern style and it also feels a little coastal like a basket weave. The first thing I did was do a design board. You can just do this on a blank word document. It is so important to look at all the pieces together BEFORE you buy anything. (I wrote a blog post on creating design boards HERE).
I love this wallpaper is very affordable. I mention below how to calculate how much you need. A roll is about $30 and we used about 10-12 rolls total for this project. Total spent was around $1800 for this makeover! With the bed being only $150 and painting all the furniture was a huge savings.
Design Board-
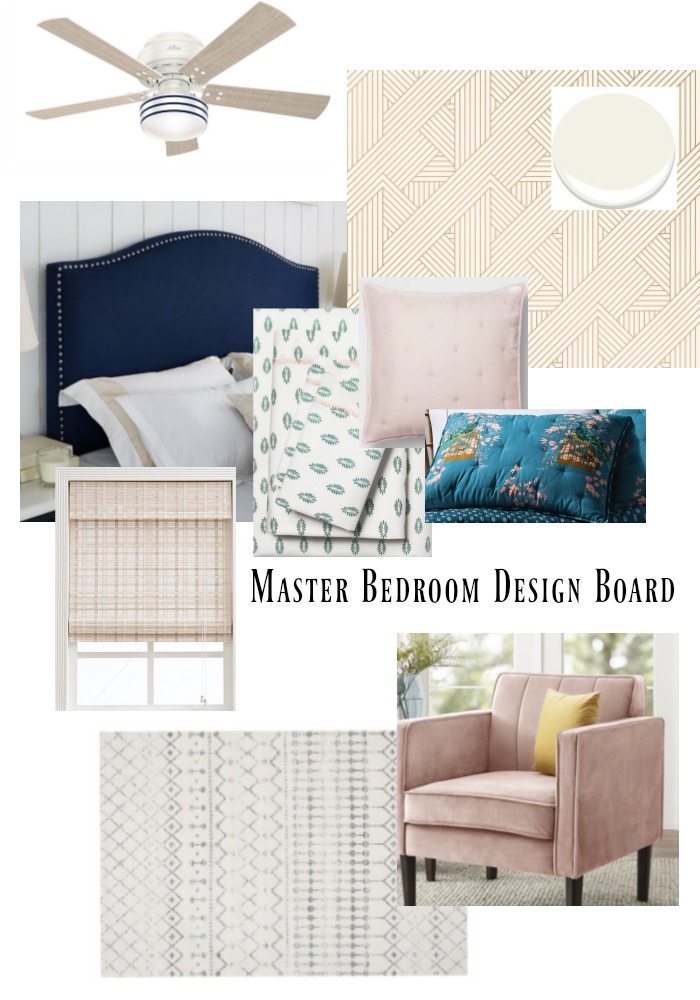
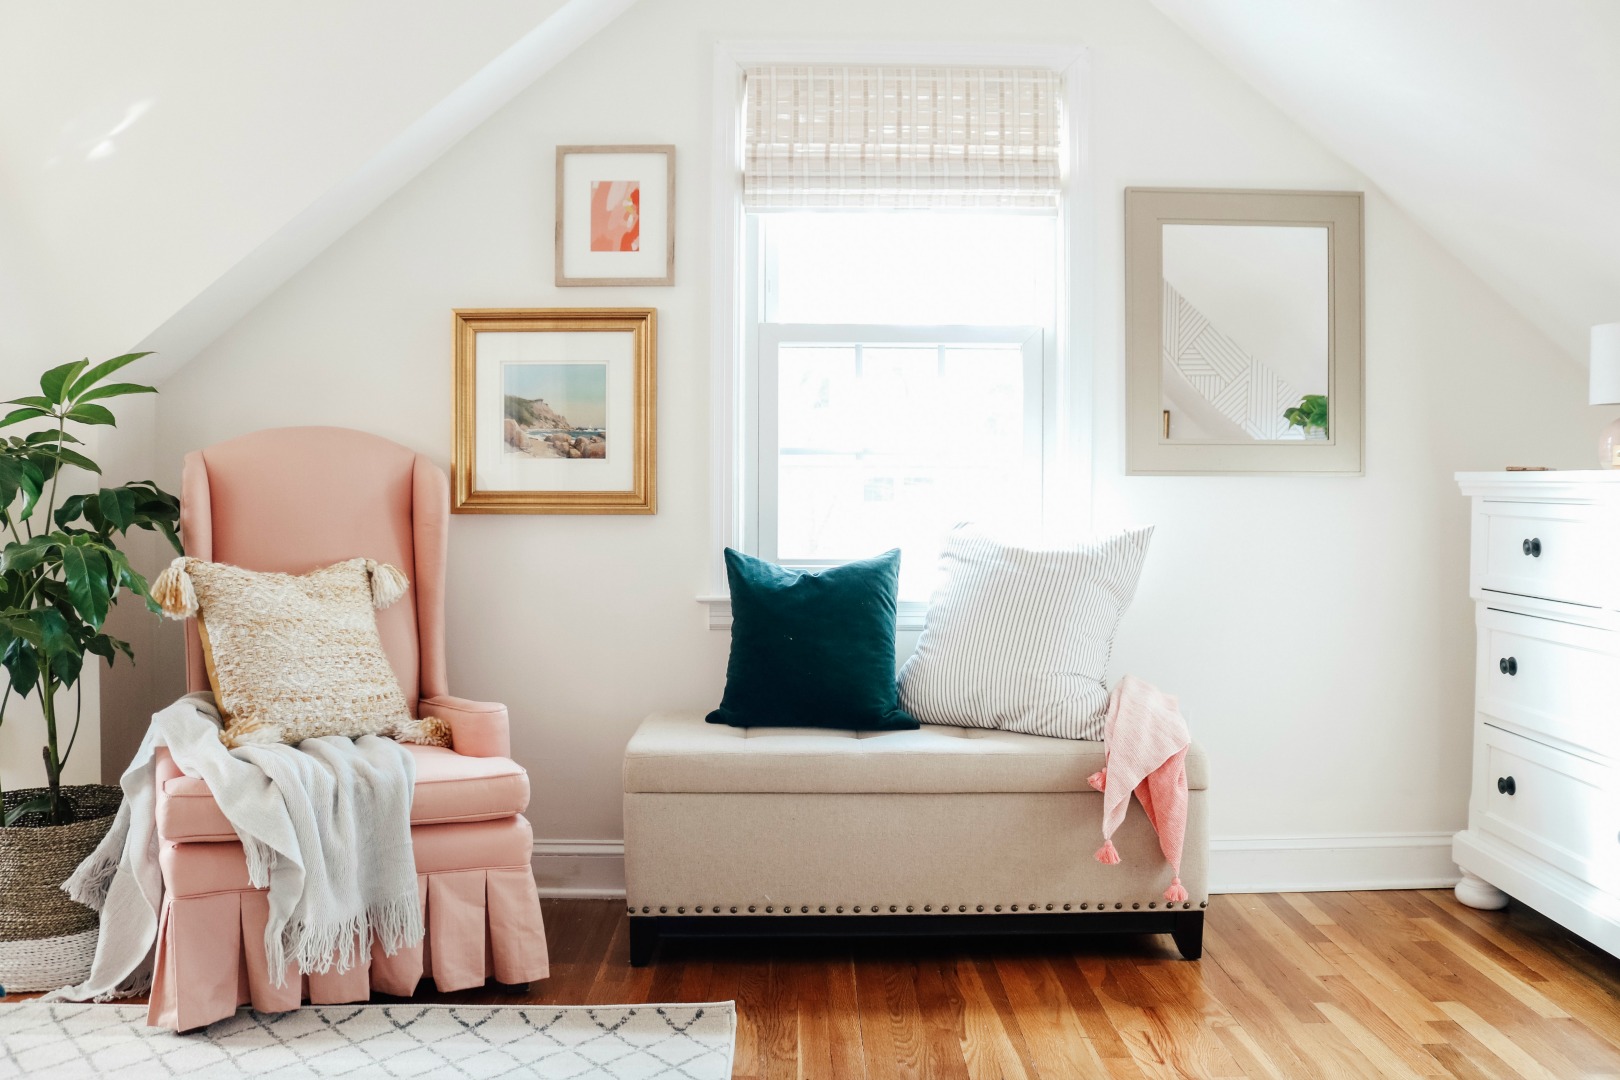
When you do a design board and already have certain pieces that you want to work with, just find a similar image online to use. This will help you visualize it. For instance my friends had a pink chair that was their grandmothers. I loved the idea of not reupholstering it but working with the pop of pink! I made sure to bring back that pink into the bedding.
Dark Bedroom BEFORE-
Paint color- Benjamin Moore Cloud White

My friend did say that she would recommend decluttering before starting a project. They went through and donated a lot of their clothes, after the fact. They had too many that they didn’t wear and it was spilling over everything. Now there is a space for everything. And having a nice room makes you want to keep it clean!
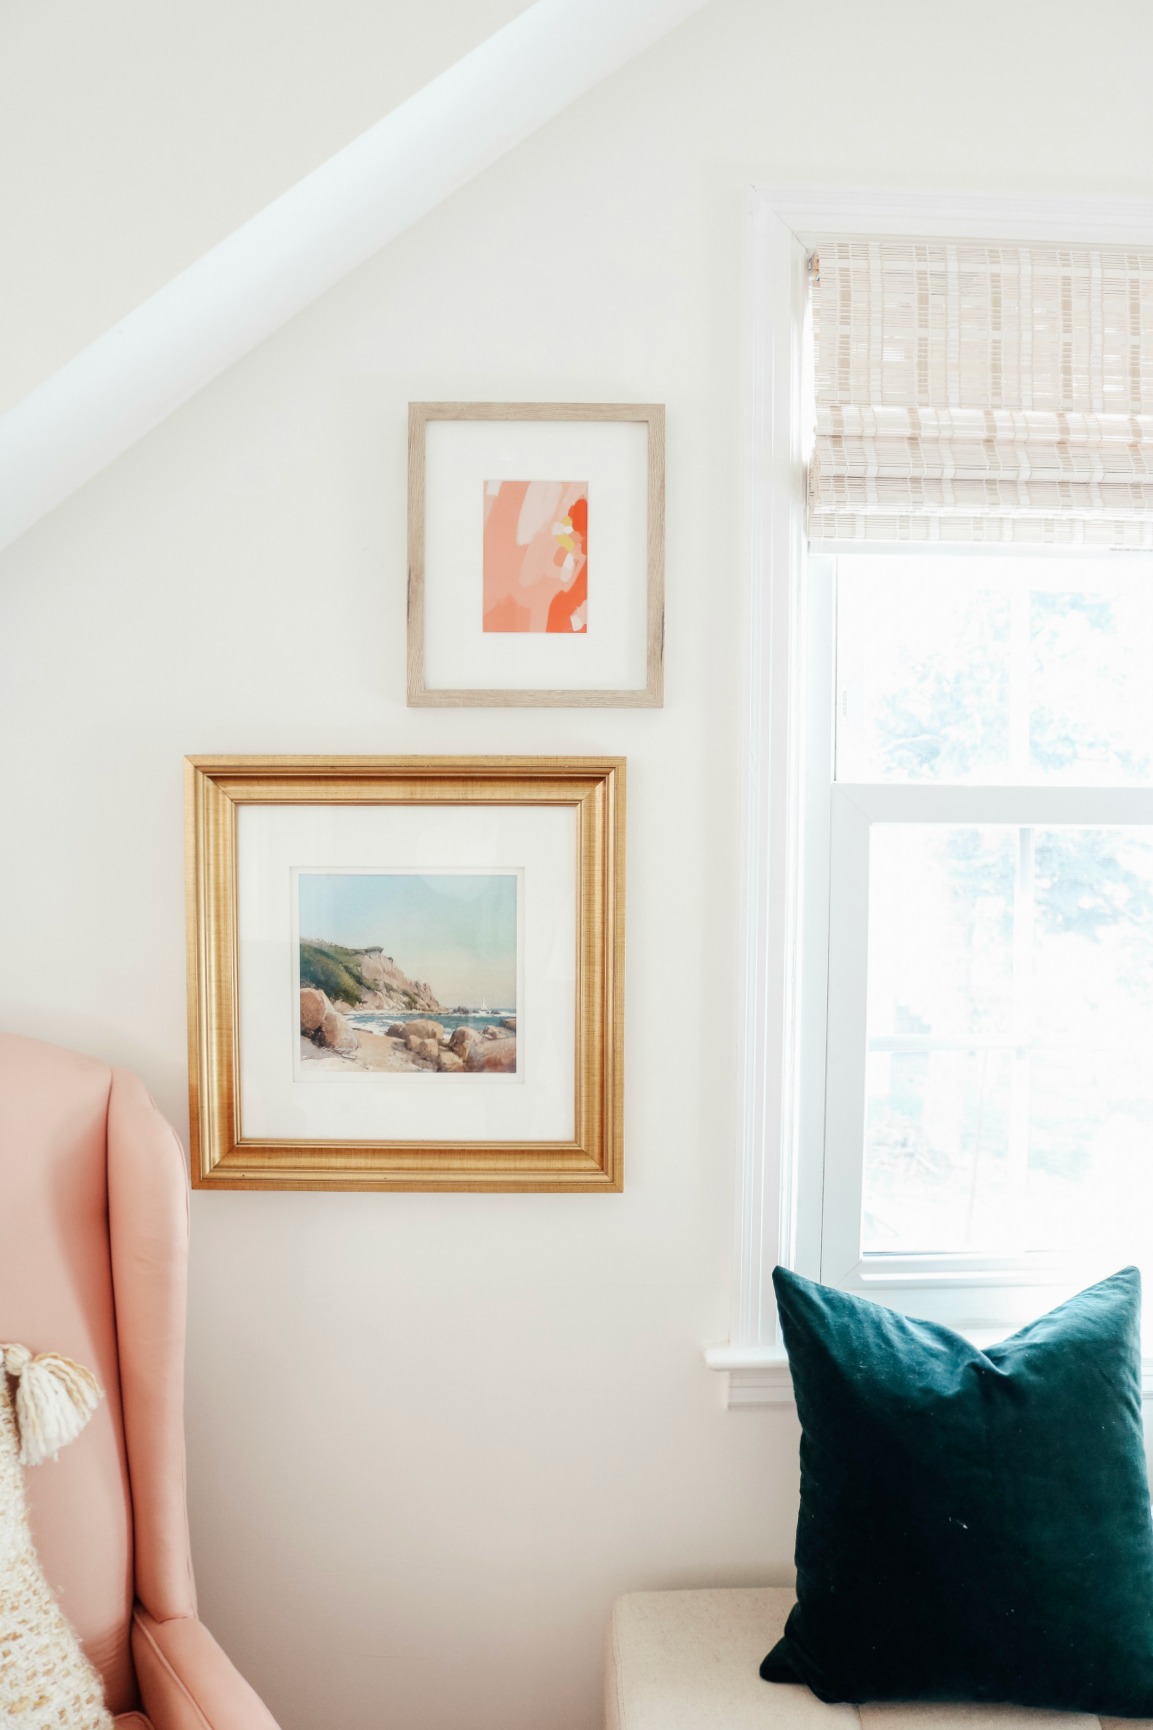
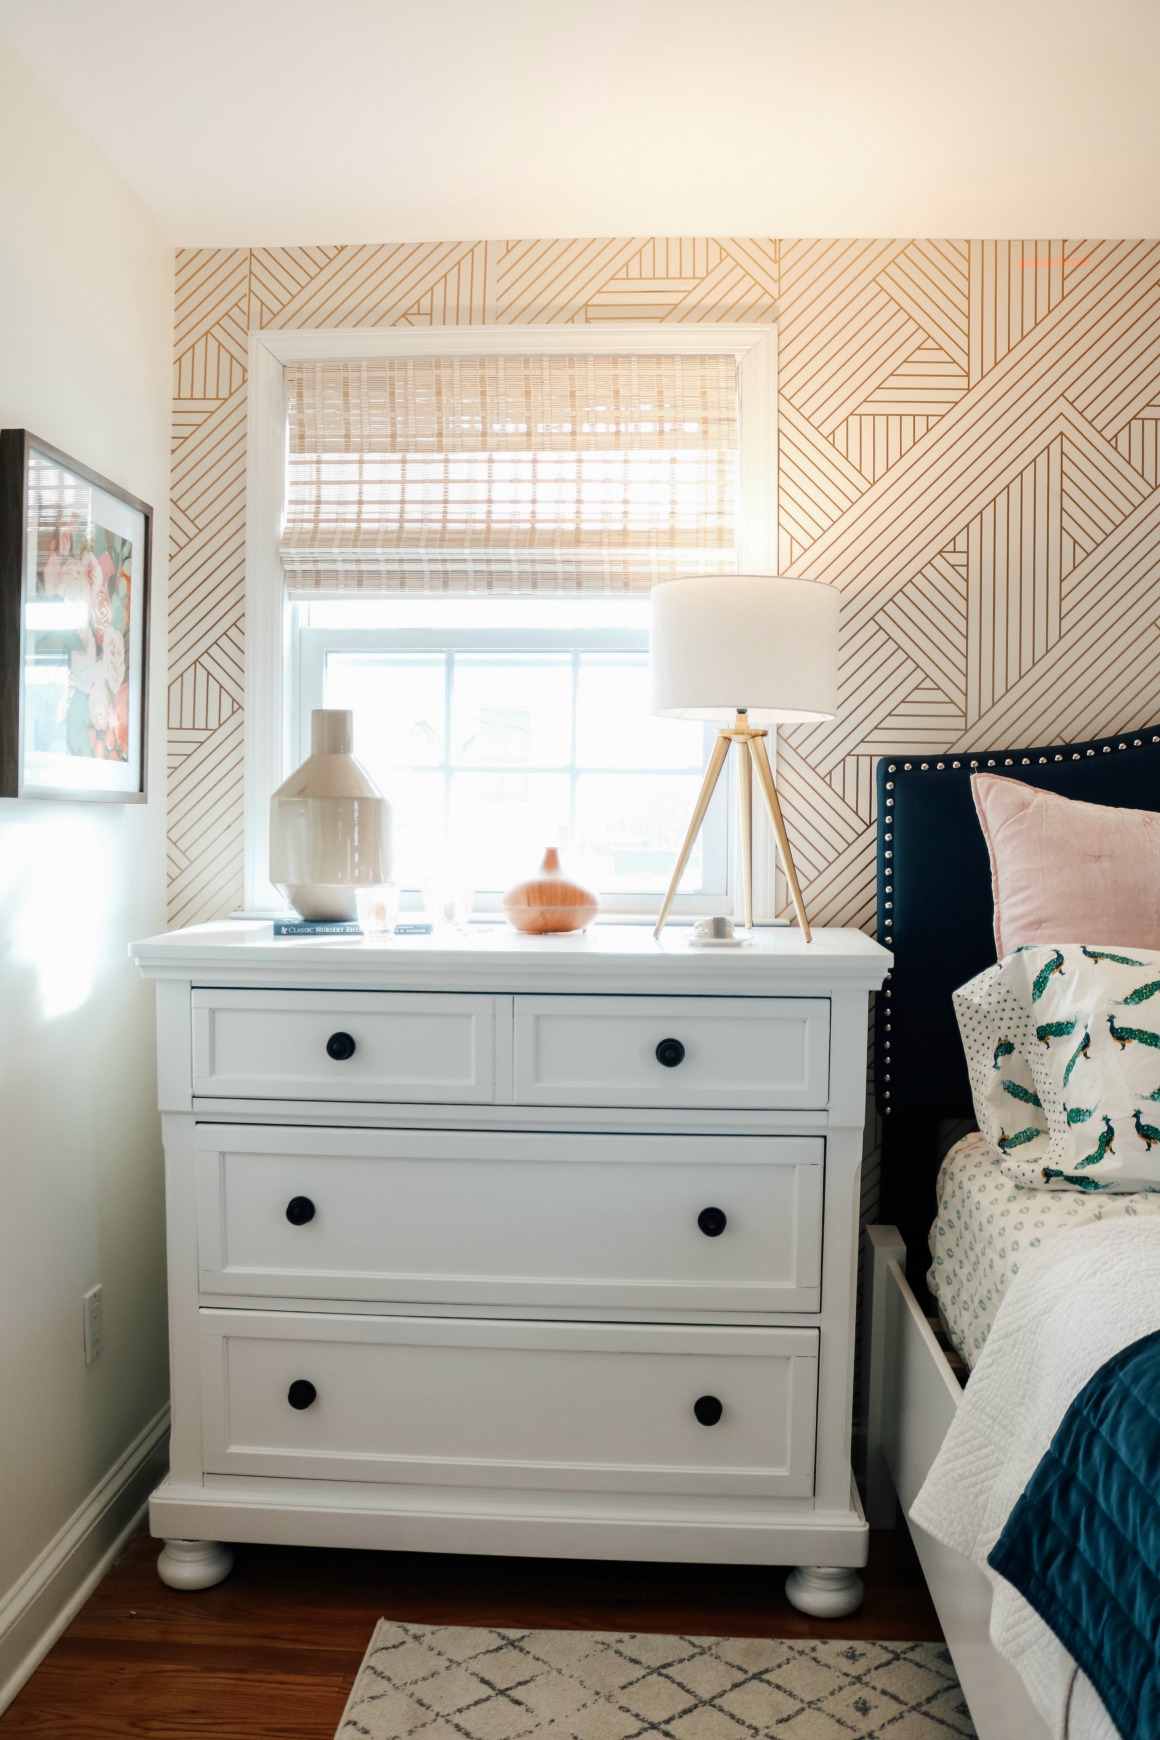
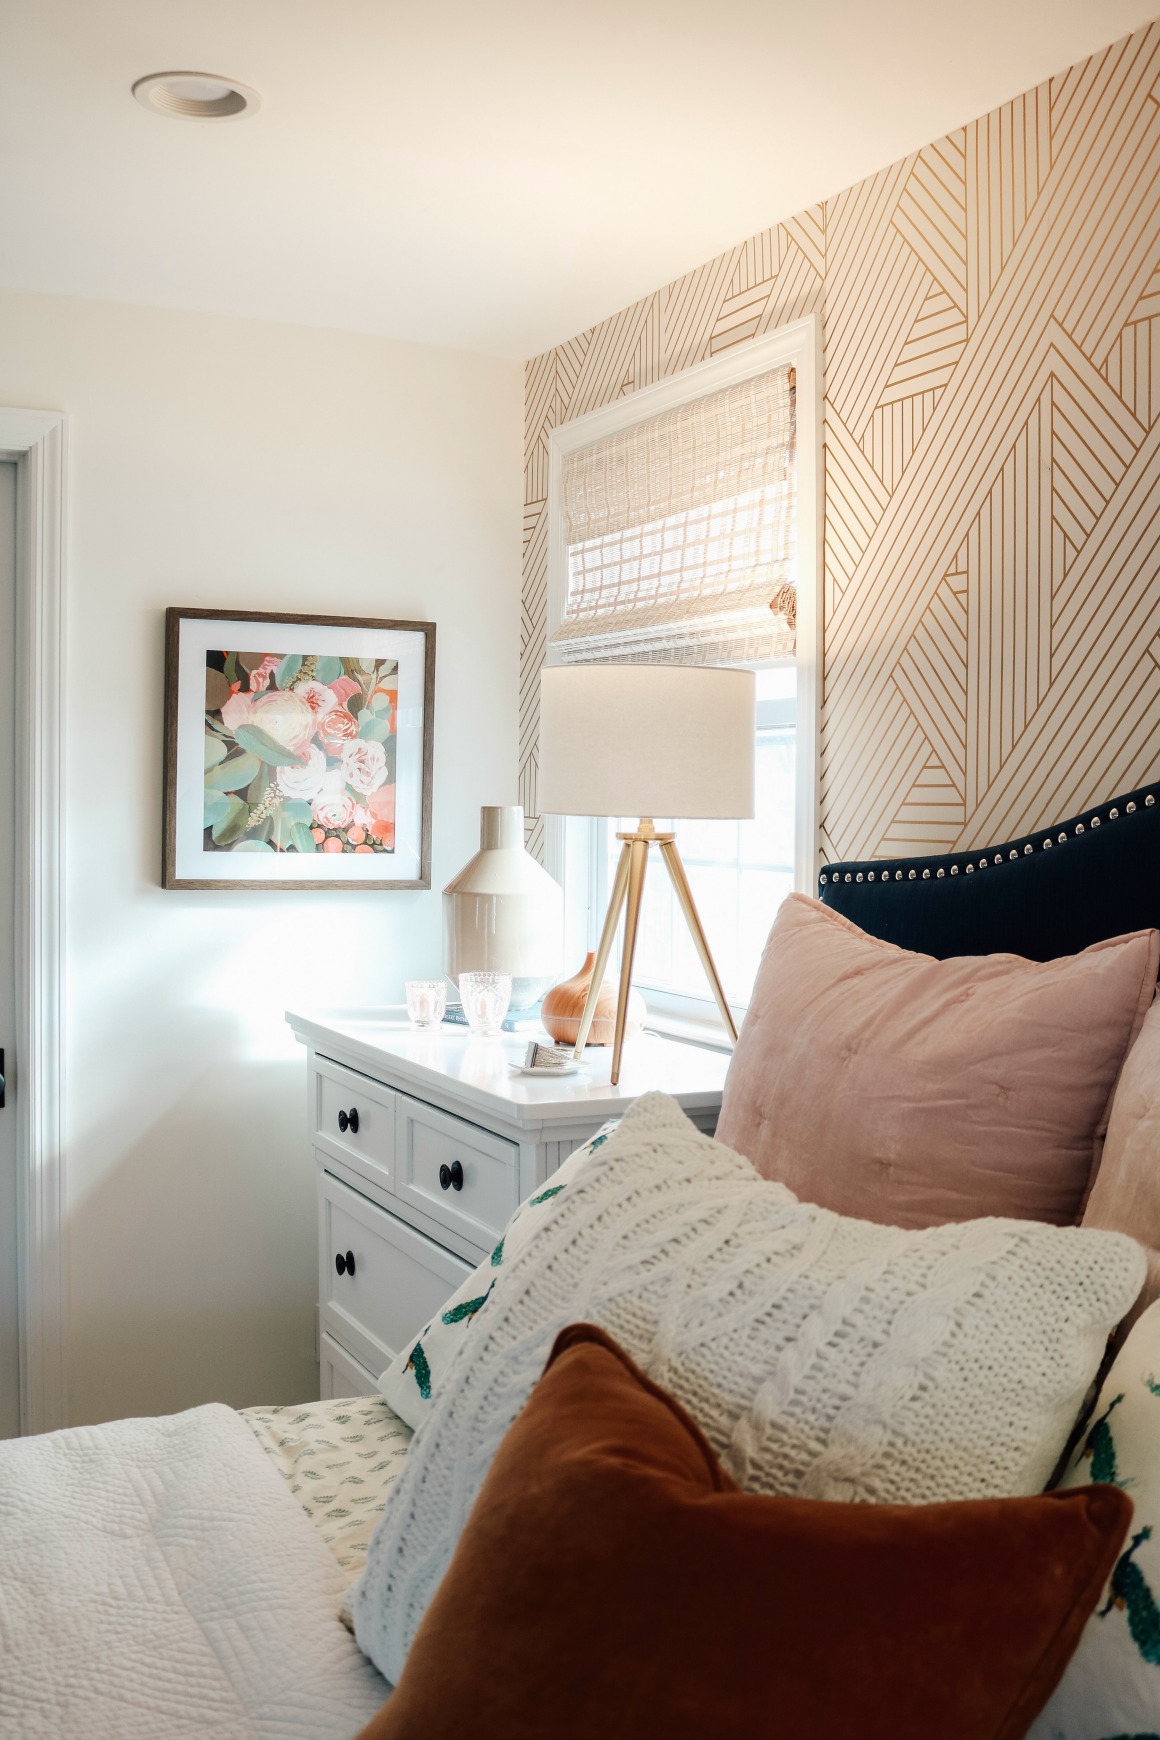
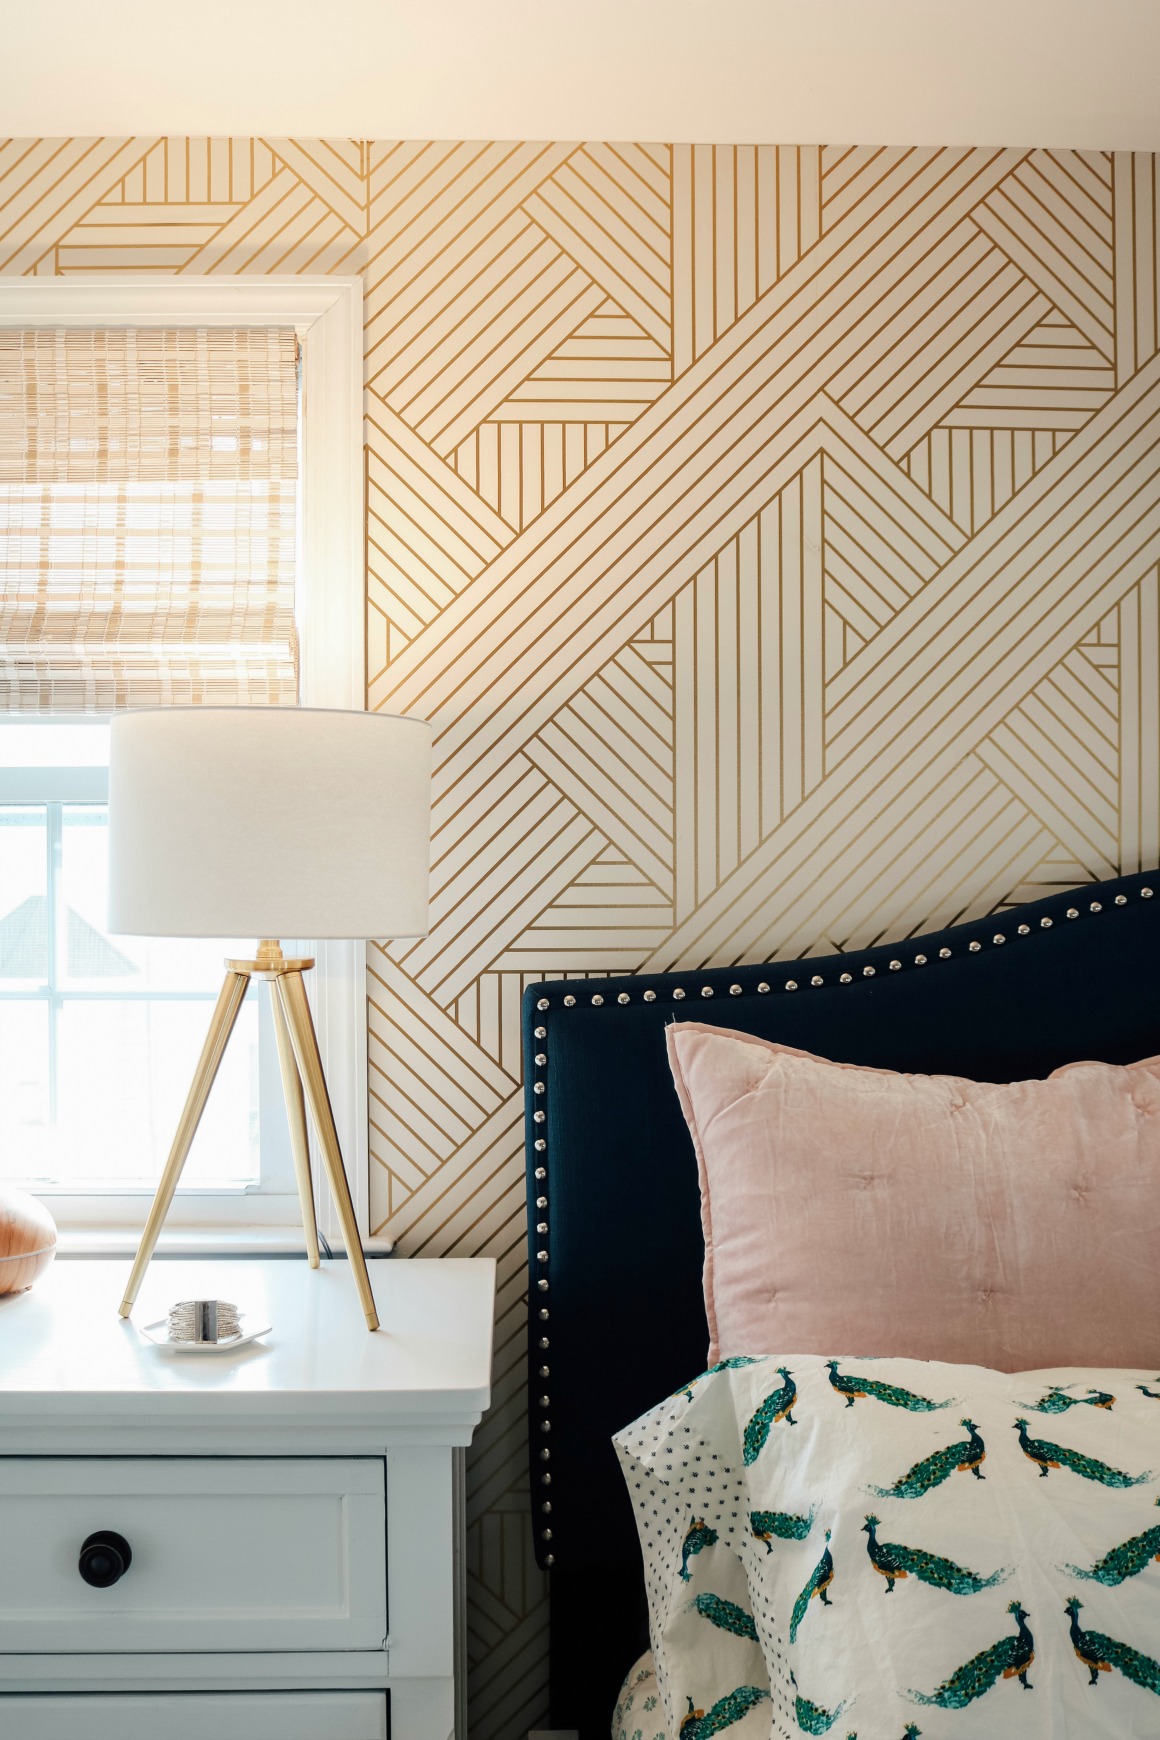
Woven Bamboo Roman Shades-
We did change all of the white wood blinds to THESE whitewash cordless bamboo shades. We have them in our home and I love how much texture and warmth they add to any room. They are not lined, but their bedroom is on the second floor. They do help to filter the light.
Furniture Changes-
I also suggested moving the furniture around. The large dresser was cutting into the window and felt too big and heavy where it was. Sometimes just looking at your room in a new way can make a world of difference. Even asking a friend to come over and asking them “do you see any other way I can re-arrange this room?” We moved the nightstands too. It makes the room flow and make more sense.
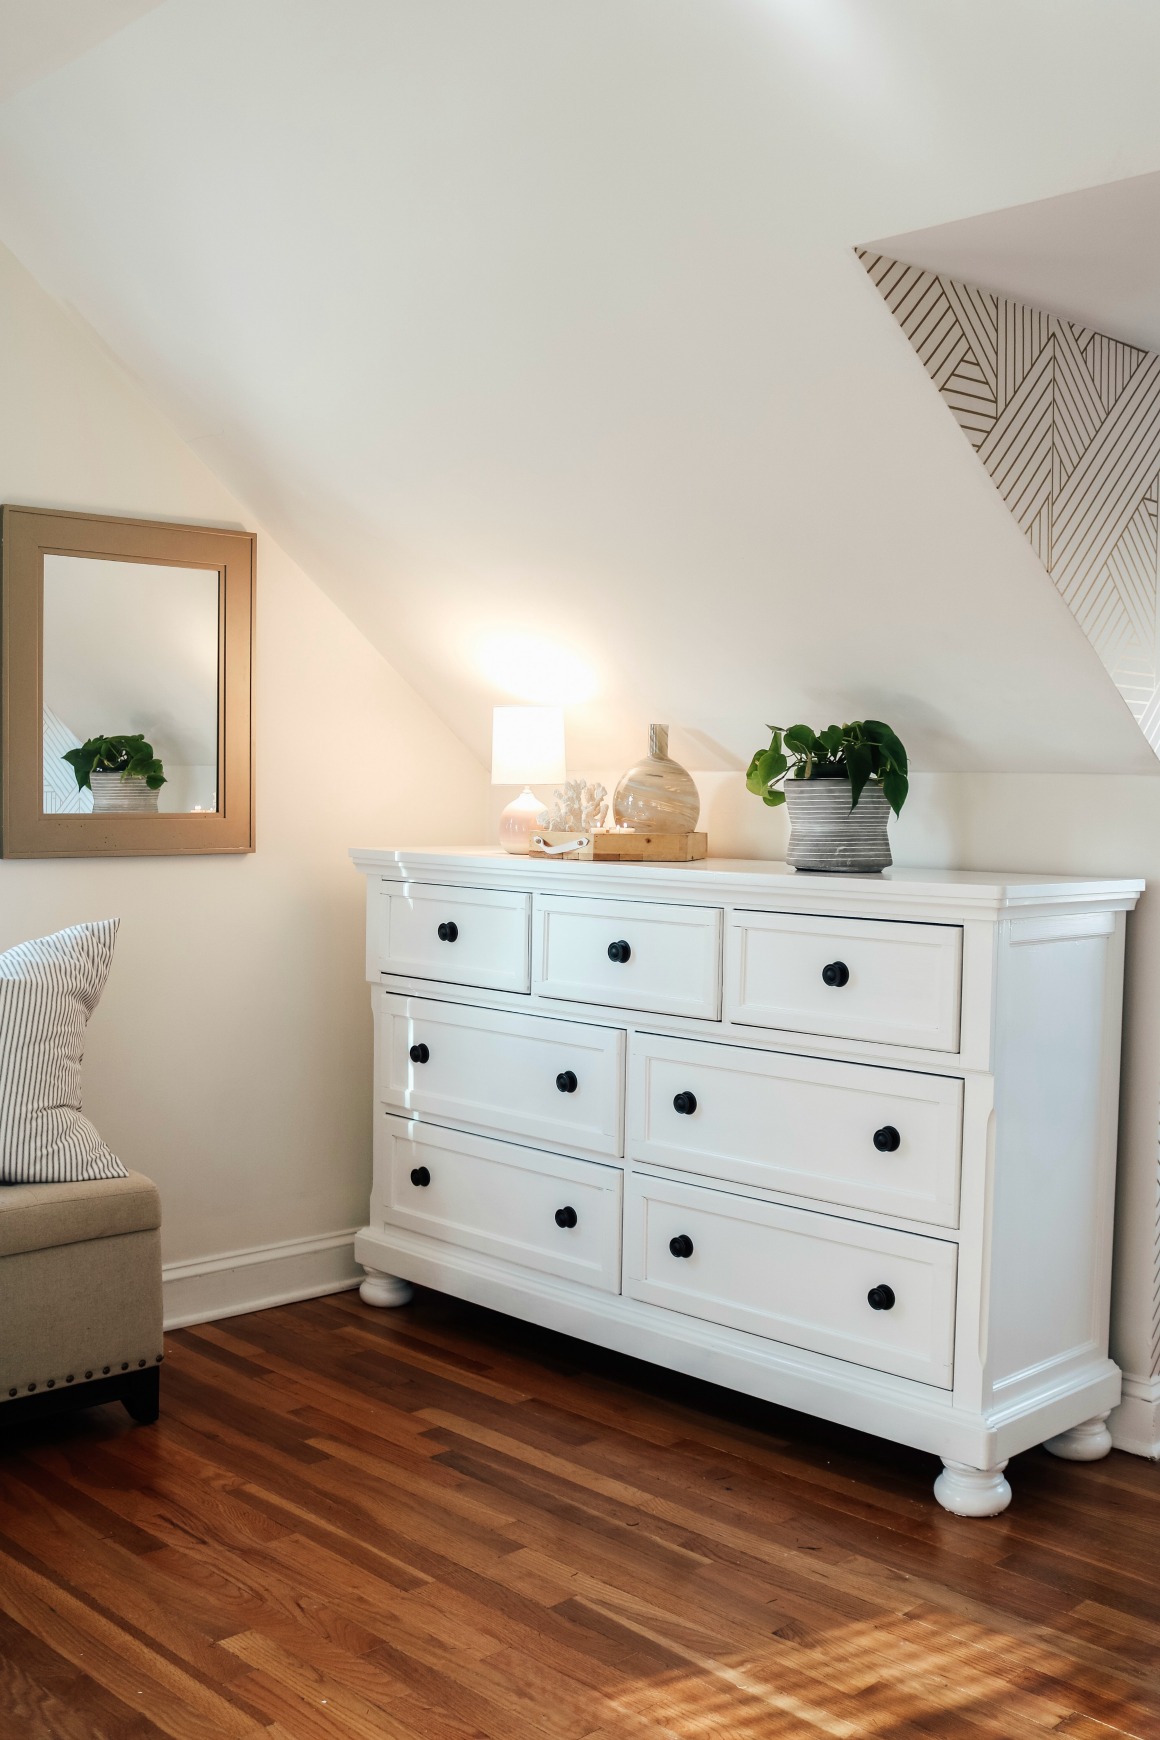
Painting Dark Furniture White-
My friend did paint all this dark furniture to a bight white. It took him about 15 hours total and 3 coats of paint. Which is a big time investment. But also saved them a lot of money! He used a paint brush to apply the paint. The paint he used was Benjamin Moore ADVANCE Interior Paint- Semi-Gloss (793) in white. He only needed one can of paint for all four pieces of furniture. No sanding.
When I planning out their bedroom I noticed that the rug they had was way too small. You typically want the rug in a bedroom to run horizontal with the bed and come out past the bed at least a couple feet (that depends on your room size). I don’t love for the nightstands to be on the rug (that is my personal preference). We went with THIS very affordable rug.
Dark Master Bedroom BEFORE-
Light Master Bedroom AFTER-
Ceiling Fan-
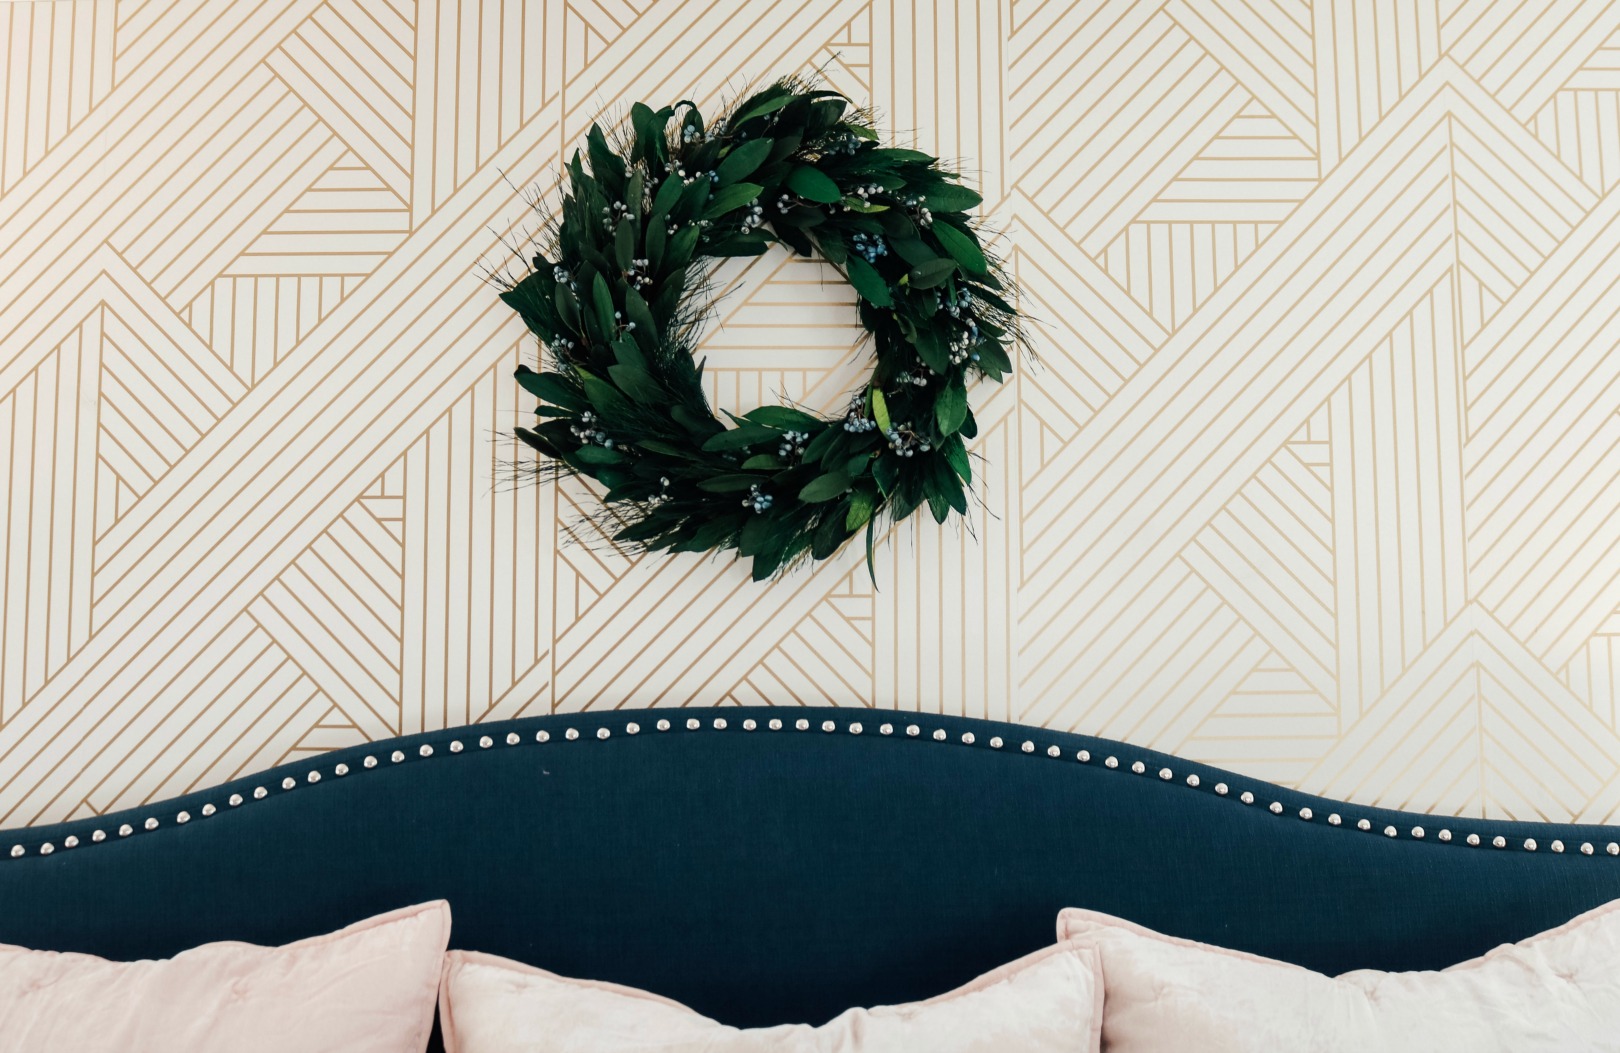
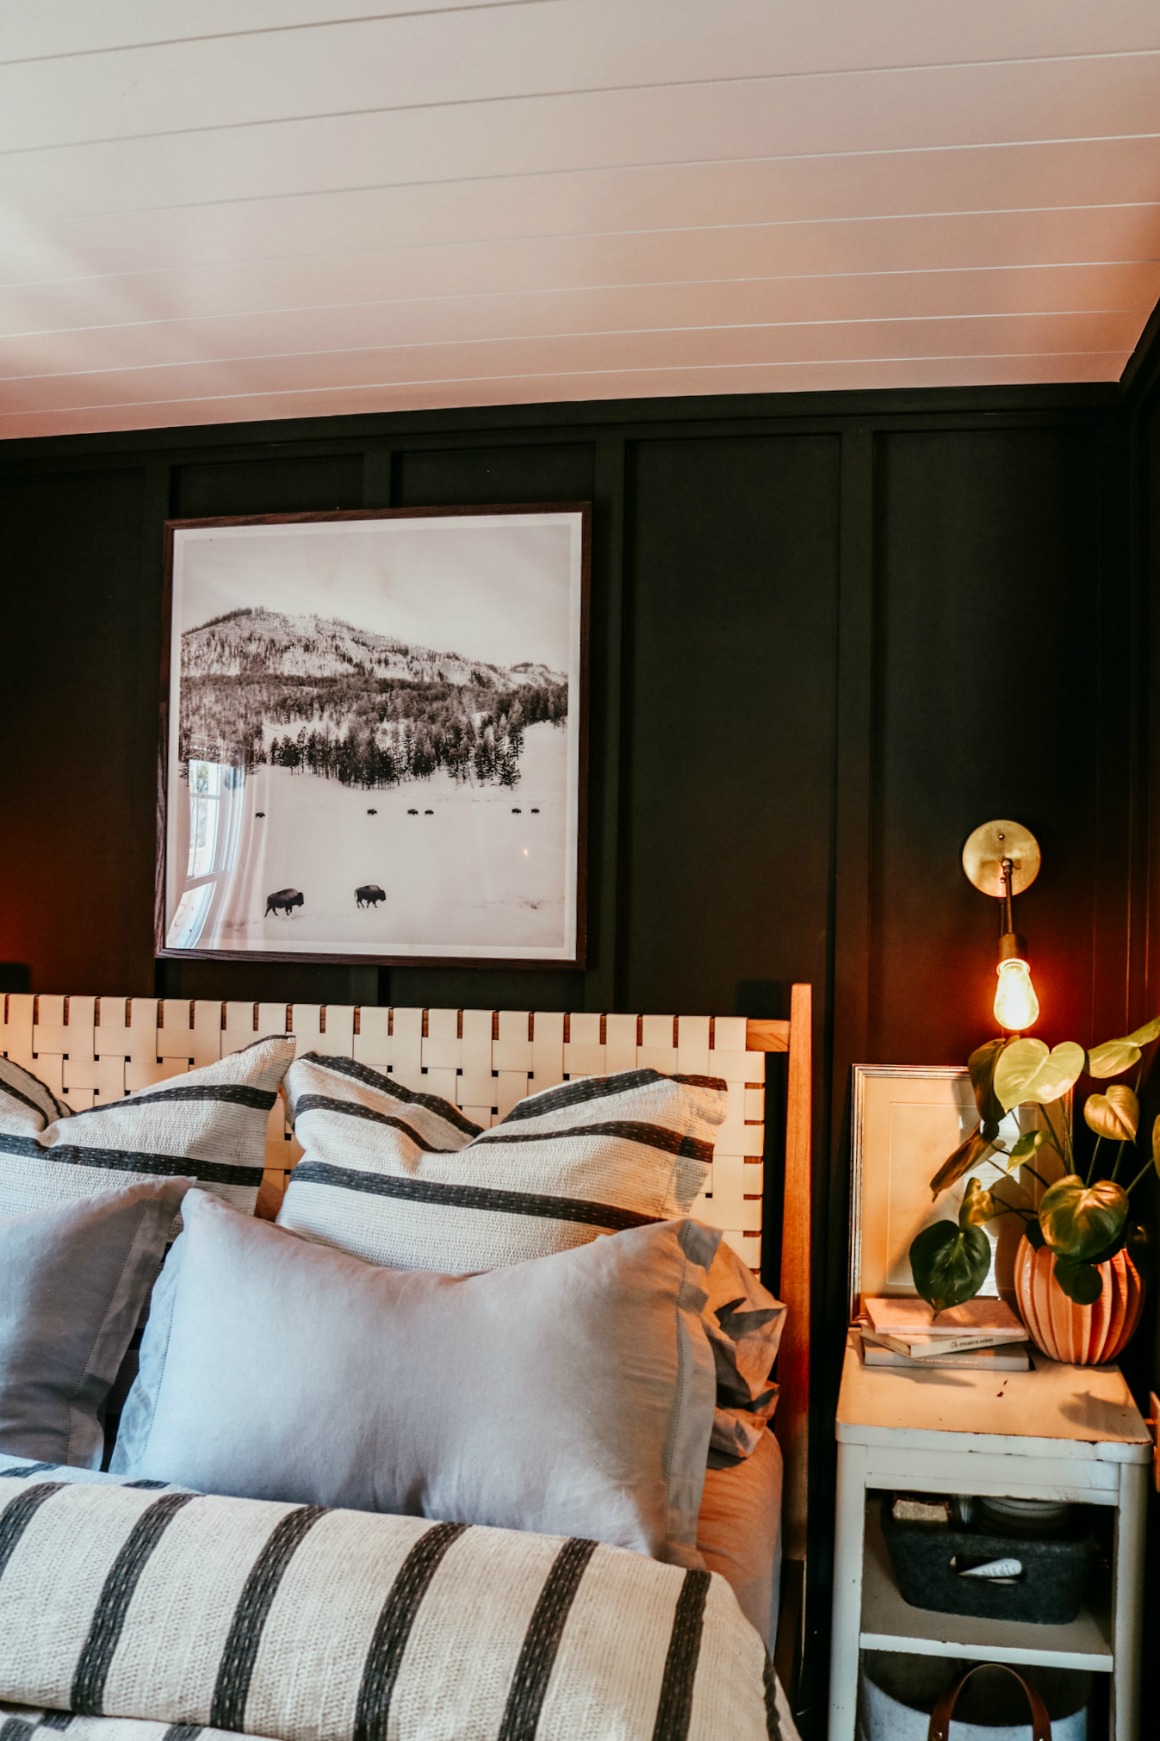
Notice that the bed is lower? I had them take off the box spring that was making the bed WAY too high. Removing the boxspring makes the room feels so much bigger!! And removing the boxspring made it safe to get a new fan! We ended up using THIS ceiling fan, I love how the fan blades work so nicely with the wallpaper and the little stripe of blue pulls in the headboard.
 1
1
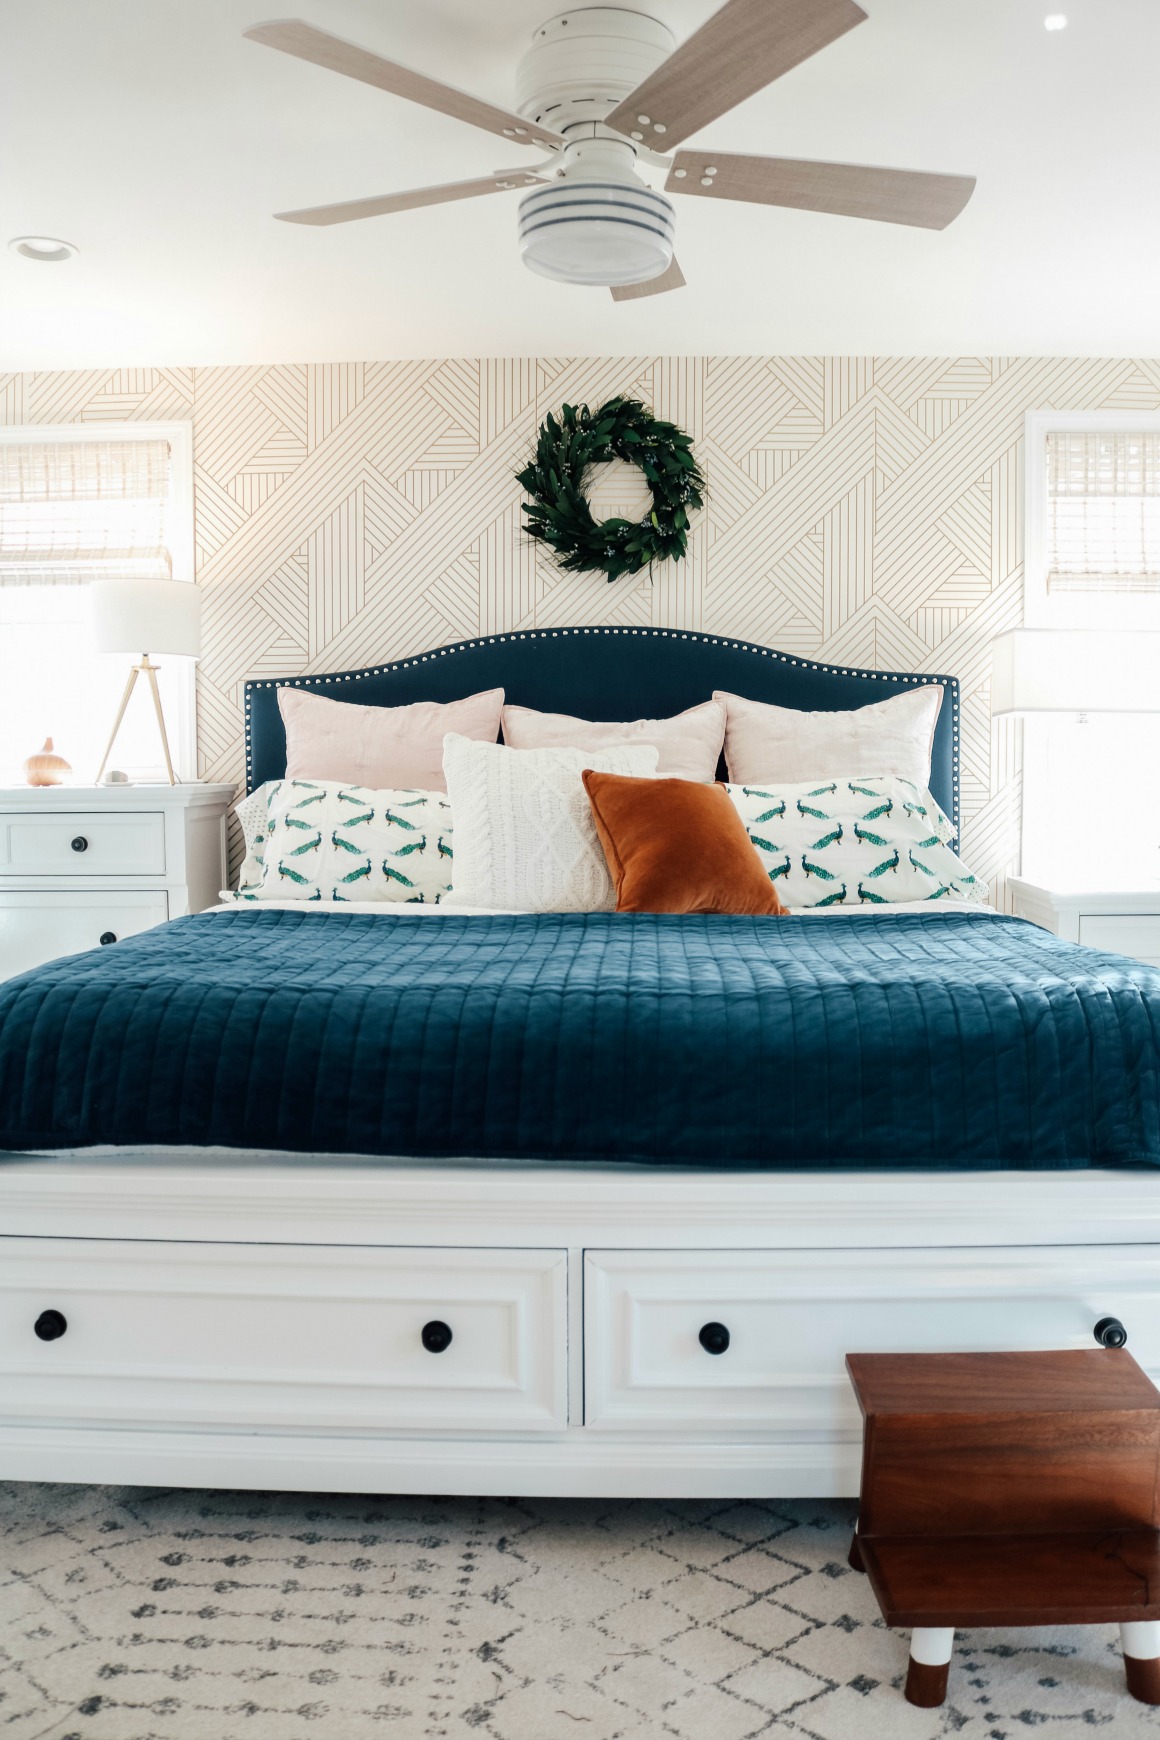
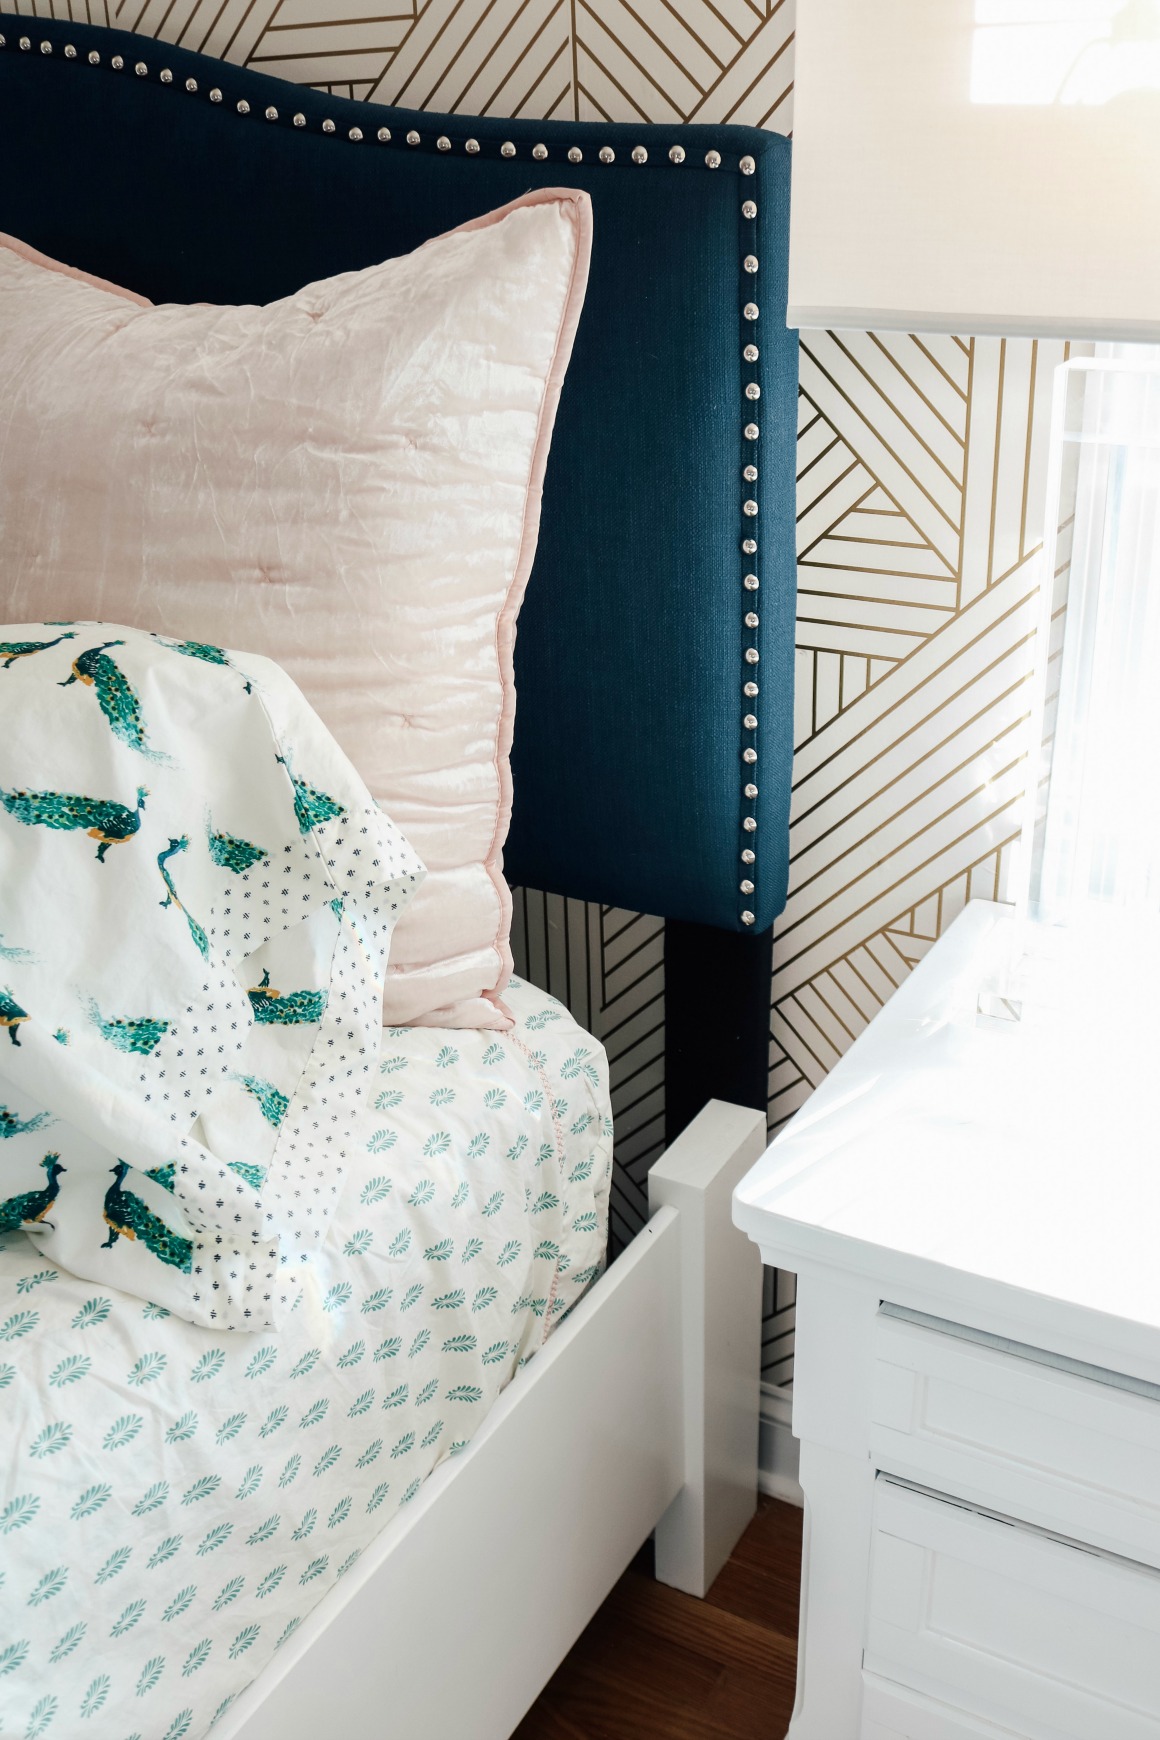
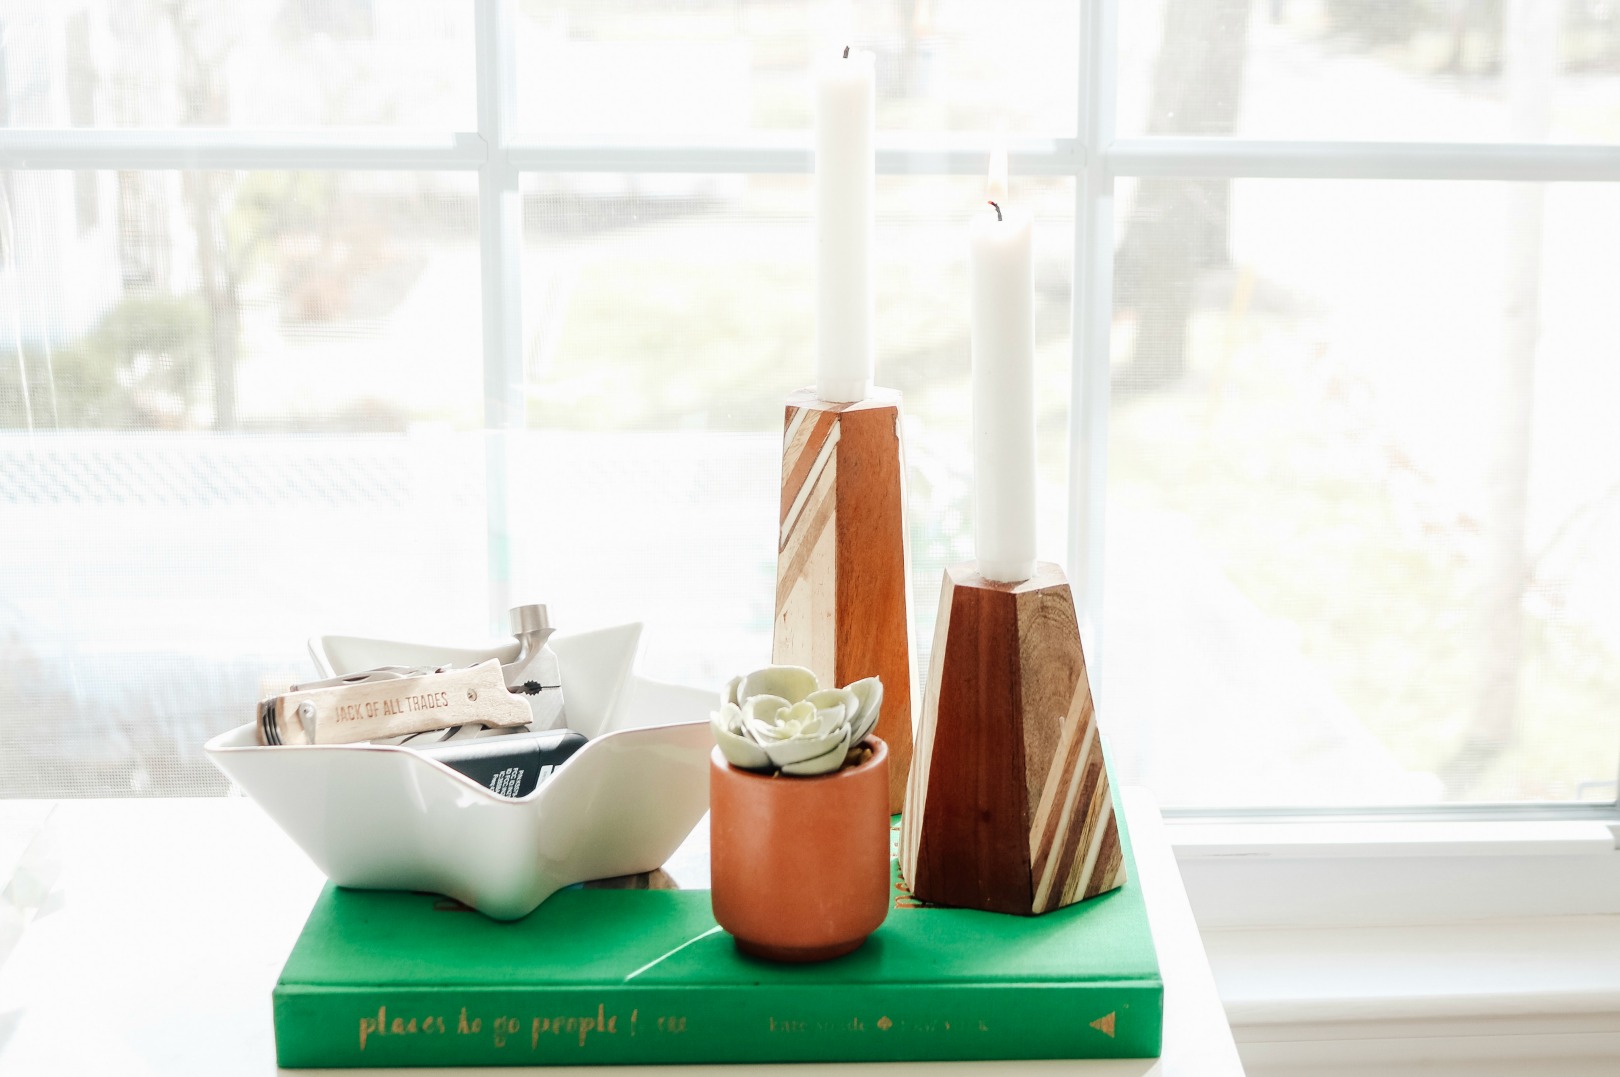
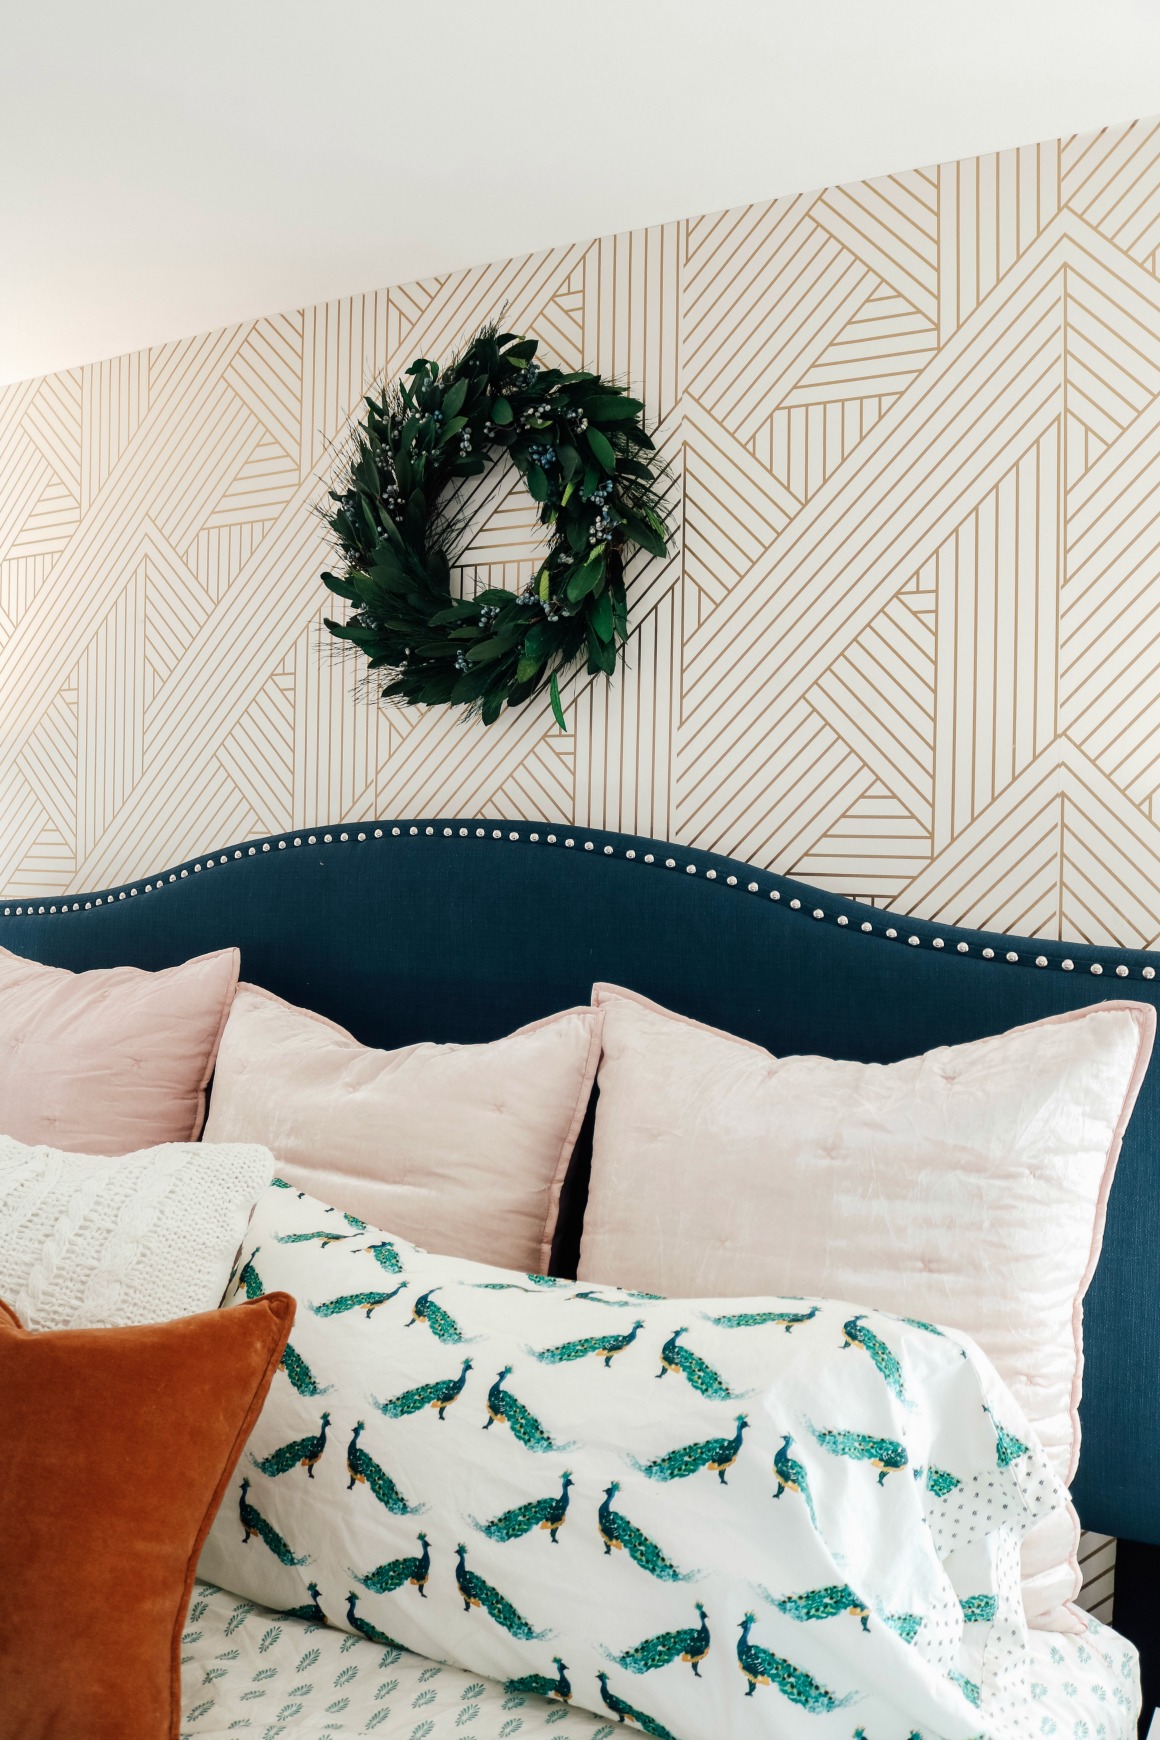
We also changed the headboard! My friend cut the sleigh bed headboard at at the top the rails. Then he attached THIS navy fabric headboard (that is only $150 for a king) to the bed! This flat headboard also made it so we could push the bead right against the wall, creating way more space. I did change up their bedding too. Added THESE blush velvet euro shams to bring in the blush chair. THESE sheets are fun way to add a little pop of color and THESE peacock pillowcases really bring in the gold from the wallpaper. Adding THIS navy velvet quilt really pulls it all together.
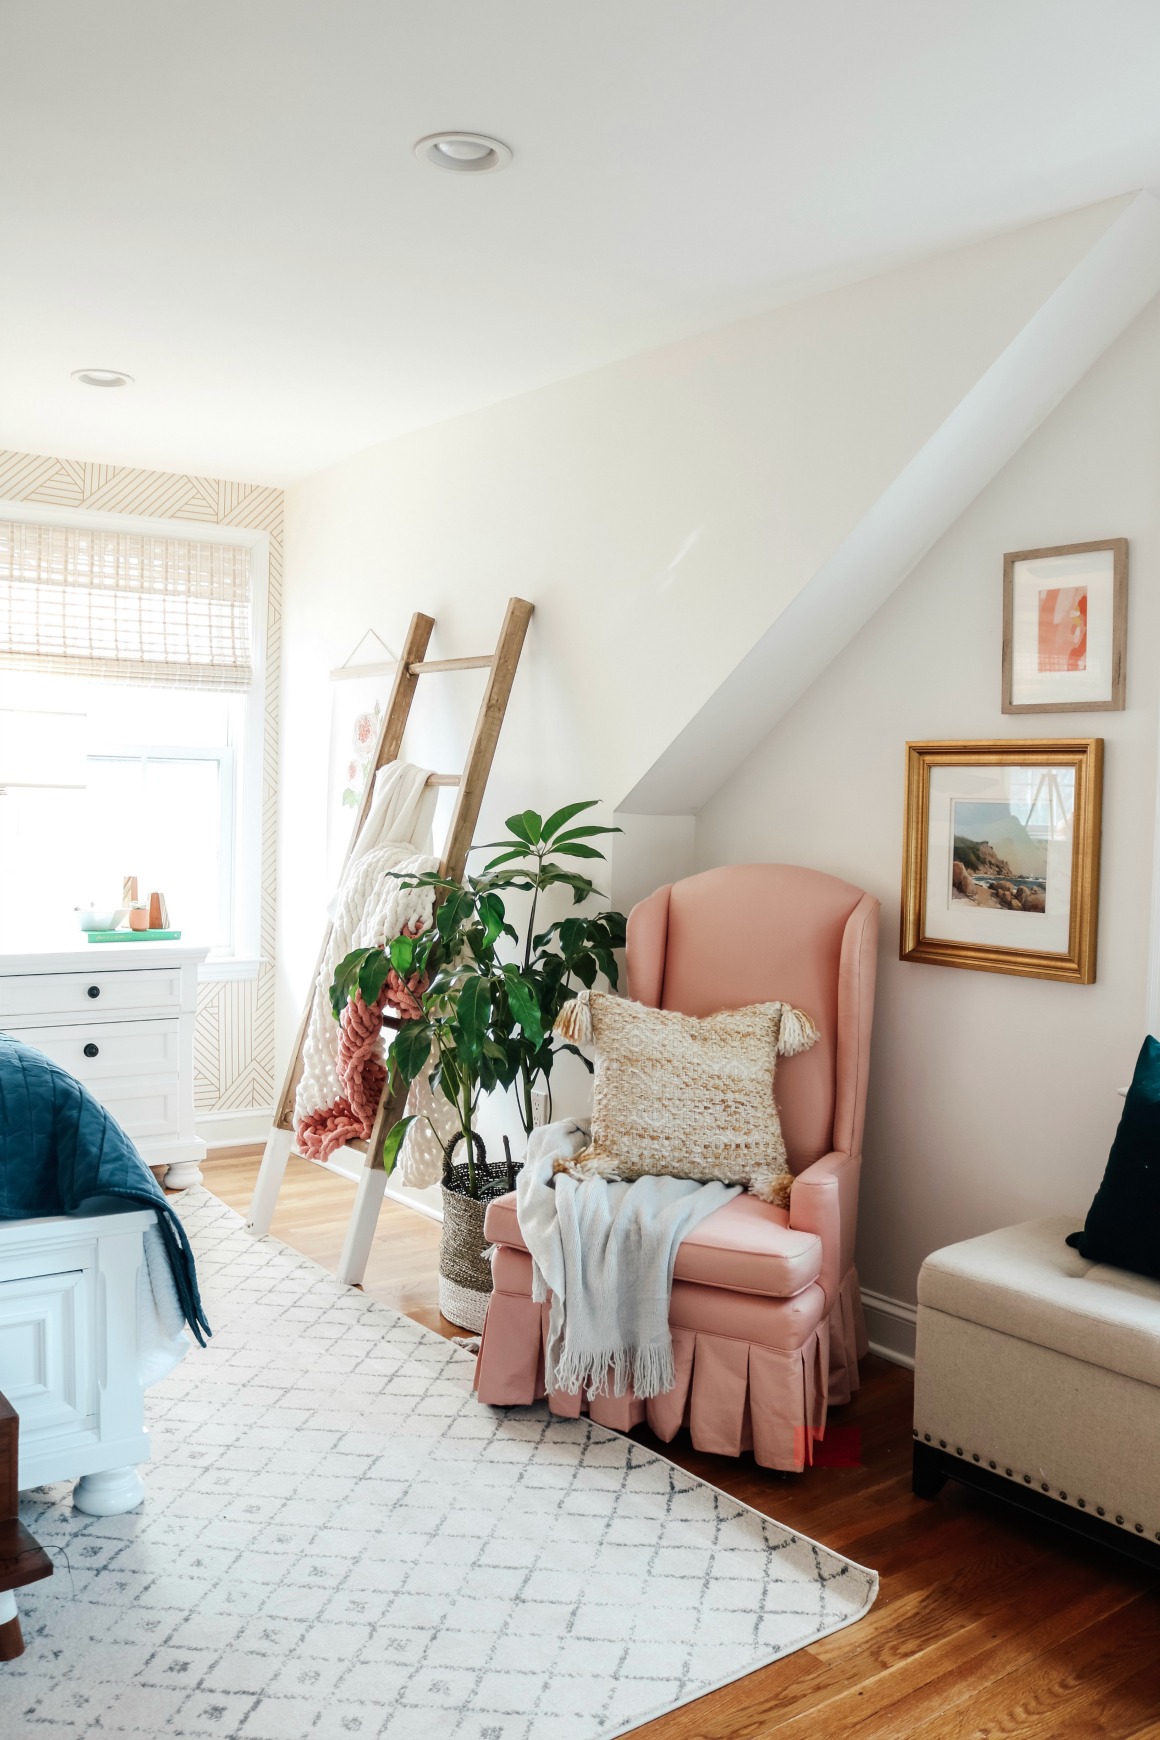
Window Seat-
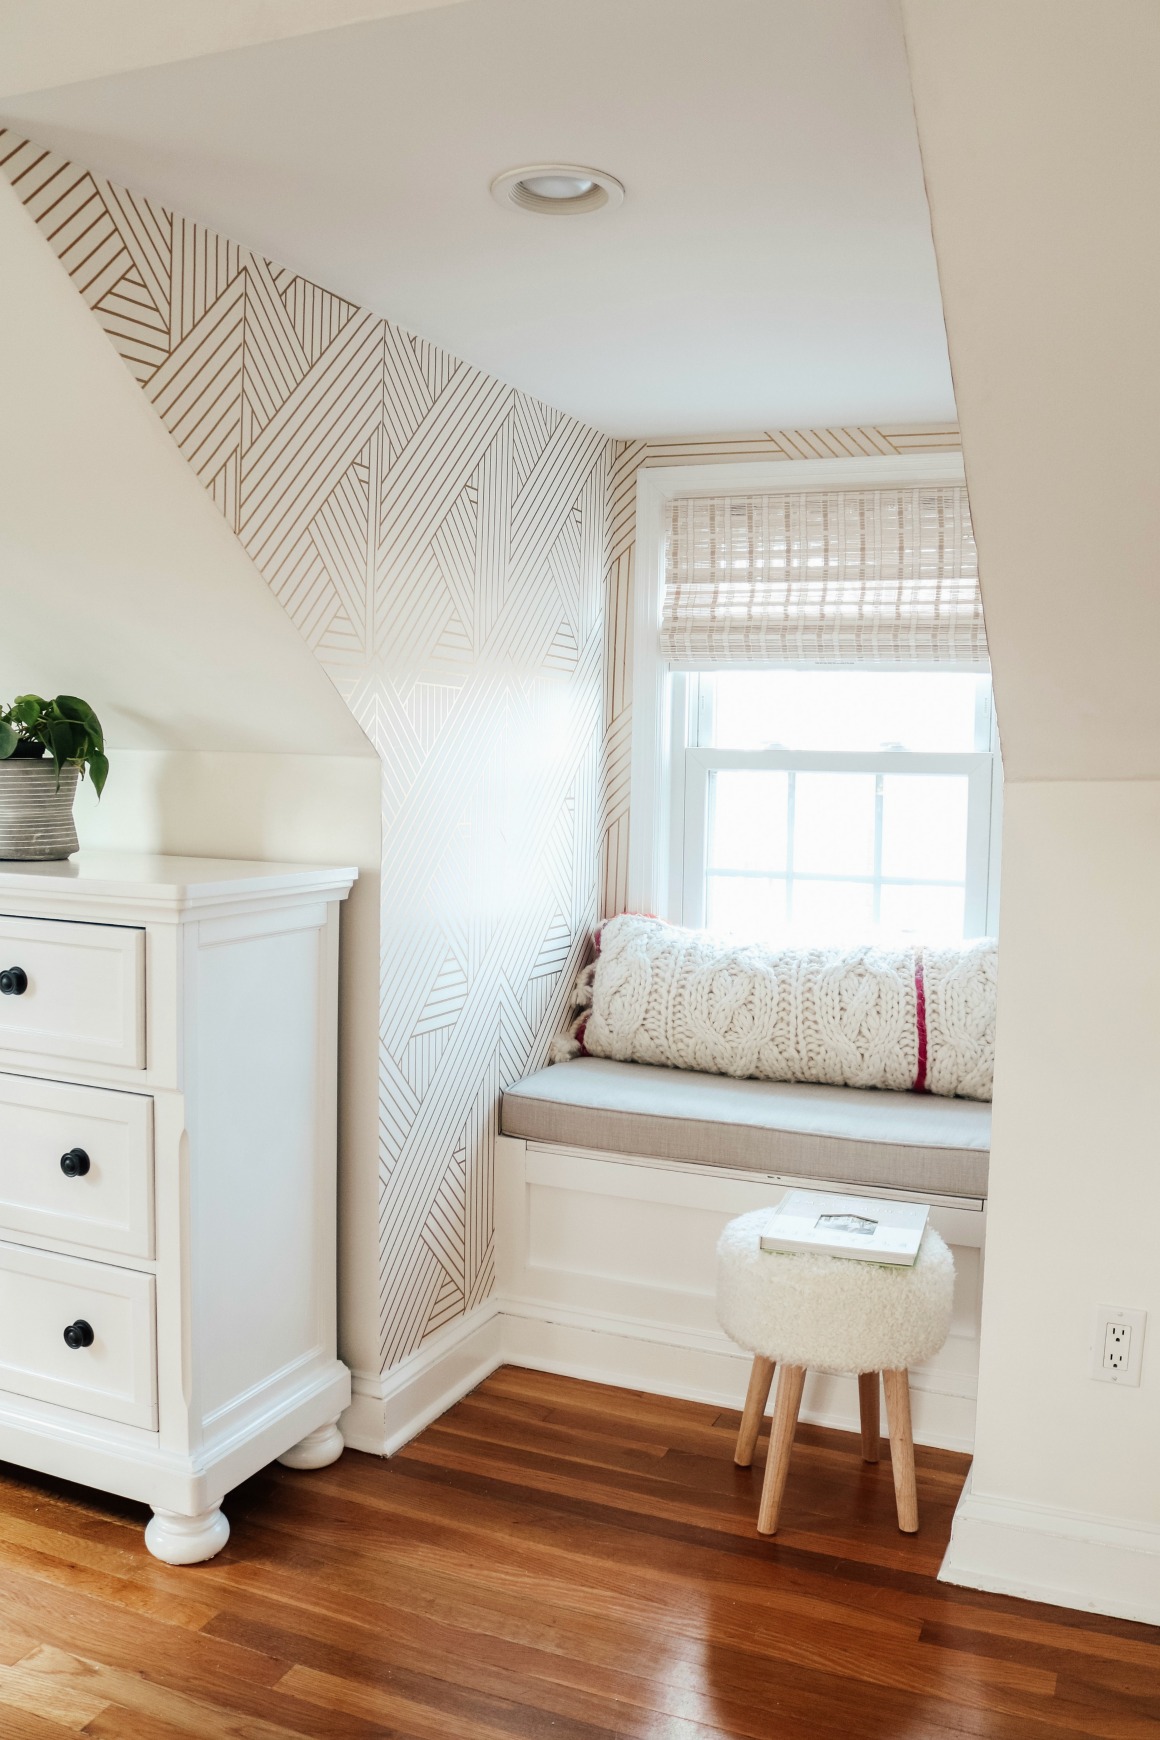
He also built a window seat in this little alcove! Can you believe how great it looks?!! I have a blog post HERE on how to build your own window seat. And find cushions for a window seat HERE.
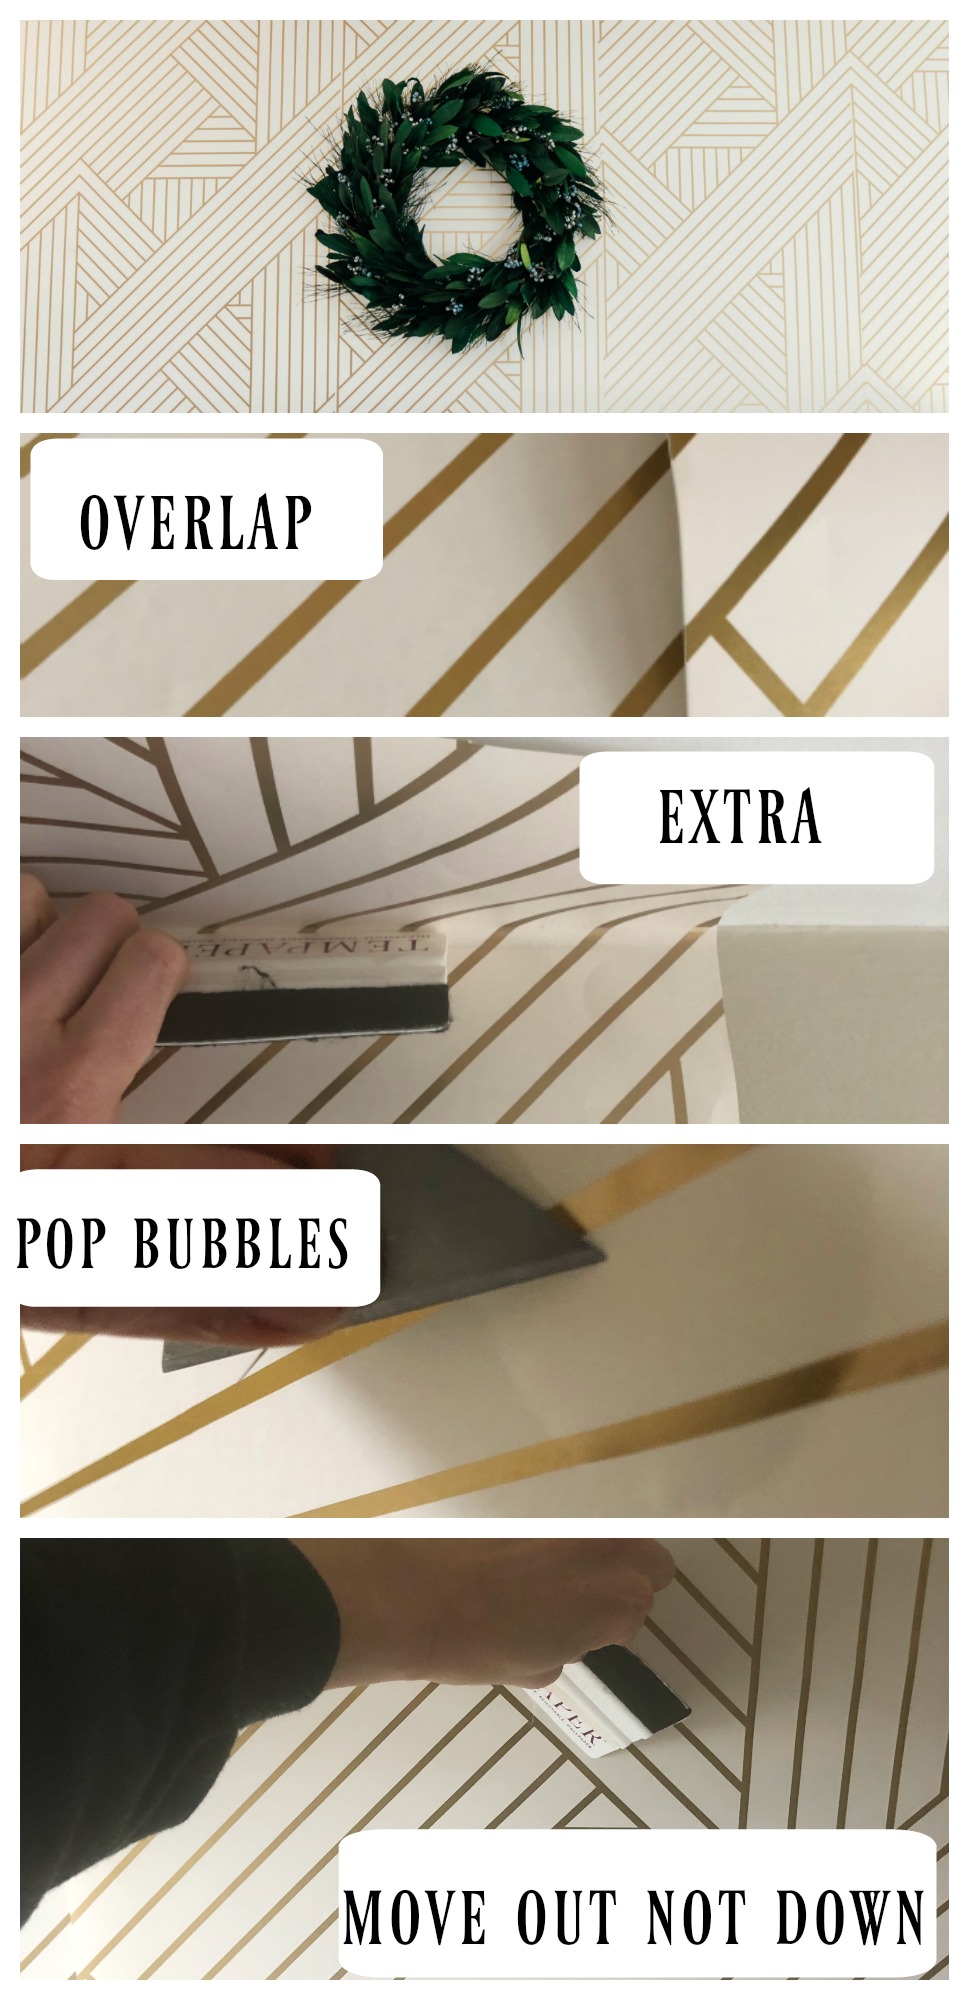
Wallpaper Tips-
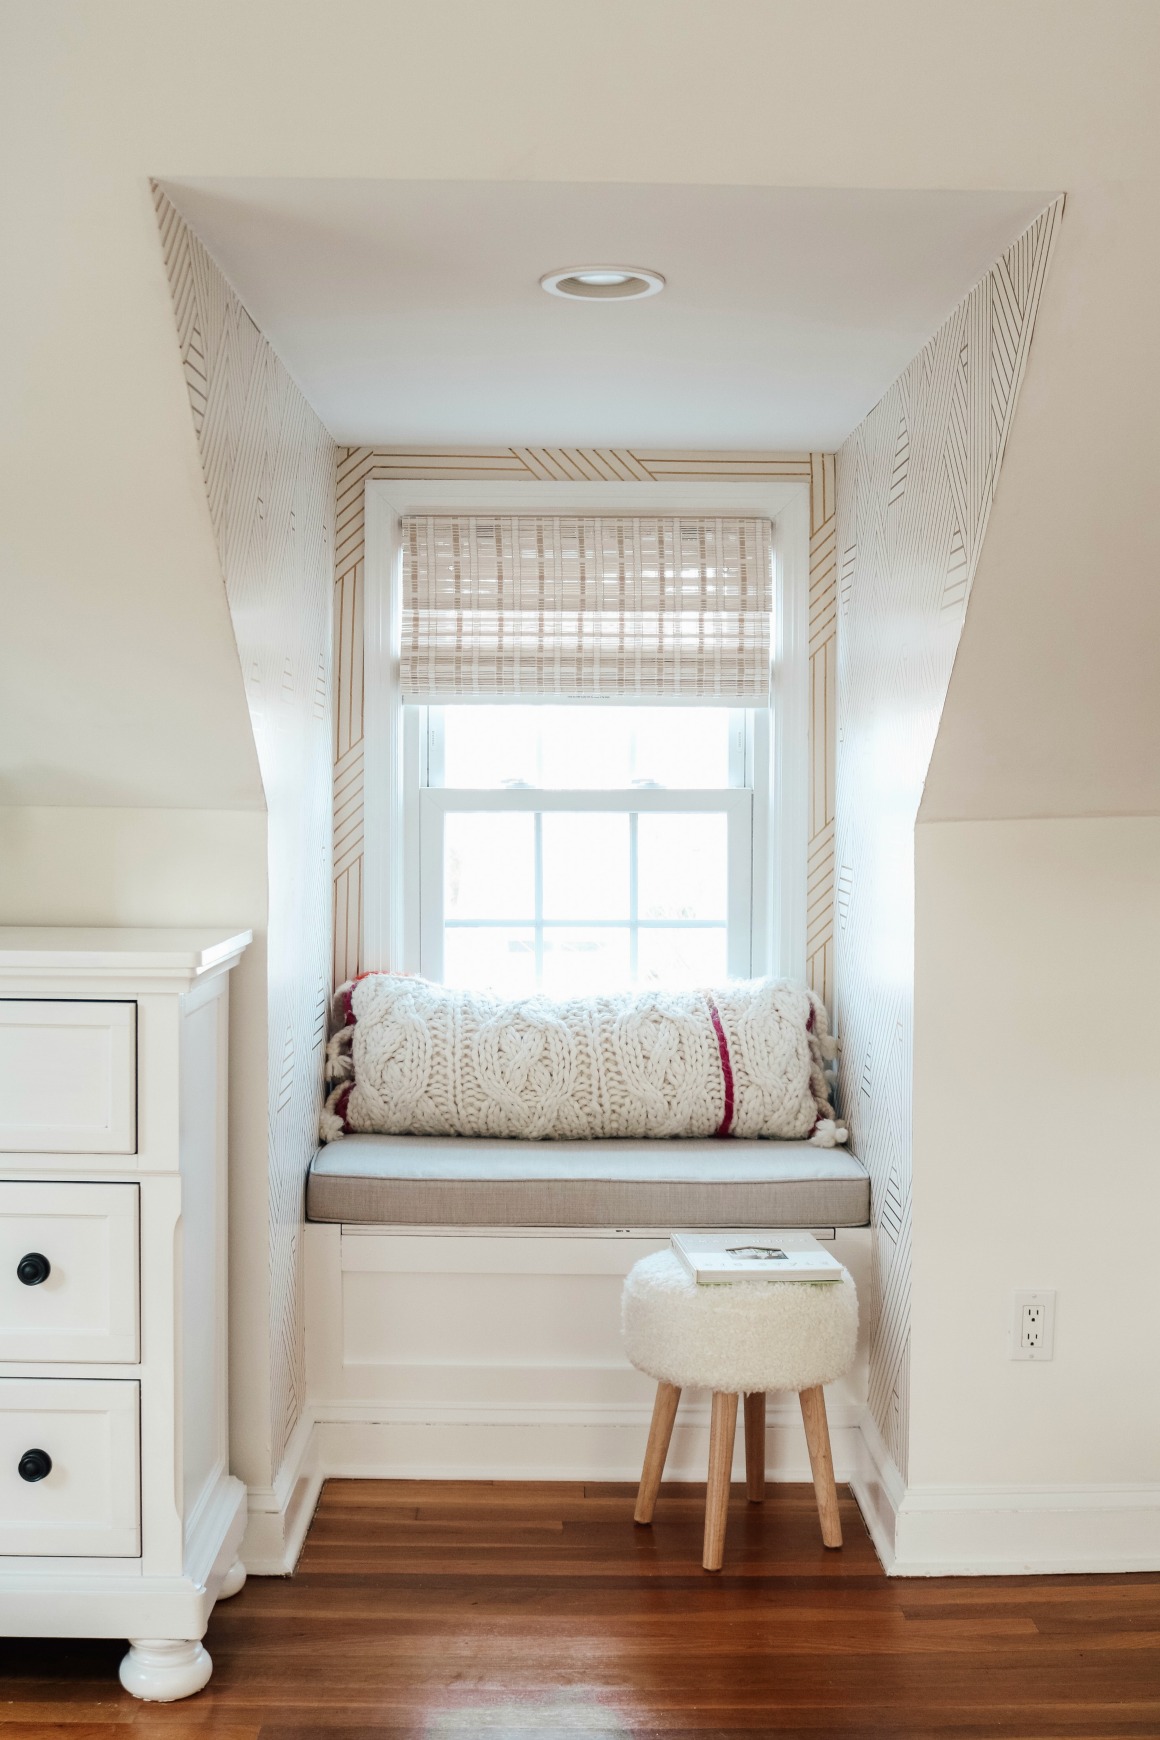
I love how this little alcove turned out! This space is an unexpected space for wallpaper and yet the perfect place to get creative! I do want to mention that cutting wallpaper around your windows takes times. And knowing that, will helpfully help you to not give up right away!! Just turn on a podcast and enjoy the process. And always make sure you have fresh razor blades to make trimming the wallpaper easy!
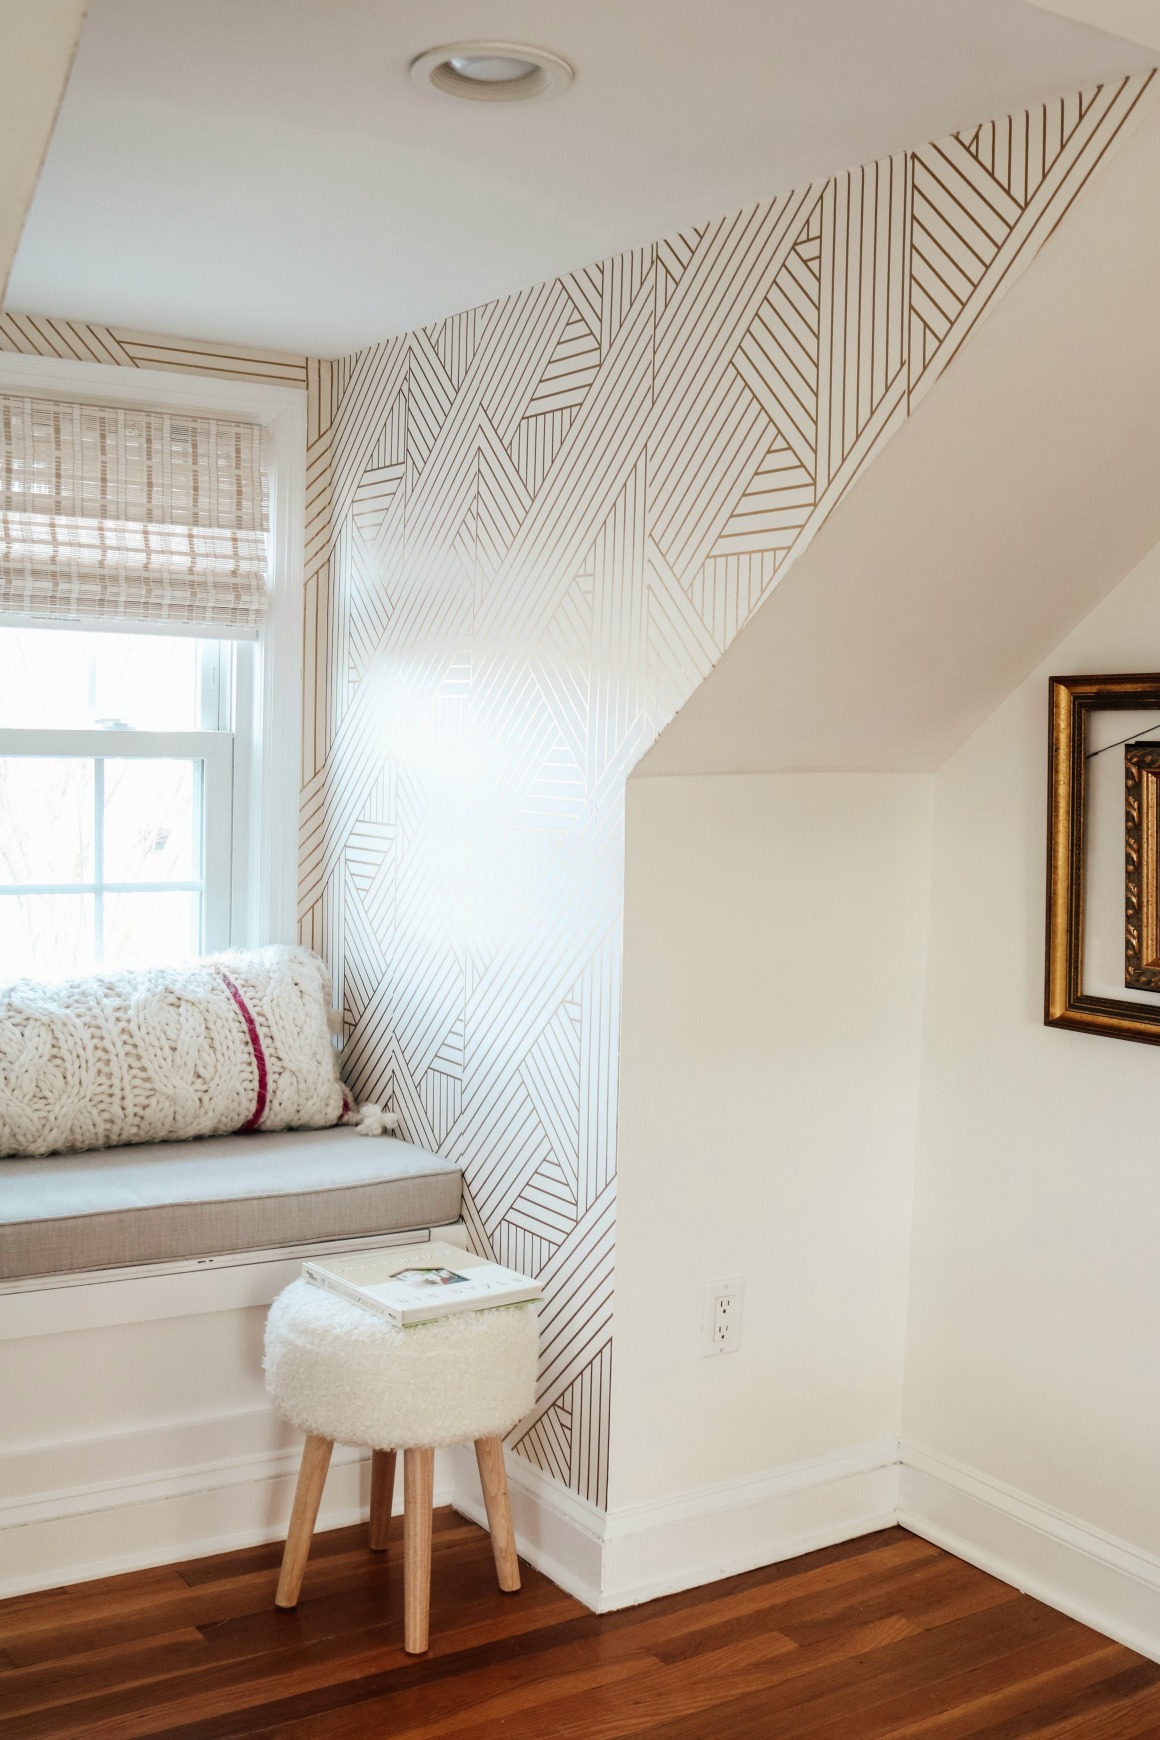
I started on the edges first and cut a piece that was much larger than the space. Don’t try to cut the perfect template before. Instead trim a large piece of wallpaper with about 5″ extra on all sides. Then trim with a razor blade after it is on the wall. I did mess up a couple times in this spot and had to take the paper off completely in a small section and throw it away.
My biggest tip is to BUY MORE THAN YOU NEED then return the extra rolls. You want to make sure and buy the same “lot number” meaning they made that wallpaper all at the same time. If not your colors could vary slightly. And you don’t want to have to run out and buy more. You should buy about 20% more than what you need. To measure for wallpaper- multiply the combined width by the height of the walls – this is the total square footage. To keep things simple and to ensure you have enough paper do not make any deductions for windows, doors, cabinets, etc
I love that Devine Wallpaper recommends a paint on each roll of wallpaper that would coordinate well with your wallpaper choice. It is so important that when you do an accent wall that the other walls coordinate instead of clash or fight against the wallpaper. The wallpaper accent wall should be the star! And then walls around it should blend in. We ended up going with a different paint color, just because it was closer to use than a Target. (Benjamin Moore- Cloud White).
Temporary Wallpaper Installation Tips-
I have installed my fair share of temporary wallpaper, if you are unfamiliar with temporary wallpaper it is basically like a big sticker that you peel off the back and then install to your wall. But instead of being a like a sticker that get’s stuck to the wall and leaves a mess when you take it off, temporary wallpaper will not damage your walls. It can easily be removed. Making the idea of installing wallpaper less of a big commitment. You also save a bunch of steps because you don’t need to use wallpaper paste. As I was installing this wallpaper I actually learned a few new things! And learned that ALL temporary wallpaper is not the same.
- Give yourself enough TIME and GRACE! I want to make sure and mention this first. Temporary wallpaper is something everyone can do themselves. But if there is a pattern like this one it does take more time to match up the pattern and the lines. So allow for time and patience!
- Overlap– do not try to put the next roll of wallpaper right up to the one on the wall. It is best to overlap the wallpaper. So put about a 1/4 inch of the new wallpaper on top of the wallpaper that is on the wall. The reason for this is that most walls are not straight, so they pattern could separate as you move down. It is easier to match up the pattern this way.
- Allow for extra on top– don’t put the wallpaper right at the ceiling crease and start from there. Instead make sure to have about 3″ extra on the top. I always match up the pattern to the next but making sure there is extra on top. You might have to push the paper up to the next pattern match to allow for extra.
- Pop the air bubbles– Use a smoother tool to push out the bubbles and also a rag works to rub them out as you go. But some just get stuck and are hard to smooth out. So take the end of your razor blade and prick the bubble. You will not even see the tiny prick.
- Smooth out and to the side not straight down– this method really helps to keep the patten to match up and to get the bubbles out.
I have done blog posts and a video on installing temporary wallpaper HERE.
I hope you enjoyed this bedroom makeover! I want to thank my friends Scott and Jess for letting us share this makeover! And especially to Scott for all of his hard work and skills! Not to mention working with my time frame. He is a talented guy!
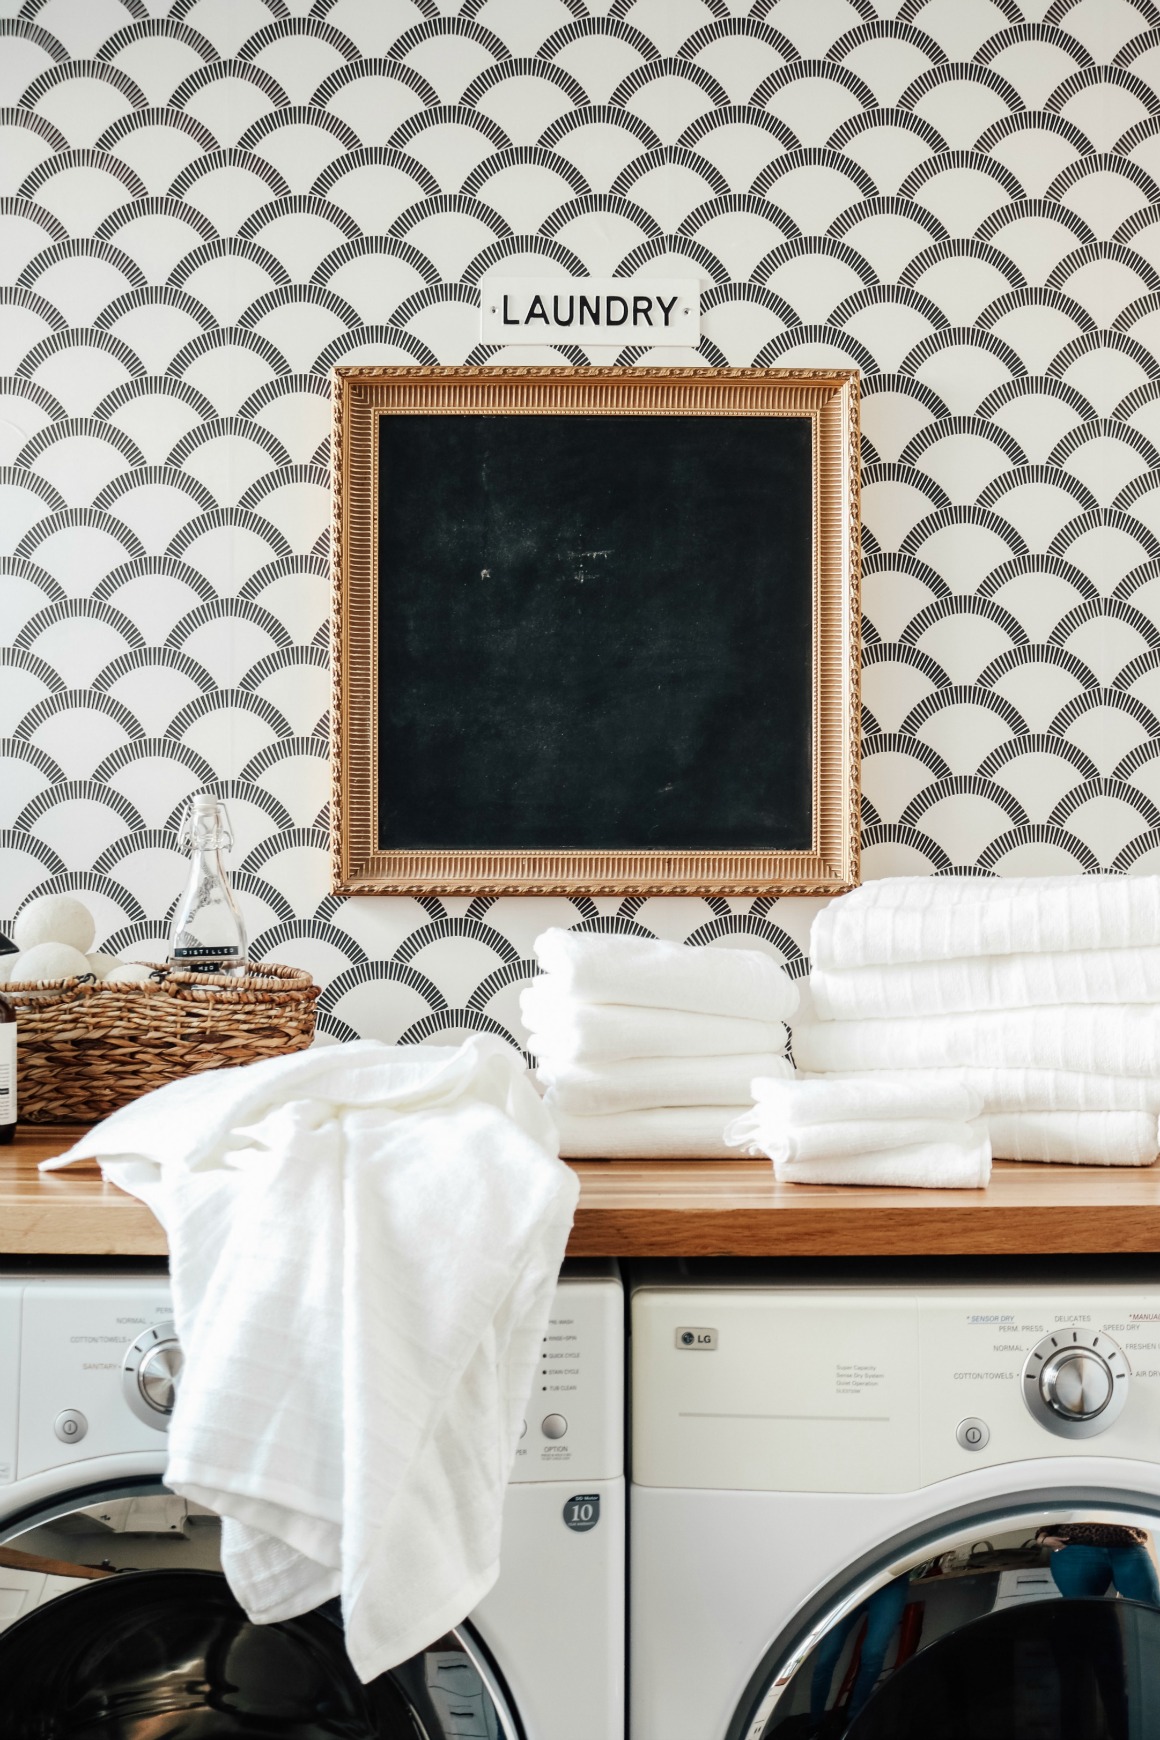
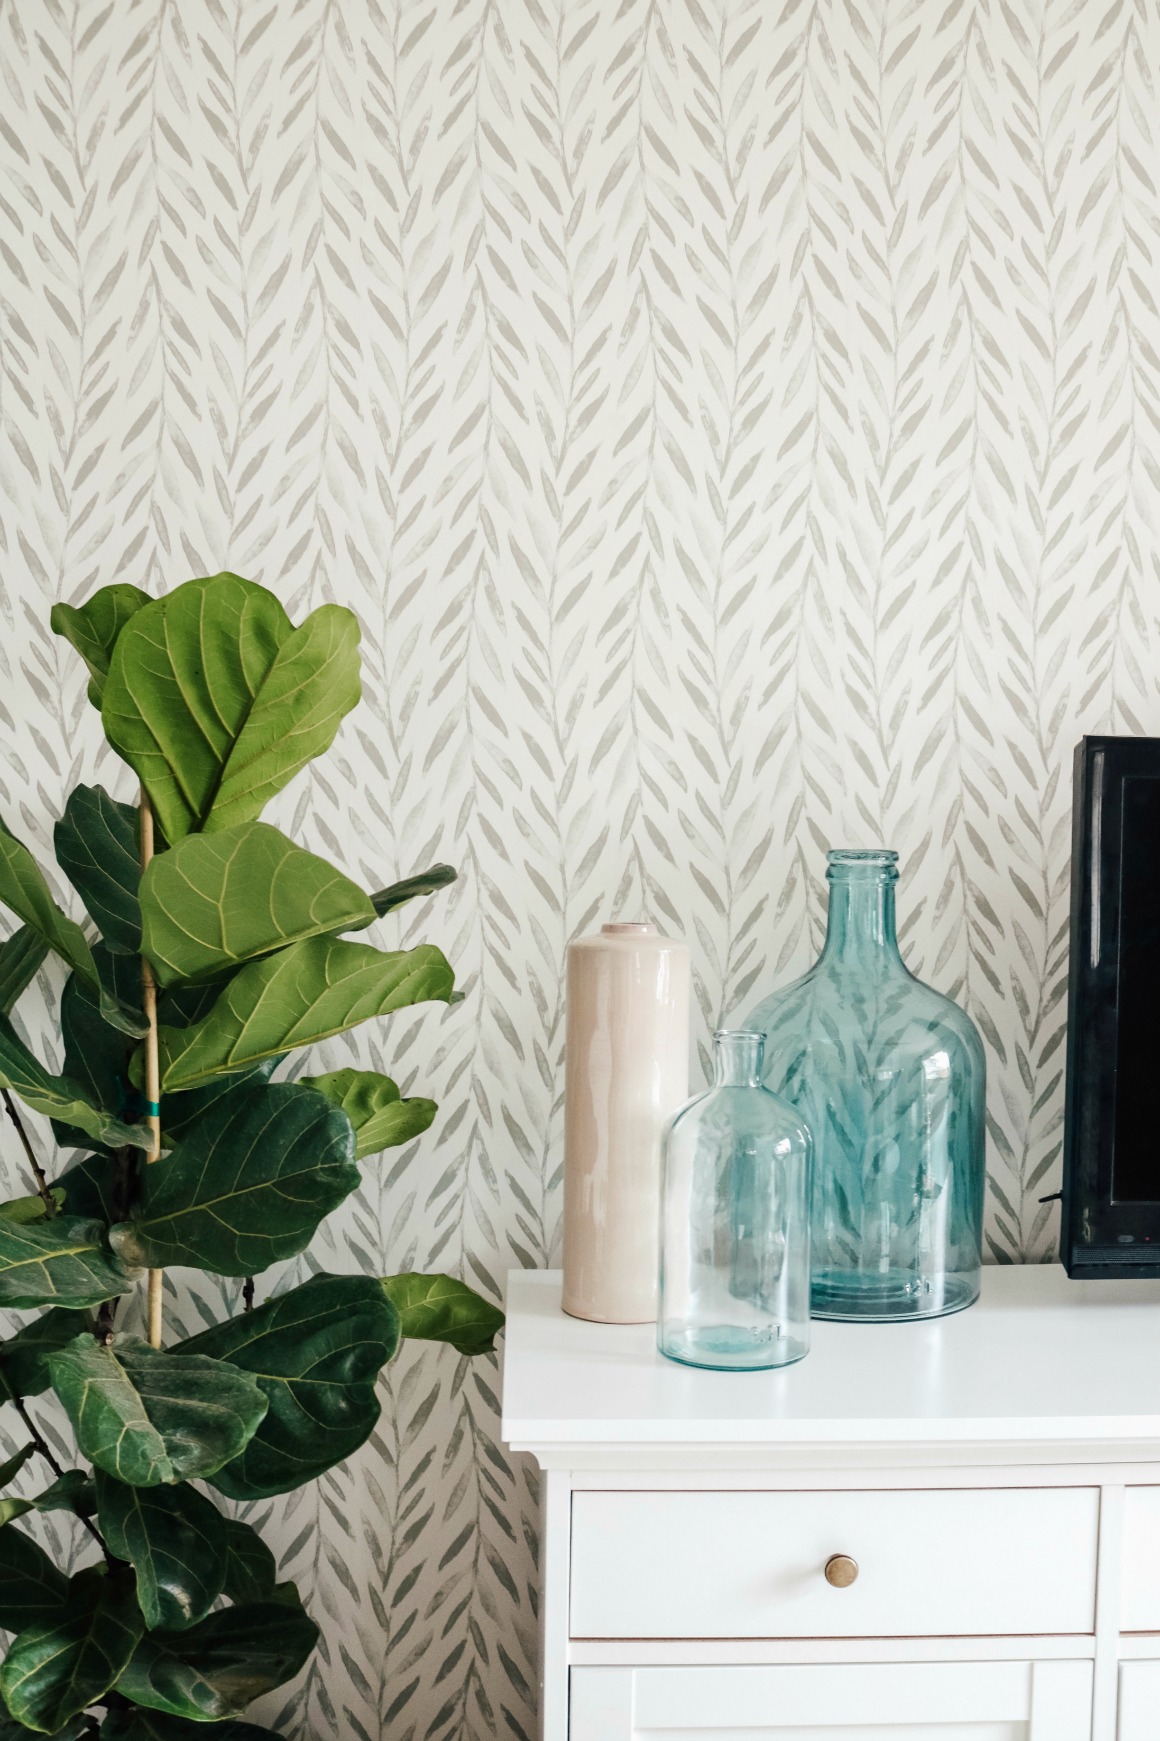
You can find the exact temporary wallpaper we used HERE it is very affordable and the pattern can mix with many styles!
Click on an image below to shop some of my favorite affordable Temporary Wallpaper
I personally have used THIS faux brick in our upstairs family room and THIS faux shiplap in our basement entrance. I really love both of them!

Click on an image to shop the room!

OMG!!! I’m so jealous. This room looks like a totally different house. Beautiful job.
Wow!! Soo pretty! I have those sheets in my daughter’s room… and I love that wallpaper with them! Hmm… giving me ideas. 🙂
I love this. I’m always learning from you about good design. I also liked how you worked with what you had for the furniture pieces they just got painted.
This room is gorgeous! I love how light and airy it feels while still having lots of colors and textures to make it feel cozy and complete. I have a completely white bedroom that I’m scared to ad color to because its tiny and I’m afraid it will make it feel smaller. This is a perfect example of how to do it.
Well done, well done, well done, Brooke! What a lovely retreat you created for your friends. They are so lucky!
I’ve been trying to take a social media break (not so successfully 😬), but your posts and blog are a breath of fresh air every morning. Thank you!
Well thank you for watching mine still!! You are so kind!
I love this makeover and your easy-to-follow steps! This before reminds me of my master bedroom and this post gives me some great ideas! Do you have suggestions about textured walls and temporary wallpaper? I’ve tried temporary decals in my daughter’s room and it just falls off. Thanks so much and thanks for sharing all your wonderful ideas!
Wow! What a transformation! Looks so much brighter and I’m loving the color scheme. Great job!
Thank you for showing HOW you do things, not just what and pretty after pictures. This is so helpful!!
This is fabulous! What color white paint did you use for the furniture?
just white it was called
Did they have to sand before they painted?
no sanding!!!
It is usually so hard to paint over dark furniture – how did it come out so good? And no sanding, just painted three coats with the color you posted?
yep! It is all because of that type of paint. It is expensive paint, but worth it!
He did say to do wax on the top tho
What a transformation! I love hearing that this was a transformation over several months. I very easily get caught up in if something cannot be done in a weekend it cannot be done. So thank you thank you Brooke going to start planning now!
You amaze me at your talent and insight. This room is stunning and such an amazing makeover.
Great job! Looks beautiful and inviting! Makes me want to paint my dark furniture white. Love the wallpaper too.
Oh my gosh!! This is beautiful Brooke!! Thanks for all the tips!
It turned out so cute!! Love it all and I’m sure your friends are enjoying their beautiful new bedroom!! Thanks for sharing all the details!
The room looks amazing! Love the wallpaper and the white dresser!!! Was the furniture Venere?
What an amazing transformation! Looks so bright and sharp. Love it. And to think it all started with Grams pink chair and came to fruition through LOTS of hard work. Love it!
This is probably a really dumb question, but do you have to take the furniture out of the room to paint it. The thought of carrying the furniture downstairs and outside keeps me from painting it. 🤪
not a dumb question. That paint is low VOC. So we left it in the room! Just protect your floors.
Loved seeing you work with what your friend already had. Looks fantastic.
Stunning ❤️❤️❤️
I love watching you express your talent in design and seeing how you change people’s lives. This is so beautiful. Bless your friend’s husband for painting all that furniture… so much work, but so worth it.
This is amazing & such an inspiration! I would love to repeat this in my Master! I have med-dark wood trim (not honey) do you think this could all work with that? Should I choose blinds that match the trim or a shade or 2 lighter? I just Love all your IG stories-you have really inspired me to love & work what I have❤️!
I do think so!! If it is darker trim you could do the darker bamboo shades!
Ok, well, I’m prepared to totally copy this for my master! So pretty without being overly feminine. And I cannot say enough about the advance paint from Benjamin Moore. I used it on my kitchen cabinets, just primed then painted. It’s been over a year and they still look great. It dries to the touch pretty fast, but you have to give it about a week to reach it’s full cure. Thanks for all of your wonderful advice and always taking the time to link what you used!
Beautiful job as always! What a great friend.
If you “plum” your first strip of paper you will never need to overlap. Paper does not adhere to itself as well as the wall. Room looks great, Benjamin Moore paint is the only paint I ever use. Well worth the money.
Not sure what you mean by “plum” haven’t heard that before.
Thanks!
“Plumb” is vertically level. We used to suspend a weight, called a plumb bob, from a string pinned to the wall (I’m sure I’m dating myself!). I’m sure that you found that line with a level before you began to be sure things didn’t end up completely out-of-whack by the last strip. I have wallpapered with glued wallpaper, but the temporary kind scares me because it doesn’t seem like there is any “play” in the paper. If things didn’t completely match-up, you could usually “smoosh” it around until they did. Beautiful job Brooke, and I love the fact that you use some of the old and just update it.
Why did they not have to sand? How does the paint stick to the furniture without sanding? I want to paint some furniture in my home and have always heard to sand first. Do you have any tips on painting furniture? I am new to your blog and love it!!
The finish was smooth-if you have flaws then you should sand.
It is all about that paint he used.Really the best paint for furniture
Wow. Brooke you did an awesome job! I want to be your neighbor! Haha! I love that your posts are both inspiring and informative. We are about to put up some temporary wallpaper in our bathroom and your tips are going to help so much.
Thank you Becky!! You will do great with the wallpaper!